

Create beautiful category galleries that automatically display your MediaHaven video categories in responsive grids, carousels, or multi-row sliders. Each category can include a custom icon, background image, colors, and styling to match your website.
A Term Gallery is perfect for organizing large video libraries into easy-to-browse collections such as Tutorials, Product Demos, Travel, Sports, Courses, or Entertainment.
What is a Term Gallery?
A Term Gallery displays your Video Categories instead of individual videos.
When visitors click a category, they are taken to a page showing all videos assigned to that category.
This is a great way to organize your content and improve navigation, especially if you have dozens or hundreds of videos.
Perfect for
- Online courses
- Video streaming websites
- Documentation portals
- Product showcases
- Educational platforms
- Travel blogs
- Entertainment websites
Before You Begin
Before creating a Term Gallery, make sure you have:
- MediaHaven installed and activated.
- At least one video created.
- Several Video Categories created.
- Videos assigned to those categories.
Tip: Categories without videos may appear empty depending on your gallery settings.
Step 1 — Create Video Categories
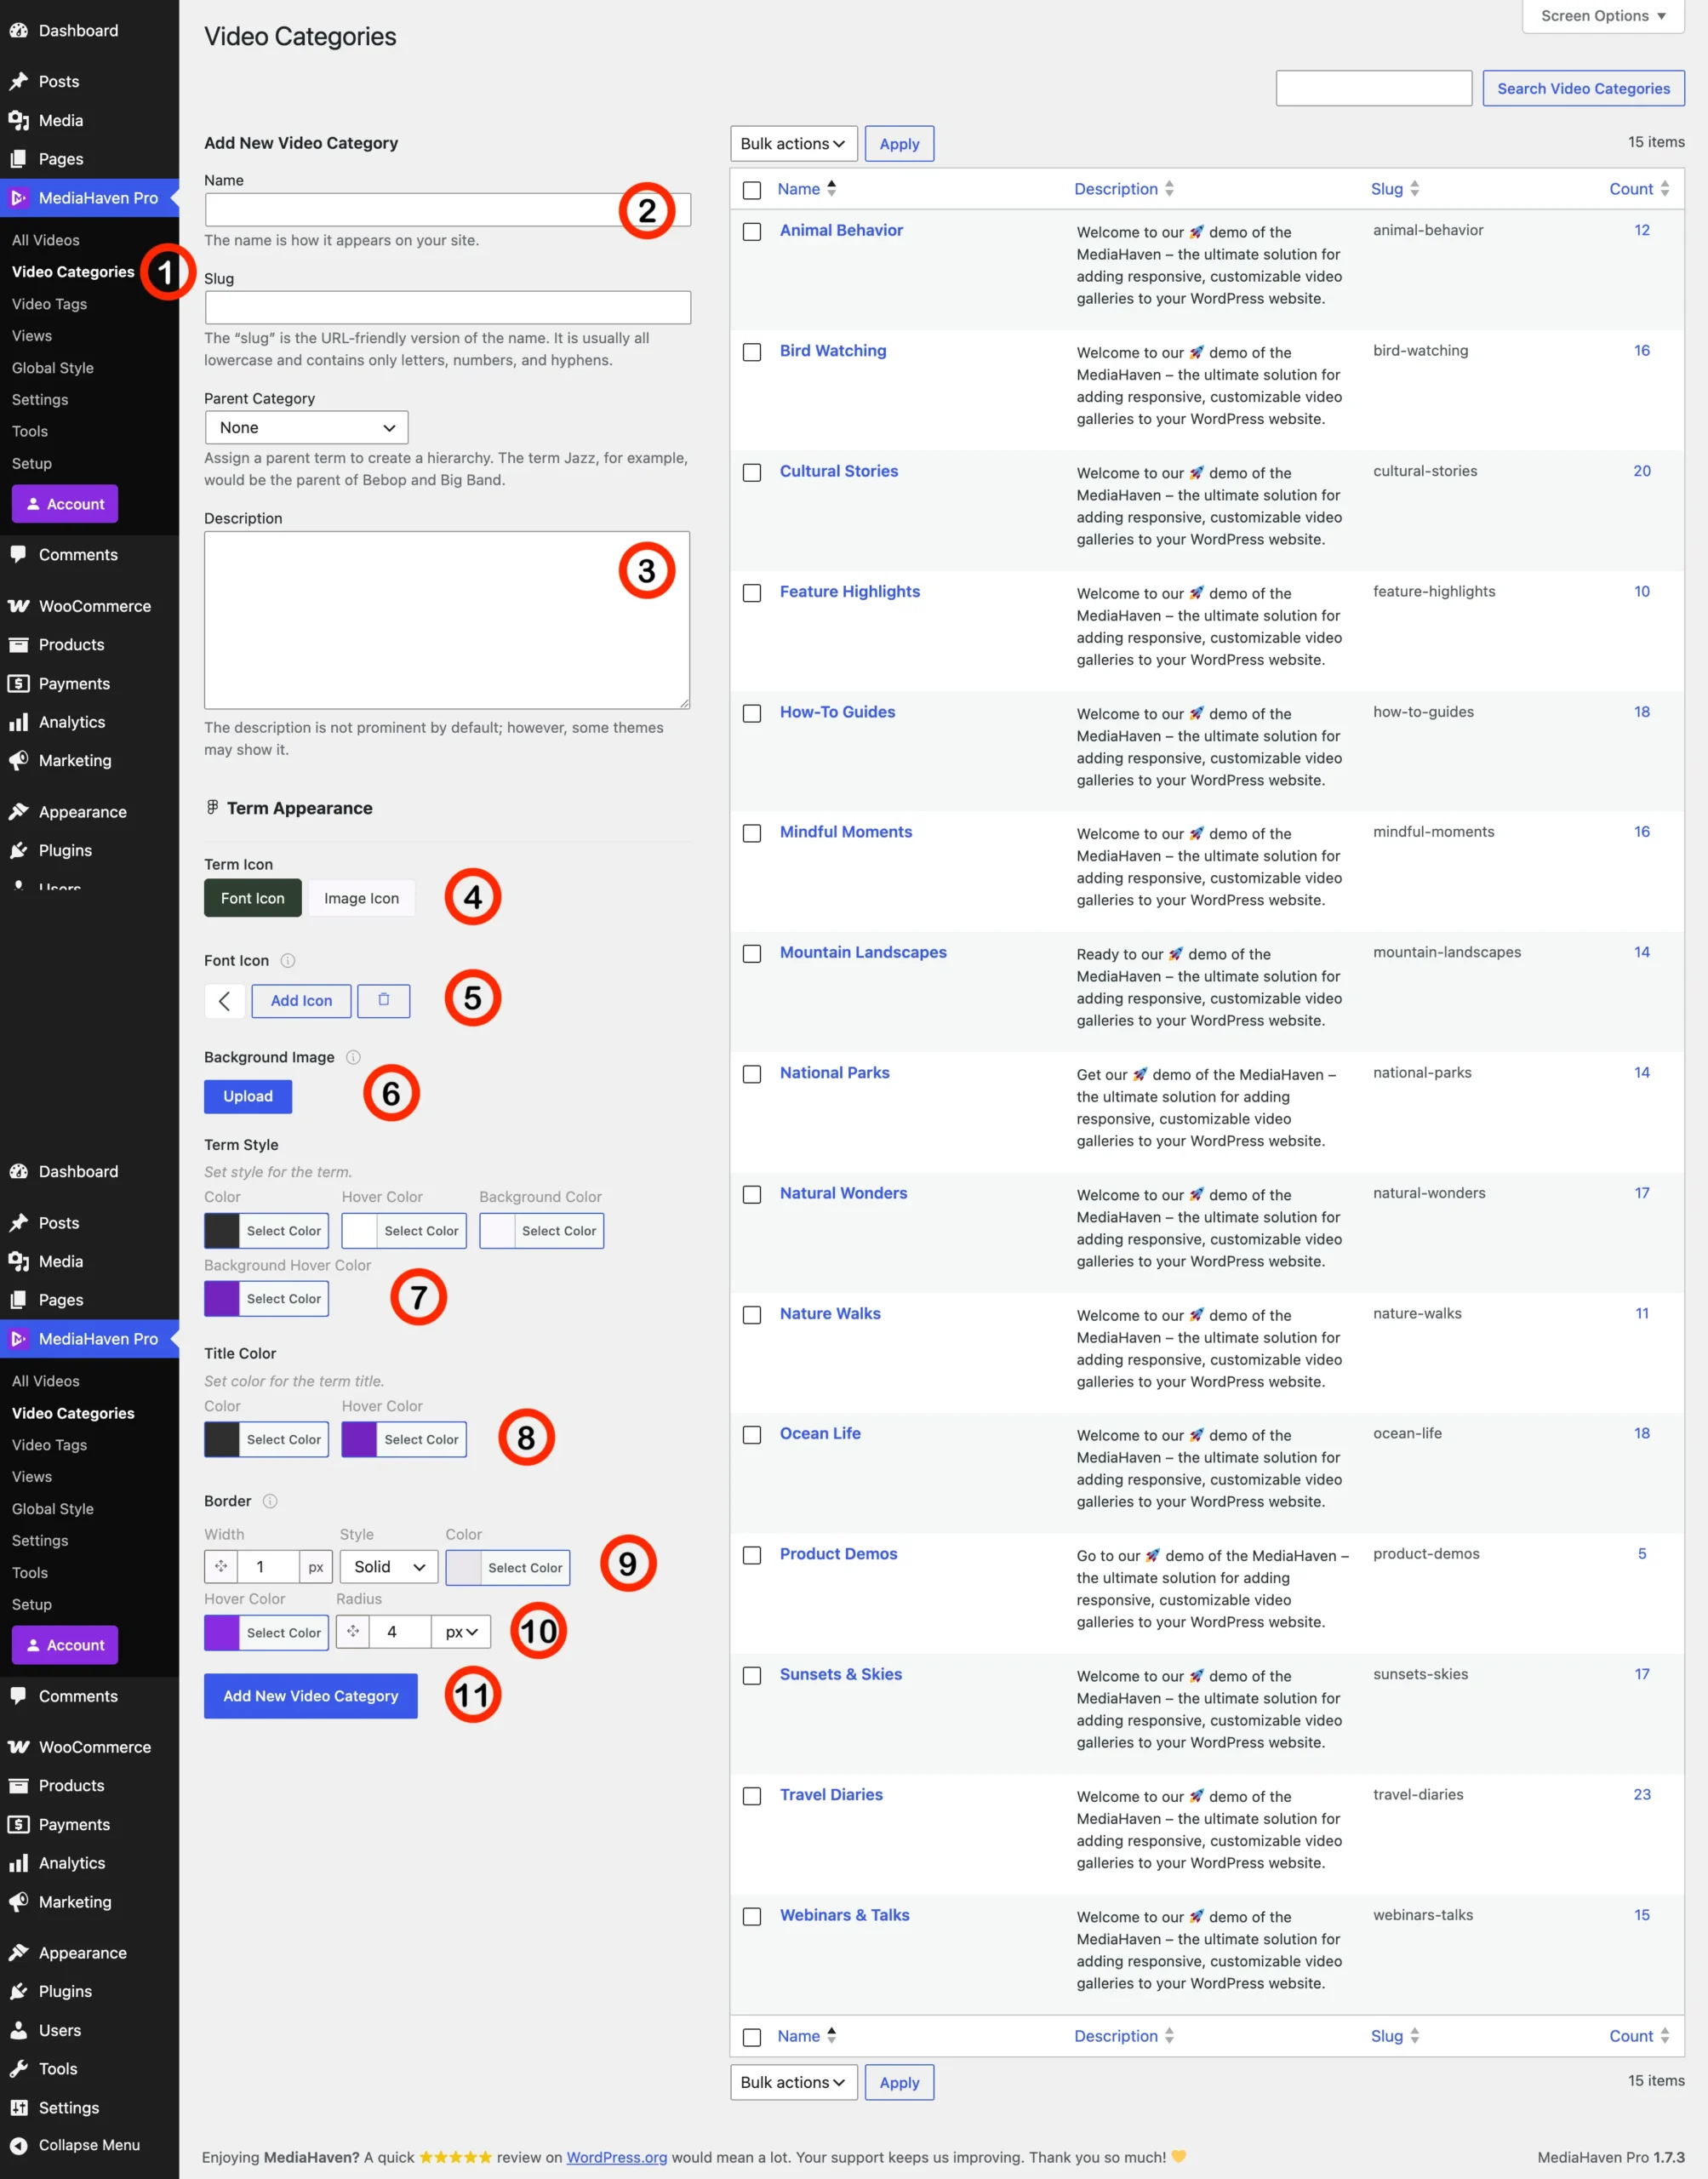
First, create the categories that will appear in your gallery.
Navigate to:
MediaHaven → Video Categories
You’ll see the Video Categories screen where you can add and manage all of your categories.
Step 2 — Enter a Category Name
Enter a descriptive name for your category.
Examples:
- Travel Diaries
- Product Demos
- Tutorials
- Nature Walks
- Customer Stories
- Sports Highlights
MediaHaven automatically generates a URL-friendly slug, but you can customize it if needed.
Step 3 — Add a Description
Write a short description for the category.
Example:
Explore our collection of travel videos featuring beautiful destinations, local culture, and unforgettable experiences.
Descriptions can be displayed inside supported gallery layouts.
Step 4 — Choose a Category Icon
MediaHaven supports two icon types:
Font Icon
Choose an icon from the built-in icon library.
Perfect for:
- Education
- Business
- Technology
- Tutorials
Image Icon
Upload a custom icon for complete branding control.
Step 5 — Select the Icon
Click Add Icon and choose the icon that best represents your category.
Examples:
- Camera
- Play Button
- Graduation Cap
- Shopping Bag
- Rocket
- Music
Step 6 — Upload a Background Image
Each category card can display its own background image.
Examples include:
- Product photos
- Nature scenes
- Office environments
- Travel destinations
- Course illustrations
Using unique background images makes your gallery more visually engaging.
Step 7 — Customize Category Colors
MediaHaven allows complete styling of every category.
Customize:
- Background Color
- Background Hover Color
- Overlay Color
- Hover Overlay Color
These settings help your gallery match your website’s branding.
Step 8 — Customize the Title
Adjust the category title colors.
Available options include:
- Title Color
- Hover Title Color
Choose colors with good contrast to improve readability.
Step 9 — Customize the Border
You can customize:
- Border Width
- Border Style
- Border Color
- Hover Border Color
Borders are useful for creating clean, modern card designs.
Step 10 — Configure Border Radius
Round the card corners by setting the Border Radius.
For example:
- 0px — Square cards
- 6px — Slightly rounded
- 12px — Modern appearance
- 20px — Soft rounded corners
Step 11 — Save the Category
Click Add New Video Category.
Repeat these steps until you’ve created all the categories you need.
For the best-looking galleries, add:
- Background image
- Icon
- Description
- Custom colors
to every category.
Step 12 — Assign Videos to Categories
Now assign your videos to the categories you created.
Navigate to:
MediaHaven → All Videos
Edit any video.
In the Video Categories panel, select one or more categories.
Click Update.
Repeat this process for all videos.
Once videos are assigned, MediaHaven automatically counts the number of videos in each category.
Step 13 — Create a New Term Gallery
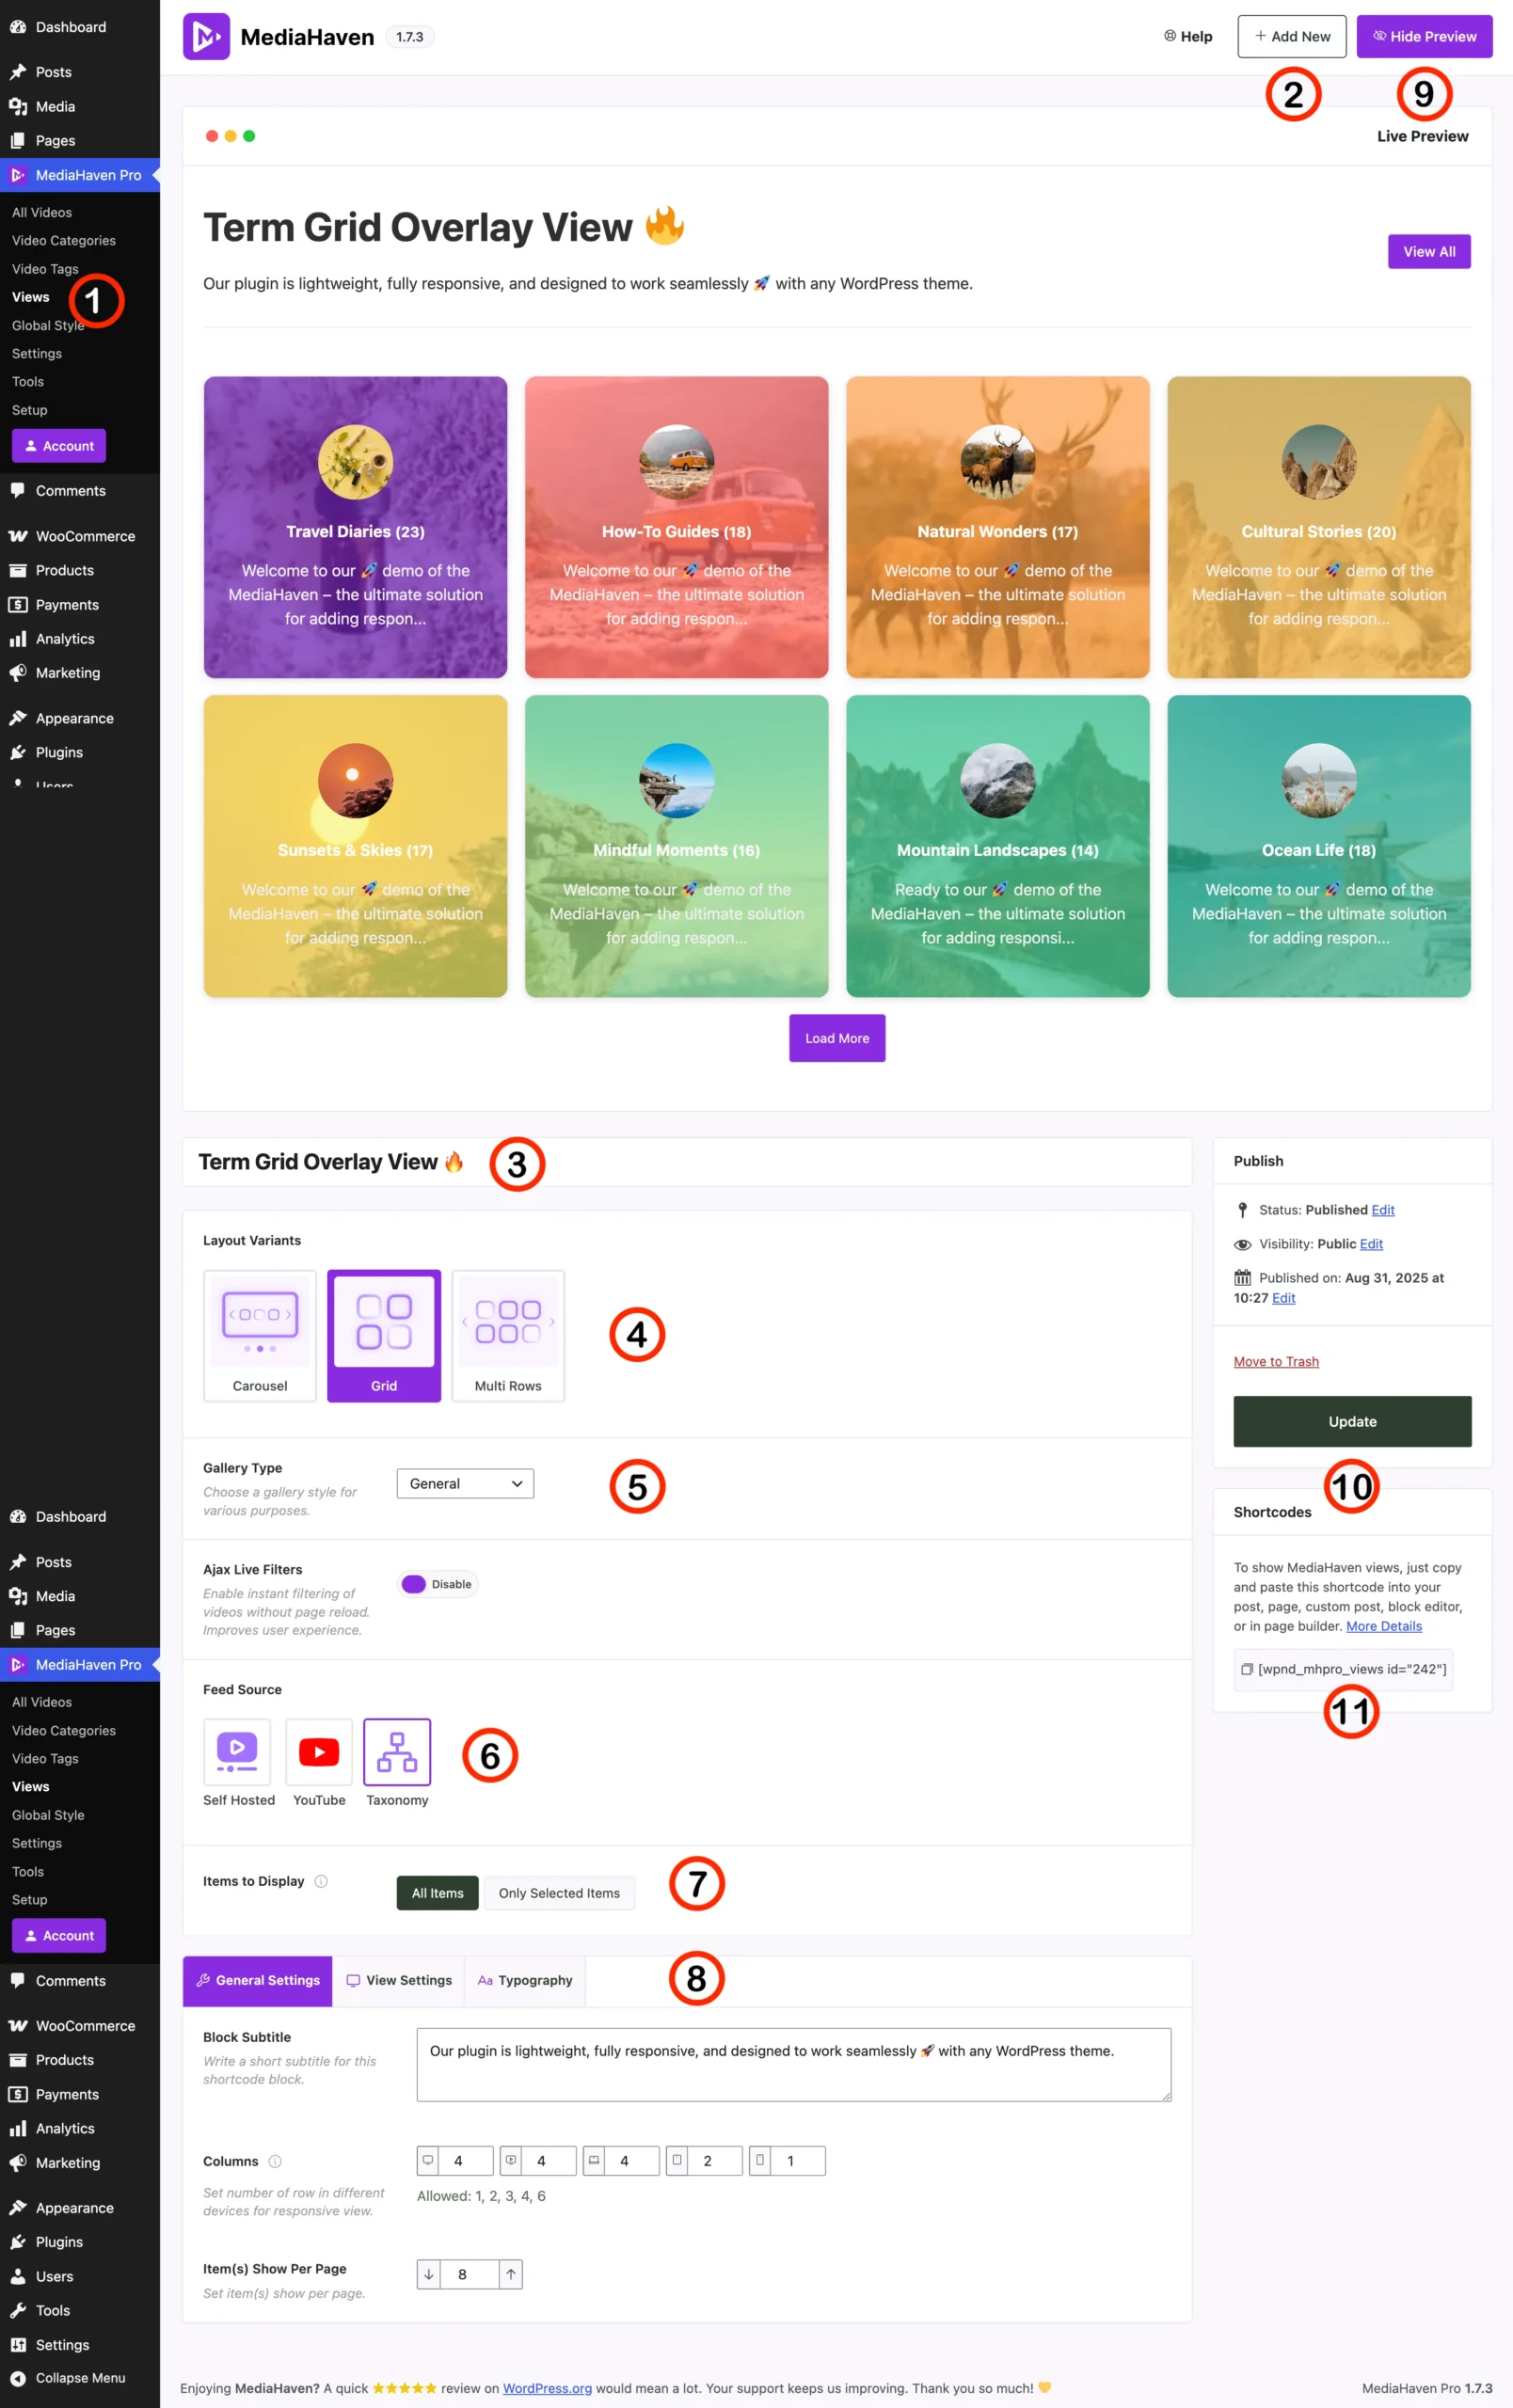
Navigate to:
MediaHaven → Views → Add New
This is where you’ll create your category gallery.
Step 14 — Choose a Layout
Select how categories should be displayed.
Grid
Displays categories in responsive columns.
Perfect for:
- Documentation websites
- Video libraries
- Learning platforms
Carousel
Displays categories inside a horizontal slider.
Perfect for:
- Home pages
- Landing pages
- Featured collections
Multi-Row Carousel
Displays multiple rows inside a slider.
Best for websites with many categories.
Step 15 — Choose a Gallery Type
Select a gallery style that controls the overall appearance of your category cards.
Different gallery types may include variations such as:
- General
- Related Videos
- WooCommerce
Choose the style that best fits your website design.
Step 16 — Select the Feed Source
Under Feed Source, choose:
Taxonomy
This tells MediaHaven to display Video Categories instead of individual videos.
Step 17 — Choose Which Categories to Display
You can display:
All Items
Automatically shows every Video Category.
Recommended for most websites.
Only Selected Items
Choose specific categories to feature.
Useful for:
- Home pages
- Landing pages
- Featured collections
Step 18 — Customize Gallery Settings
Open the General Settings tab.
Customize options such as:
Block Subtitle
Display a heading or introduction above the gallery.
Responsive Columns
Choose different column counts for:
- Desktop
- Laptop
- Tablet
- Mobile
Items Per Page
Control how many categories are displayed initially.
This is especially useful for large category collections.
Step 19 — Preview Your Gallery
Click Live Preview to see your gallery before publishing.
Check:
- Card spacing
- Images
- Colors
- Typography
- Responsive layout
- Hover effects
Make any adjustments until you’re satisfied.
Step 20 — Publish the Gallery
Click Publish or Update.
MediaHaven generates a shortcode automatically.
Example:
[wpnd_mhpro_views id="x"]Copy the shortcode and paste it into:
- Gutenberg Shortcode Block
- Elementor Shortcode Widget
- Classic Editor
- Any page
- Any post
- Any shortcode-compatible page builder
Your category gallery will appear instantly.
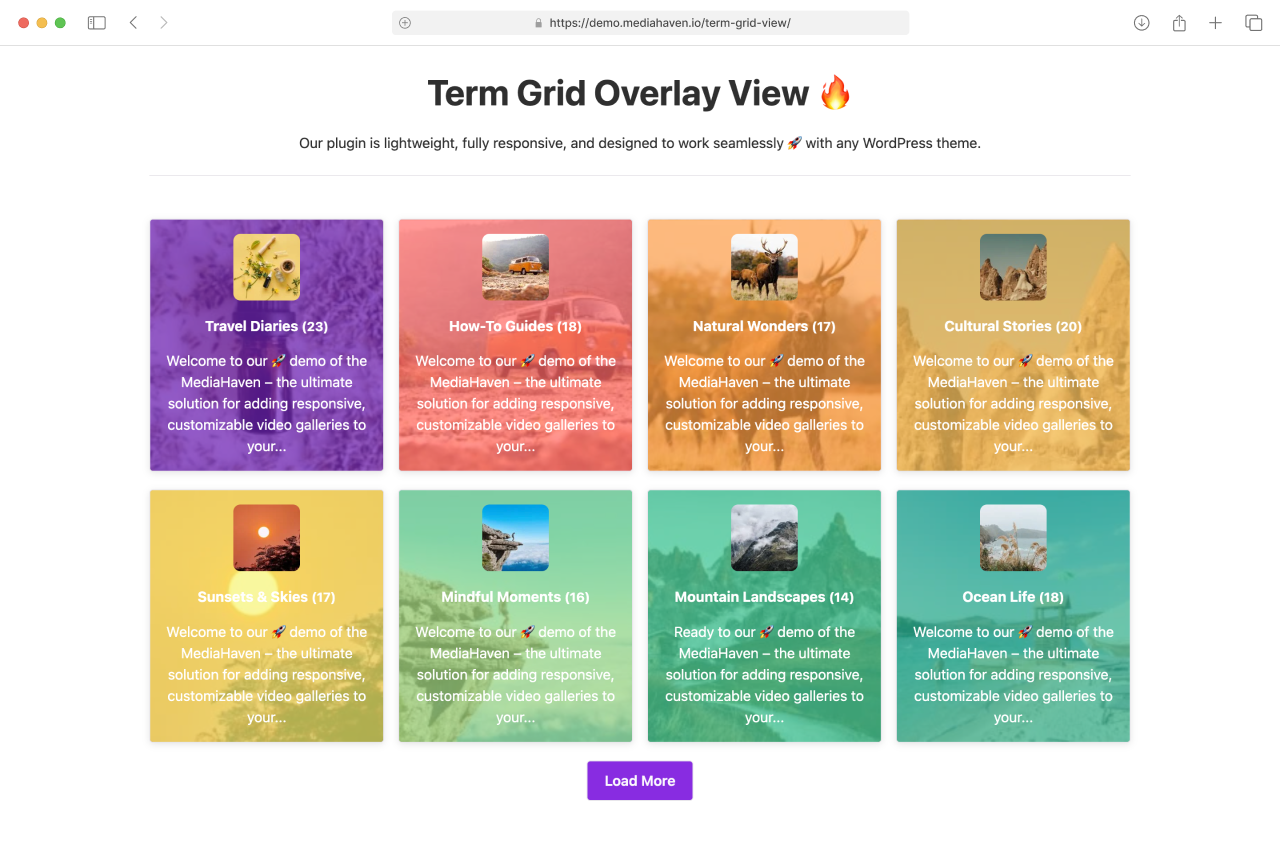
Result
Your visitors can now browse your video library by category through a beautiful, responsive gallery.
Each category card can display:
- Background image
- Custom icon
- Category title
- Description
- Video count
- Custom colors
- Hover effects
When a visitor clicks a category, they can immediately explore all videos assigned to that category, making it easier to discover and navigate your content.
Best Practices
- Use descriptive category names that are easy to understand.
- Add a unique background image for every category to create a more engaging gallery.
- Include short, informative descriptions to help visitors understand the content of each category.
- Keep your category styling consistent by using the same color palette and border radius across all cards.
- Assign every video to at least one category to ensure your gallery stays organized and complete.
- Use Grid layouts for documentation sites and video libraries, and Carousel layouts for home pages or featured collections.
- Regularly review and update your categories as your video library grows to keep navigation simple and intuitive.
I also recommend adding “Next Steps” at the end of every documentation page to improve user onboarding: