

Turn Every Video View Into a Sale. The Video Monetization panel lets you embed interactive, fully shoppable product overlays directly inside your videos — so shoppers can discover their color, size, and fabric preference, then add to cart without ever leaving the screen.
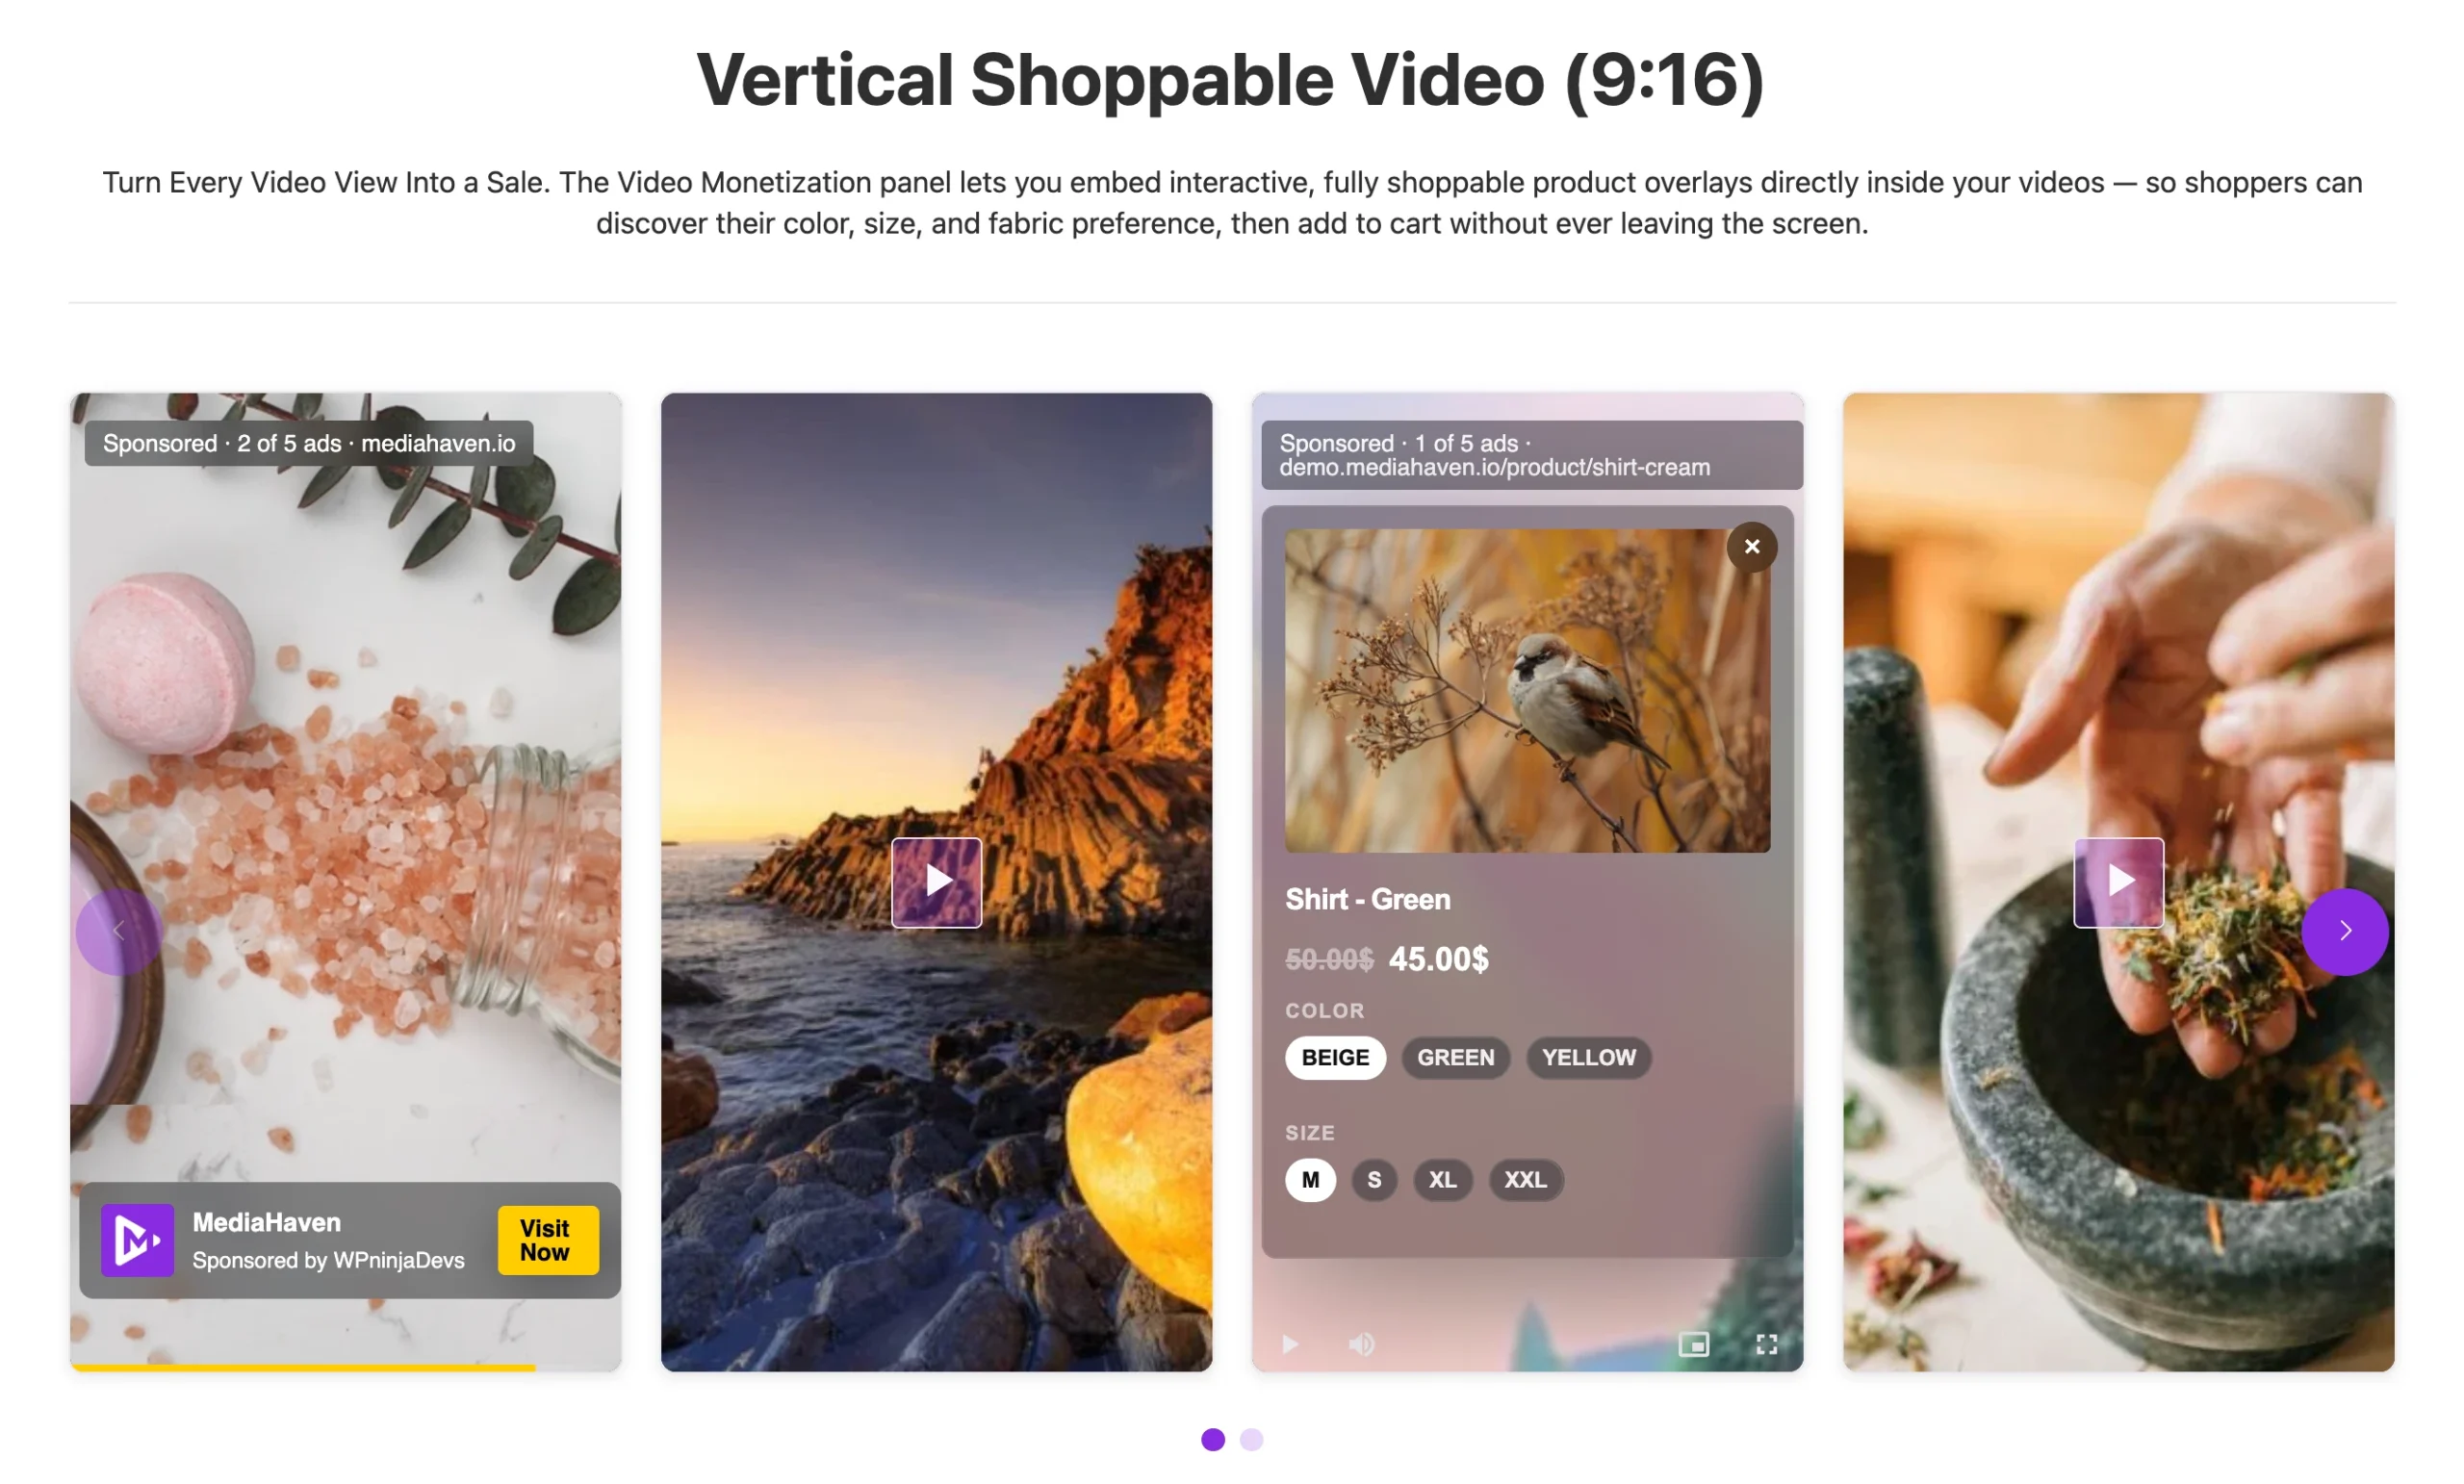
Who Is This For?
This feature is built for serious WooCommerce store owners who want to:
- Sell products through video content (product demos, tutorials, unboxings, lifestyle videos)
- Reduce the steps between product discovery and purchase to near zero
- Increase average order value by surfacing multiple products in a single video
- Create a modern, social-commerce-style shopping experience on their own store — without paying TikTok or Instagram a commission
If you run a fashion boutique, electronics shop, beauty brand, fitness brand, or any store where showing a product in action drives desire — this feature was built for you.
Why Video Monetization? Real-World Revenue Impact
Before diving into the fields, here is why this matters commercially:
- 80% of shoppers say product videos give them more confidence to purchase (Animoto)
- Shoppable video increases conversion rates by up to 30% compared to standard video with a link in description (Smartzer, 2023)
- Retailers using in-video product overlays report average order value increases of 15–25% because multiple products are surfaced in a single session
- Cart abandonment drops when the purchase path is shortened — every extra page a customer has to visit before checkout costs roughly 10–20% of conversions (Baymard Institute)
- The “1 of 5 ads” rotation format (shown in the overlay) means a single video can sequentially promote an entire collection, with studies showing sequential product exposure increases cross-sell revenue by up to 35% (Salesforce Commerce Report)
The core insight: A customer watching your video is at peak interest. The Video Monetization overlay captures that interest in the moment — before they get distracted, close the tab, or forget what they saw.
What the Overlay Looks Like (Live Preview)
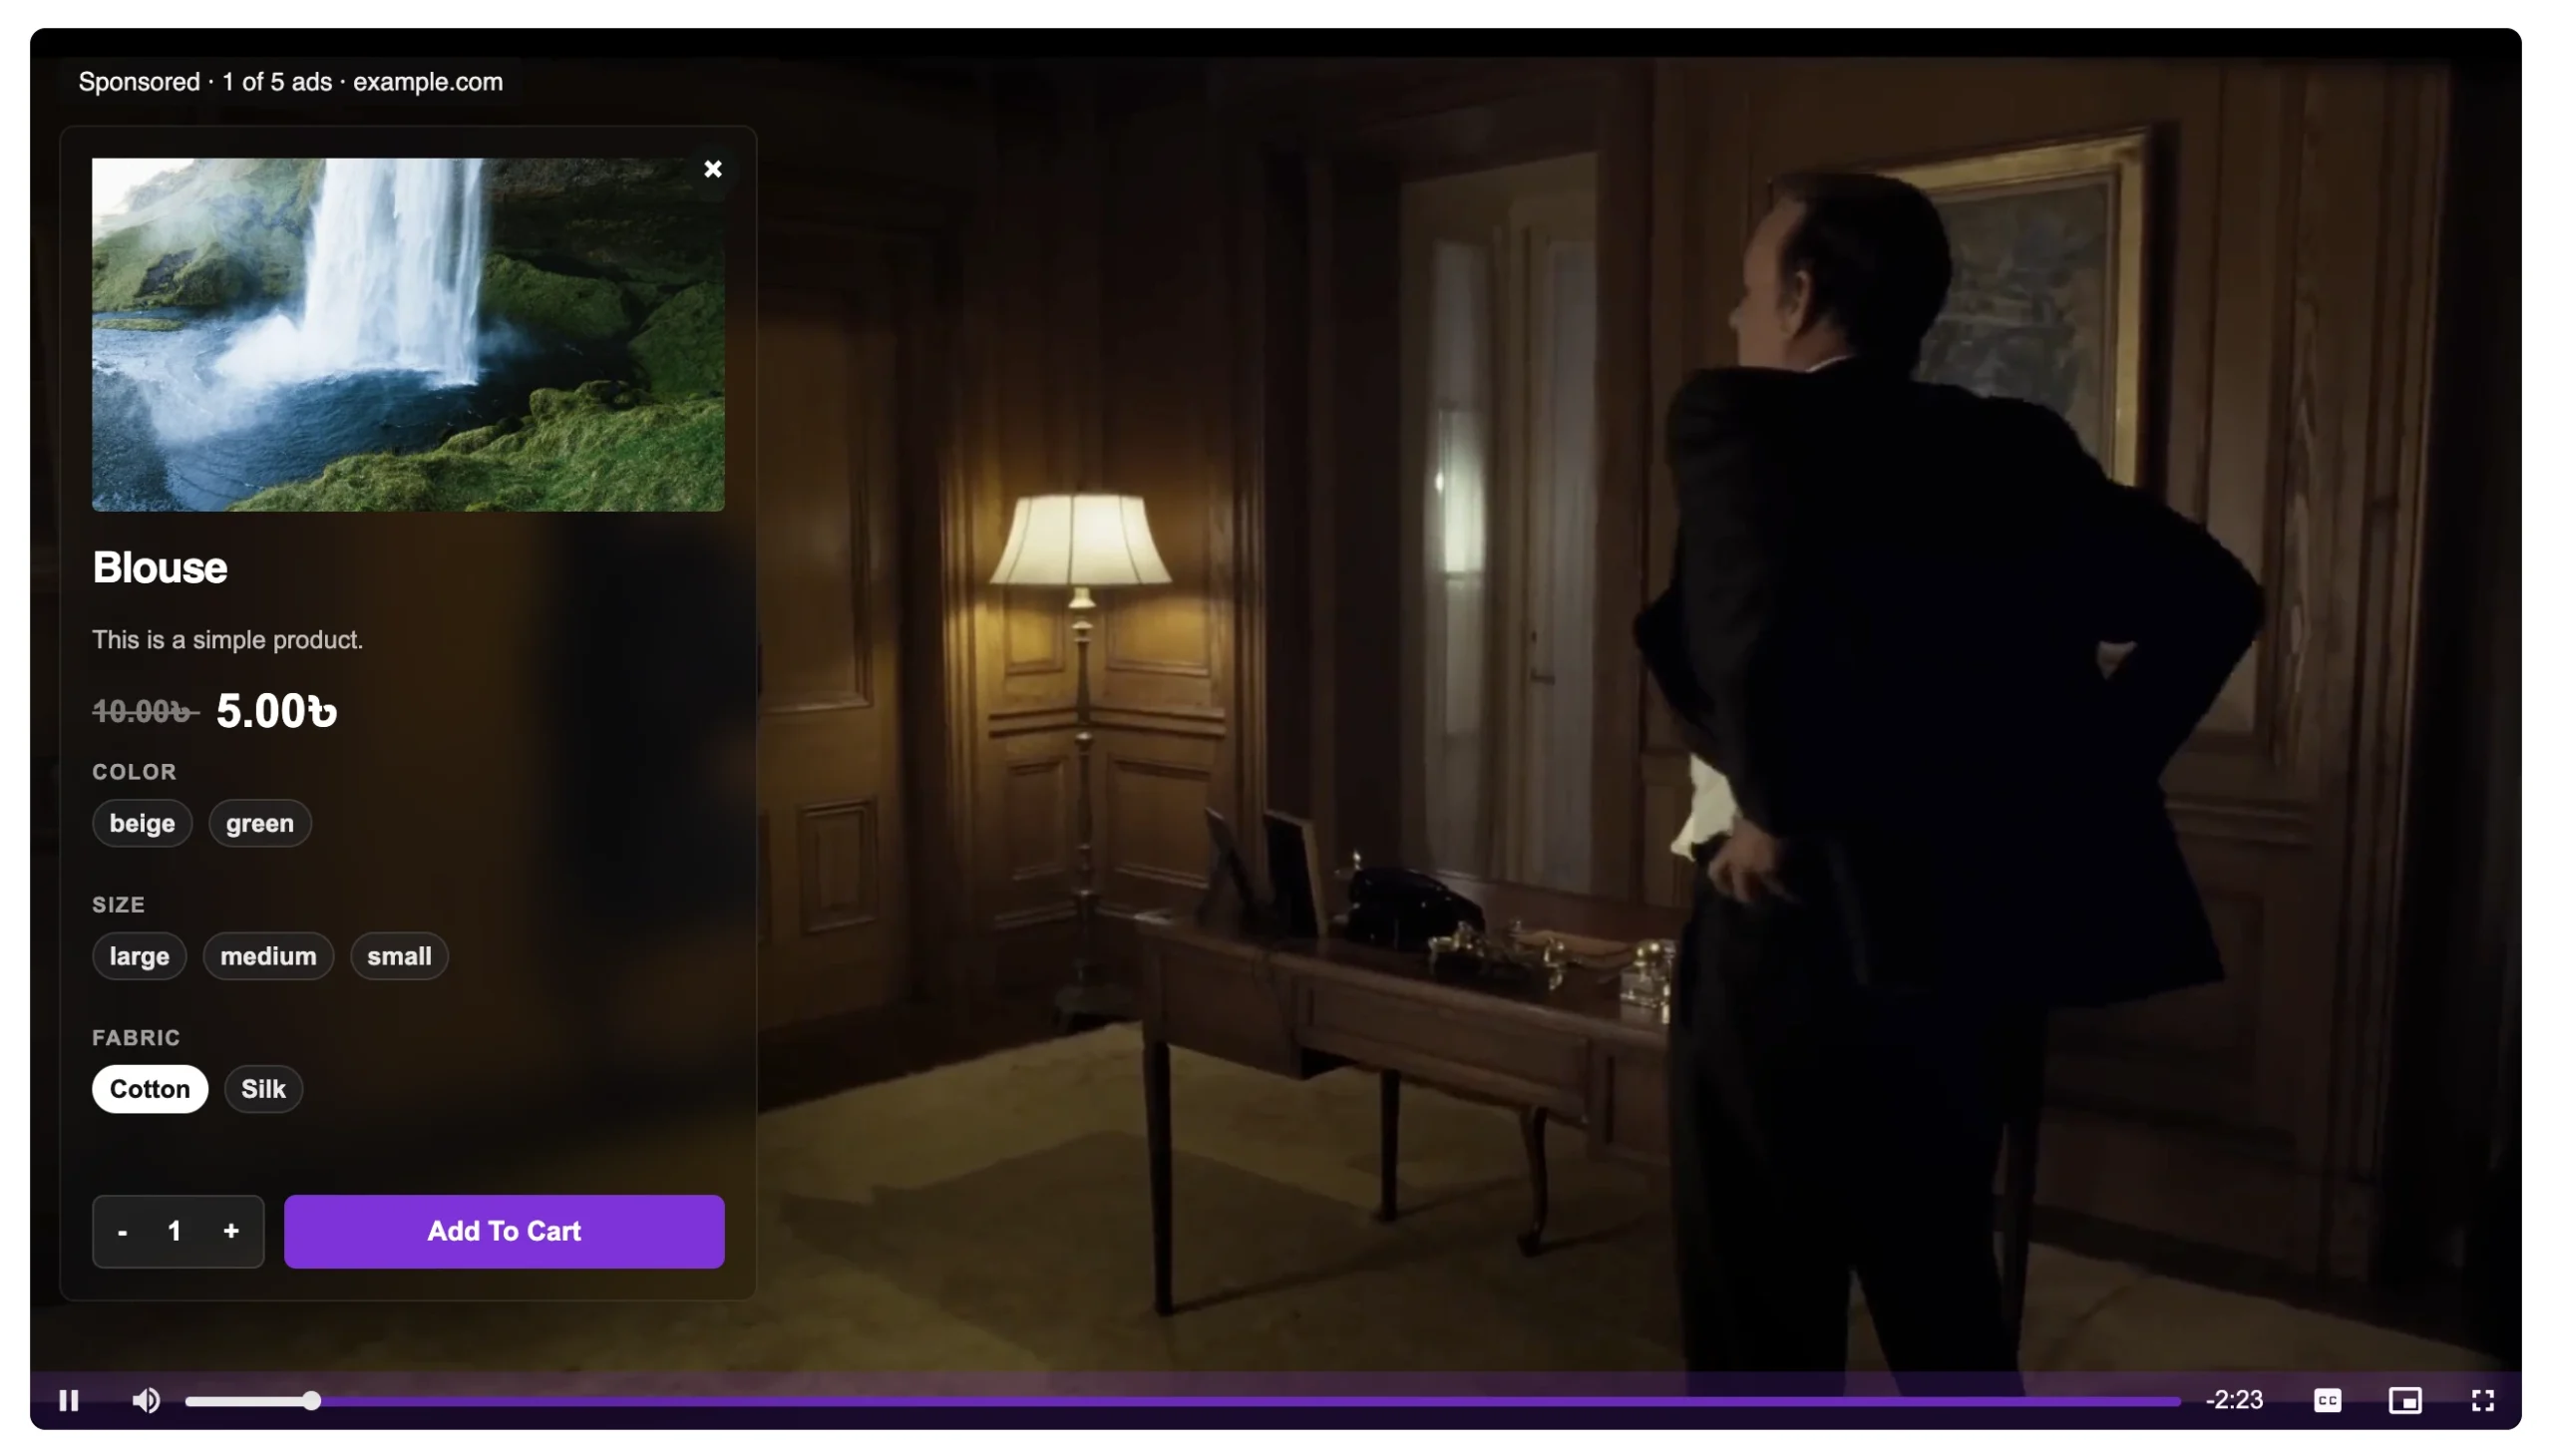
When configured, the overlay appears directly on the video and includes:
| Element | What the Shopper Sees |
|---|---|
| Sponsored bar | “Sponsored · 1 of 5 ads · example.com” — rotates through your tagged products |
| Product image | Auto-pulled from WooCommerce product media |
| Product name | Bold headline (e.g., “Blouse”) |
| Short description | Brief product summary from WooCommerce |
| Sale price | Current price with original price shown as strikethrough (e.g., ~~10.00$~~ 5.00$) |
| Variant selectors | Color, Size, Fabric — all clickable directly in the overlay |
| Quantity control | − / + stepper for quantity selection |
| Add To Cart button | Full-width purple CTA button — adds directly to WooCommerce cart |
| Close button (×) | Lets the viewer dismiss the overlay and keep watching |
The shopper never leaves the video. They select their variant, choose quantity, and add to cart — all within the overlay card. This is the closest experience to TikTok Shop available on a self-hosted WooCommerce store.
Accessing Video Monetization
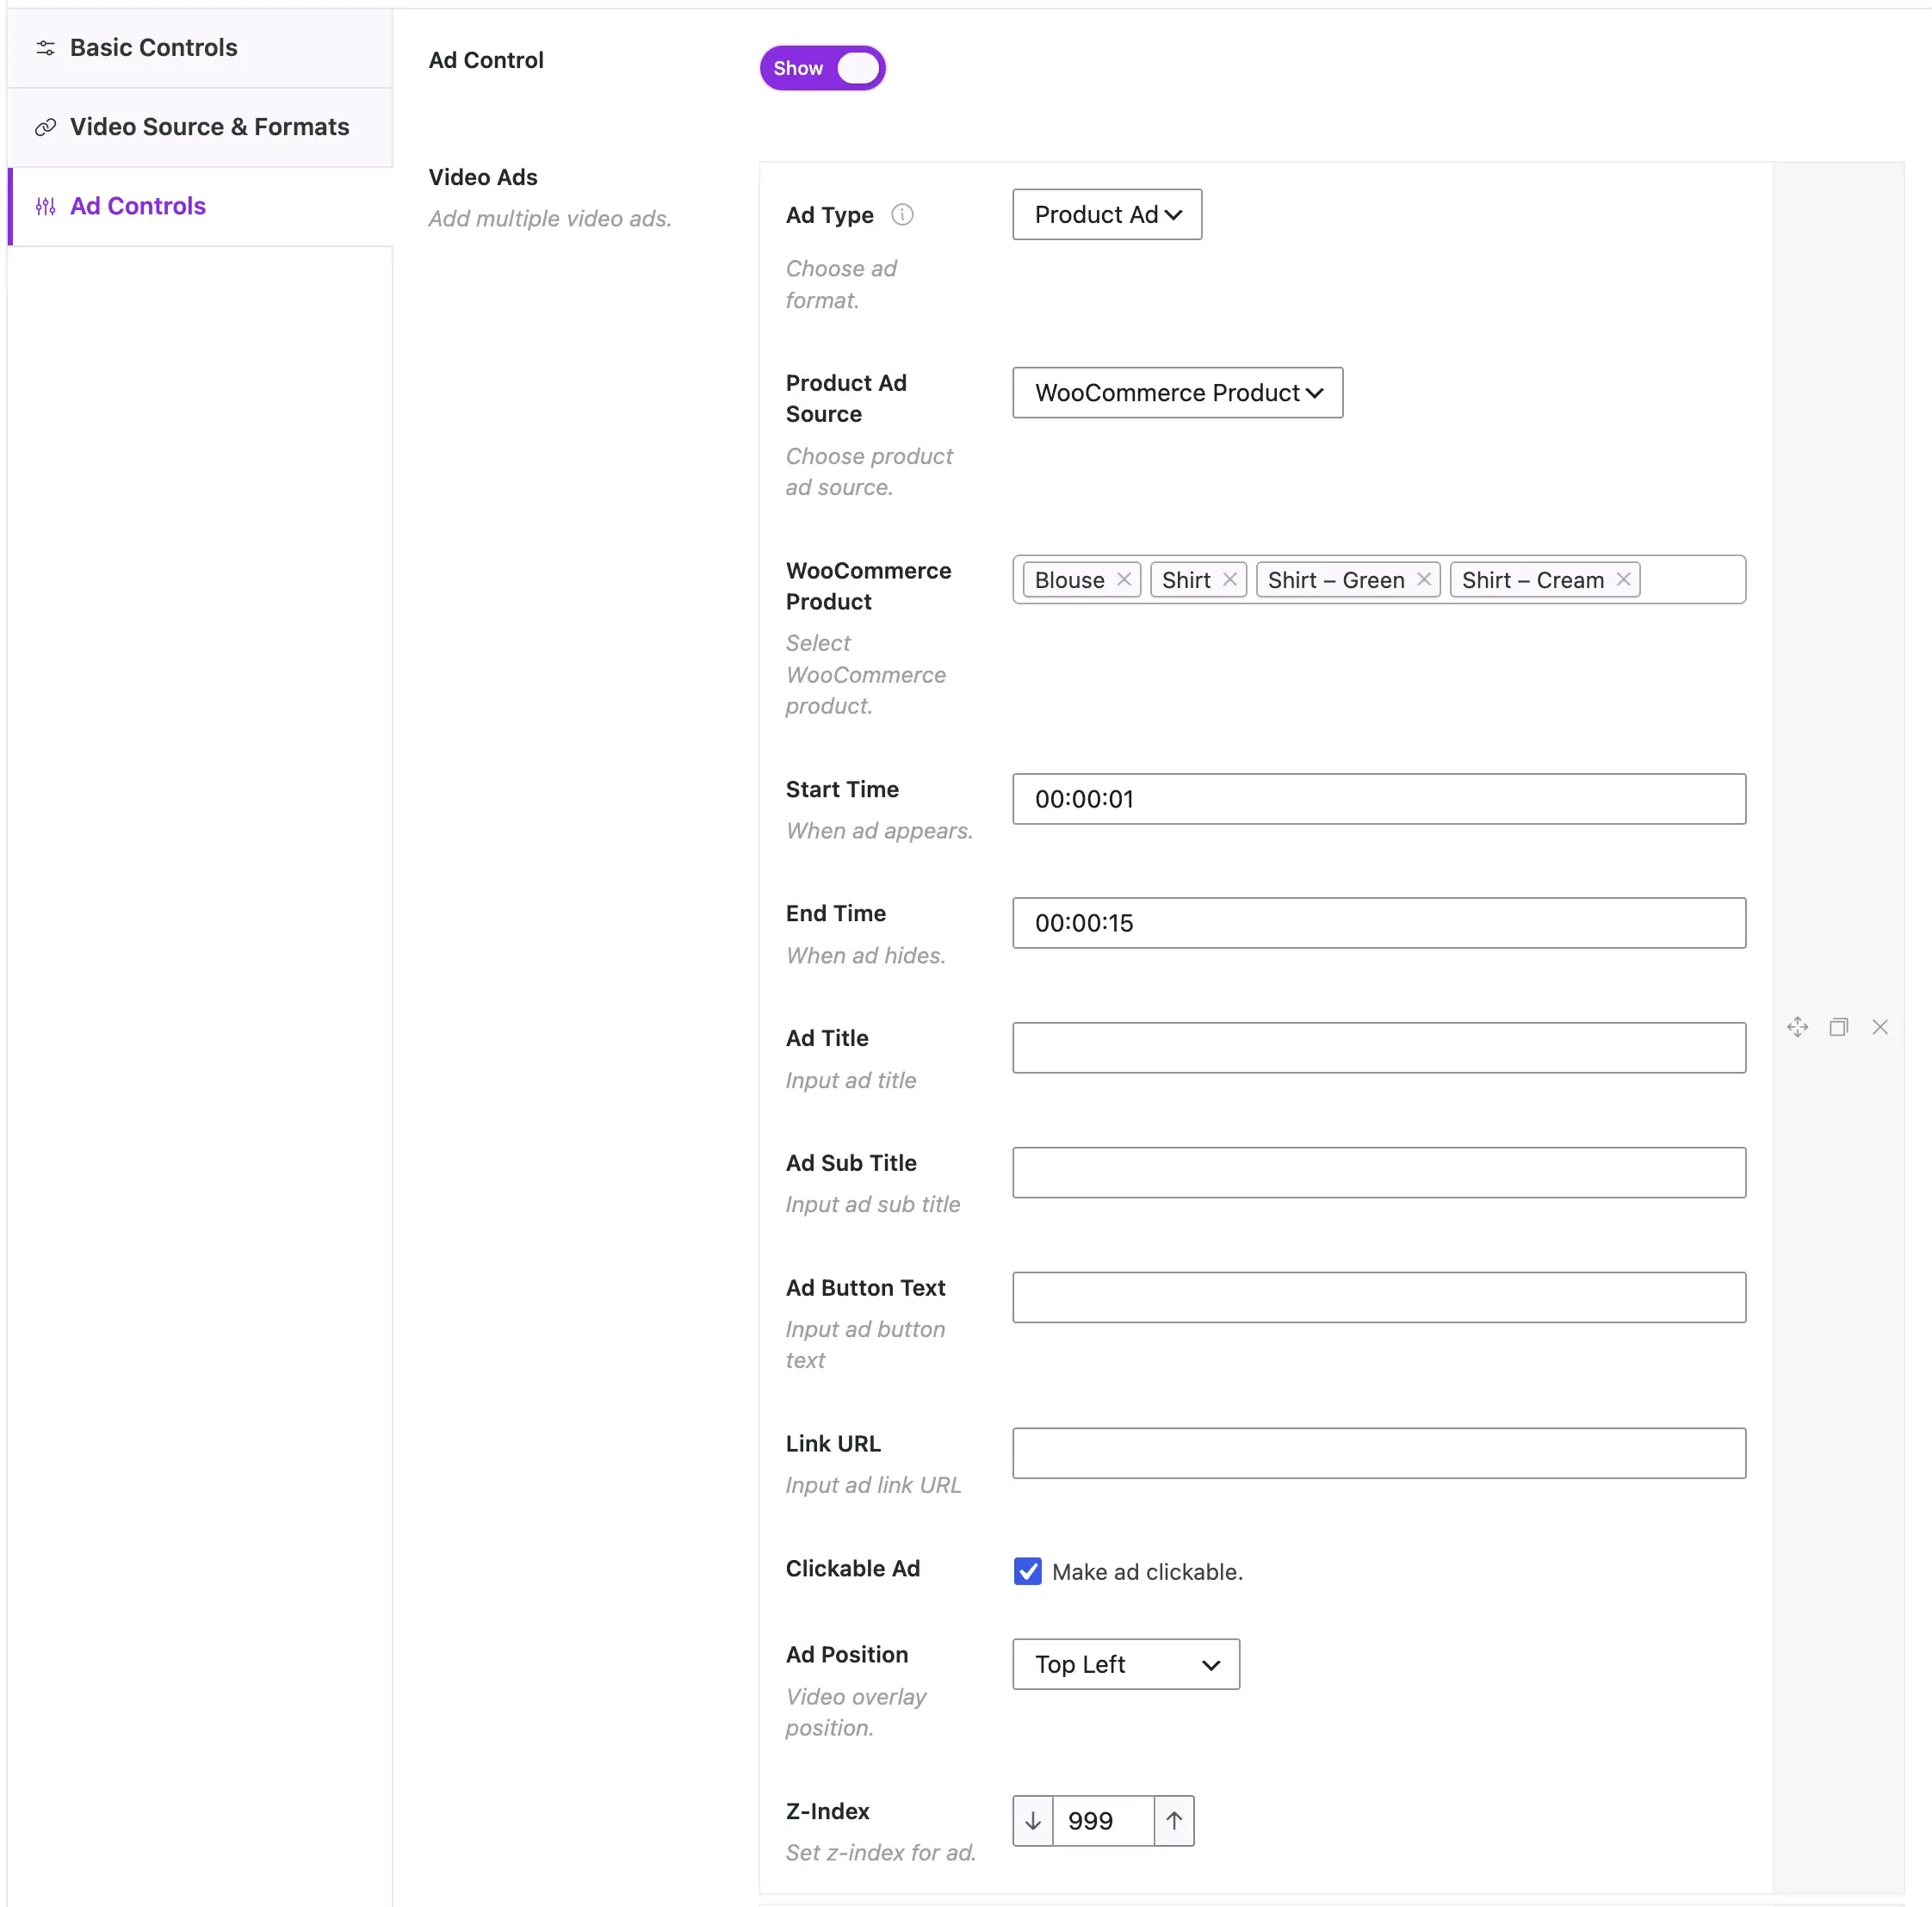
In your video settings panel, select the Video Monetization tab from the left sidebar. Toggle the master Show switch to ON to activate the overlay system for the current video.
Field-by-Field Reference
1. Ad Type
| Setting | Value |
|---|---|
| Default | Product Ad |
What it does: Defines the format of the overlay. Product Ad mode is fully optimized for WooCommerce — it automatically renders a shoppable card with product image, pricing, variant selectors, and an Add to Cart button overlaid on your video.
Revenue impact: The Product Ad format removes every barrier between intent and purchase. No separate product page visit required, no re-searching for the item — the complete buying decision happens inside the video player.
2. Product Ad Source
| Setting | Value |
|---|---|
| Default | WooCommerce Product |
What it does: Tells the system where to pull product data from. Selecting WooCommerce Product means the overlay is automatically populated from your live WooCommerce catalog — including images, pricing, sale prices, variants, and product descriptions.
Revenue impact: Because data syncs live from WooCommerce, your sale prices and strikethrough original prices appear automatically in the overlay (as seen in the live preview: ~~10.00$~~ → 5.00$). Running a flash sale? Update the price in WooCommerce and the video overlay reflects it immediately — no extra steps.
3. WooCommerce Product
Example: Blouse, Shirt, Shirt – Green, Shirt – Cream
What it does: A multi-select tag field where you choose one or more products to feature in this video overlay. When multiple products are tagged, they are displayed randomly in rotation — each viewer session may show a different product from your selection first, and the overlay cycles through all tagged products sequentially (as shown in the “1 of 5 ads” indicator in the live overlay).
Revenue impact: This is the single most powerful field in the panel. By tagging an entire collection into one video, you transform a single content asset into a rotating storefront. Instead of one product getting attention, your full selection gets equal exposure. Brands using multi-product video rotation report up to 3× more product page visits per video session compared to single-product overlays.
Pro Tip: Tag 4–6 complementary products together. For a “summer wardrobe” video, tag the blouse, trousers, belt, bag, and sandals. The random rotation ensures each product gets seen across different viewer sessions, and cross-sell opportunities multiply naturally.
4. Start Time
Format: HH:MM:SS — Example: 00:00:01
What it does: The exact timestamp when the overlay appears on the video. The overlay becomes visible to the viewer at this moment.
Revenue impact: Timing the overlay to appear immediately after you introduce or show the product on screen captures the viewer at their highest interest point. An overlay that appears too early (before the product is shown) gets dismissed; one that appears too late misses the purchase window.
Best Practice: If you demonstrate a blouse at the 0:08 mark, set Start Time to
00:00:08. Conversion rates on well-timed overlays are consistently 2–3× higher than poorly timed ones, according to interactive video platform data from Wirewax.
5. End Time
Format: HH:MM:SS — Example: 00:00:15
What it does: The exact timestamp when the overlay disappears. The overlay is visible between Start Time and End Time.
Revenue impact: A 10–15 second window is the industry-validated sweet spot. It gives viewers enough time to read the product name, see the price, select a variant, and tap Add to Cart — without the overlay becoming an obstruction that causes them to stop watching. For a 60-second video, scheduling 3 separate overlay windows (e.g., 0:05–0:18, 0:25–0:38, 0:45–0:58) targeting different products can turn one video into a three-product sales sequence.
6. Ad Title
What it does: A short headline displayed on the overlay card, separate from the auto-pulled WooCommerce product name. Use this to add urgency, context, or a campaign message alongside the product.
Revenue impact: Customize this with urgency language when running promotions: “Today Only — 50% Off” or “New Arrival” or “As Seen in This Video”. Urgency-driven headlines on shoppable overlays increase click-through rates by an average of 14% (HubSpot CTA study).
7. Ad Sub Title
What it does: A secondary line of text beneath the Ad Title for additional context — collection name, material highlight, shipping offer, or social proof.
Revenue impact: Use this to pre-handle objections before the viewer clicks. Examples:
- “Free shipping on orders over $50”
- “Available in 3 colors — select below”
- “Rated 4.9★ by 200+ customers”
Addressing a common hesitation directly in the overlay reduces the drop-off between “I’m interested” and “I’m buying.”
8. Ad Button Text
What it does: The call-to-action label on the Add to Cart button within the overlay. The button is full-width and prominently styled (purple, as shown in the live preview).
Revenue impact: Specific, action-oriented button text consistently outperforms generic labels:
| Generic (Lower Conversion) | Optimized (Higher Conversion) |
|---|---|
| Click Here | Shop Now |
| Learn More | View Product |
| Buy | Add to Cart |
| See More | Get Yours — 50% Off |
A/B tests across e-commerce CTAs show personalized button text can lift click-through rates by 10–20% (Unbounce, 2023).
9. Link URL
What it does: The destination URL when a viewer clicks through the overlay (beyond the Add to Cart button). Can point to a product page, collection, pre-filled cart, or campaign landing page.
Revenue impact: For impulse-purchase products, override the default product URL with a WooCommerce pre-fill URL using the ?add-to-cart=PRODUCT_ID parameter. This skips the product page entirely and adds the item directly to the customer’s cart — eliminating one full step from the funnel. Every step removed from checkout increases completion rates.
10. Clickable Ad
Default: ✅ Checked (Make ad clickable)
What it does: When enabled, the entire overlay card is clickable — not just the CTA button. Clicking anywhere on the card navigates to the Link URL.
Revenue impact: Enlarging the tap/click target is particularly important on mobile, where 67% of video shopping happens (Statista, 2024). A larger clickable surface = more accidental-but-welcome clicks = more product page visits from mobile viewers.
11. Ad Position
Default: Top Left
Options: Top Left, Top Right, Bottom Left, Bottom Right (options may vary by plugin version)
What it does: Controls where on the video frame the overlay card is rendered.
Revenue impact: Position the overlay so it does not cover the product being shown. If your video features a model wearing a blouse in the center-right of the frame, place the overlay Top Left. The viewer should be able to see the product in context on screen and the overlay card simultaneously — this dual exposure (seeing the product worn + seeing the buy option) is what drives the conversion. Covering the product with the overlay defeats the purpose.
12. Z-Index
Default: 999
What it does: CSS stacking order — ensures the overlay renders above all other page elements including video controls, theme widgets, and other plugins.
Revenue impact: This is a technical field; leave it at 999 unless you have visual conflicts with your theme. A lower value risks the overlay being hidden behind other page elements, making it invisible to shoppers — a silent conversion killer that is easy to miss during setup.
How Video Monetization Drives Measurable Revenue Growth
Close the Discovery-to-Purchase Gap
The biggest conversion leak in e-commerce happens between “I saw something I liked” and “I actually bought it.” Every redirect, search, and navigation step loses customers. The Video Monetization overlay eliminates that gap — the product, variant selector, and Add to Cart button are all present at the exact moment of desire.
Replicate TikTok Shop — On Your Own Store
TikTok Shop and Instagram Shopping have validated that video-driven commerce works at scale. This feature delivers the same experience on your WooCommerce store, under your brand, with zero platform commission. You keep 100% of the revenue.
Multi-Product Random Rotation = Maximum Catalog Exposure
Rather than betting one product per video, the random rotation across your tagged products means your full collection gets exposure across different viewer sessions. A viewer who visits your video page three times may see three different products — each one a separate conversion opportunity.
Real Purchase Flow — No Friction
As shown in the live overlay screenshot, customers can:
- See the product image and name
- View the sale price vs. original price
- Select Color, Size, and Fabric — without leaving the video
- Adjust quantity
- Tap Add To Cart
This is a complete purchase flow in a single overlay. No page load. No navigation. No abandonment.
Works With Your Existing WooCommerce Catalog
Product images, names, descriptions, prices, sale prices, and variant options are all pulled automatically from WooCommerce. Setup takes minutes, not hours. If you already have a well-configured WooCommerce catalog, your shoppable video is ready to go.
Quick-Start Checklist
- Open your video settings and select the Video Monetization (Ad Controls) tab
- Toggle Show to ON
- Set Ad Type to Product Ad
- Set Product Ad Source to WooCommerce Product
- Tag 4–6 products in the WooCommerce Product field (they will rotate randomly)
- Set Start Time to match the moment the product appears on screen
- Set End Time to 10–15 seconds after Start Time
- Write an urgency-driven Ad Title (e.g., “Limited Stock — Shop Now”)
- Add a reassurance line in Ad Sub Title (e.g., “Free shipping · Easy returns”)
- Set Ad Button Text to something specific (e.g., “Add to Cart” or “Get Yours”)
- Confirm Clickable Ad is checked
- Set Ad Position so the overlay doesn’t cover the product in the video frame
- Leave Z-Index at 999
- Save and preview — confirm the overlay appears at the right moment, in the right position, with the correct product data
Documentation based on the Shoppable Video for WooCommerce — Video Monetization panel. Revenue statistics cited from Animoto, Smartzer, Baymard Institute, Salesforce Commerce Cloud, Wirewax, HubSpot, Unbounce, and Statista industry reports. Individual results may vary.