This is a comprehensive user guide for MediaHaven, designed to help you build stunning video galleries with ease.
Before You Start
Make sure you have:
- WordPress installed
- MediaHaven activated
- At least a few videos ready: Add Your First Video and Configure External Video Sources
Getting Started with MediaHaven
MediaHaven is a video solution for WordPress that allows you to showcase content from self-hosted files, YouTube, or specific taxonomies in a beautiful, responsive grid or slider.
1. Creating Your First Video Gallery
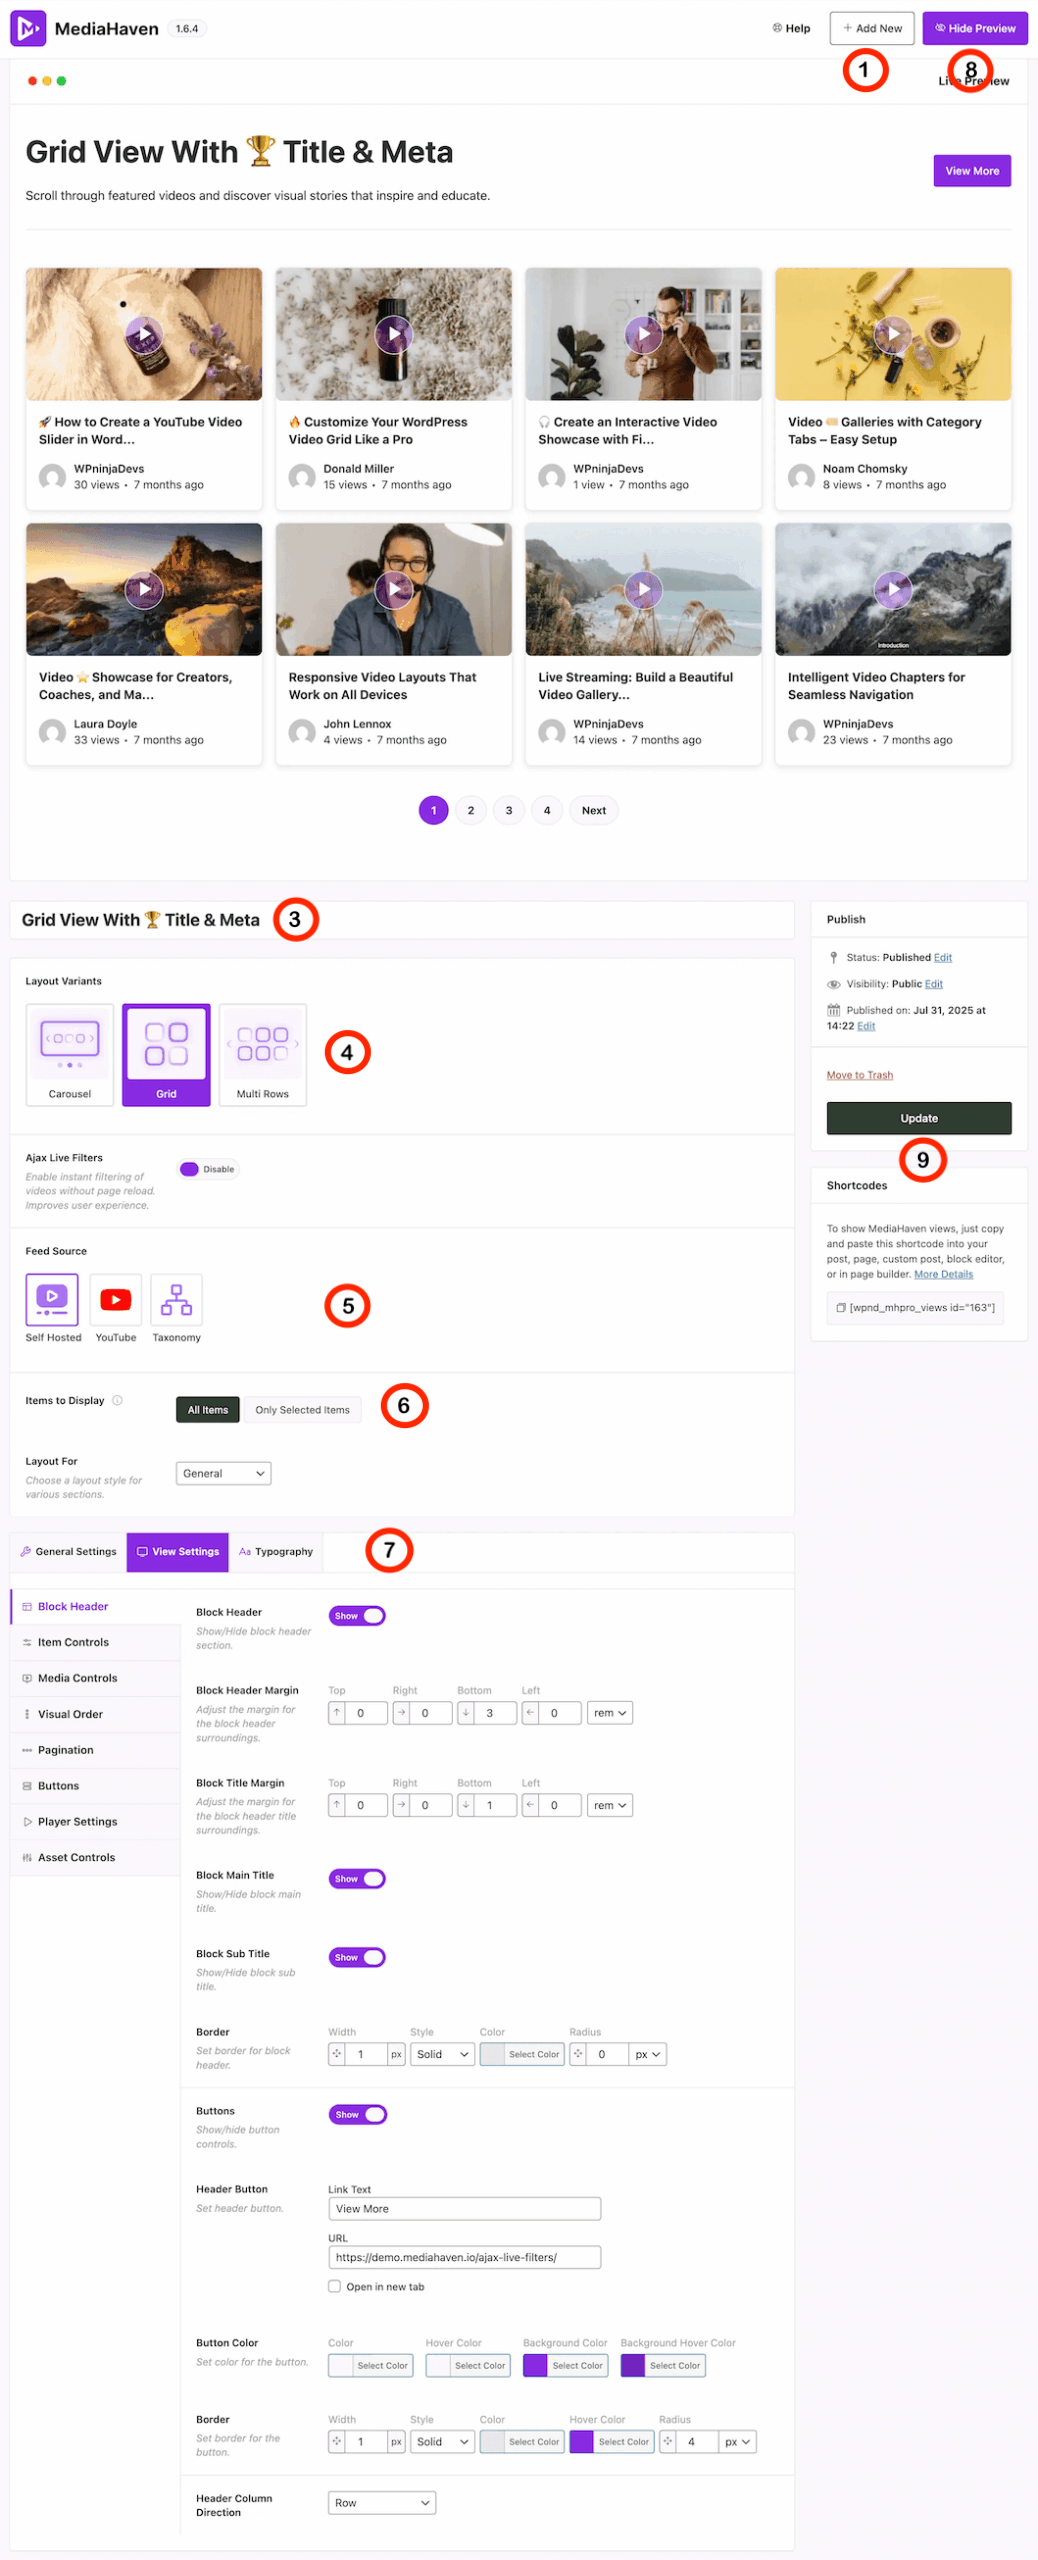
To begin, navigate to MediaHaven in your WordPress admin sidebar and click Views > Add New. You will be presented with the main configuration interface.
Top Toolbar Actions:
- Add New: Click this to create a clean, new video gallery view.
- Hide/Show Preview: Toggle the live preview frame at the top of the screen to monitor your design changes in real-time.
2. General Configuration
The upper section of the editor controls the layout structure, operational settings, and data sources of your video showcase.
Layout Variants
Choose how your videos are structurally displayed on the page:
- Carousel: A sliding, touch-friendly horizontal list.
- Grid: A classic multi-column response layout (selected in screenshot).
- Multi Rows: A dense layout optimized for large video libraries.
Ajax Live Filters & Sources
- Ajax Live Filters: Toggle the switch to Enable or Disable instant filtering. When active, it allows users to filter videos dynamically on the front end without a page reload.
- Feed Source: Select where your video files are pulled from:
- Self-Hosted: Videos uploaded directly to your local WordPress Media Library.
- YouTube: Display external streams using YouTube source feeds.
- Taxonomy: Create dynamic galleries that automatically populate based on categories, tags, or custom taxonomies.
- Items to Display: Switch between showing All Items or filtering to Only Selected Items.
- Layout For: A dropdown menu choice to assign or style a layout rules framework for specific categories (set to General in the screenshot).
3. Customizing the View (View Settings)
To refine the aesthetics of your gallery, use the General Settings, View Settings, and Typography tabs located in the configuration panel below.
💡 Design Tip: While each styling sub-tab (such as Item Controls, Media Controls, or Pagination) offers unique layout controls, they all follow a consistent interface design logic. The customization workflow detailed in the Block Header section below is mirrored across all other setup panels.
Configuring the Block Header
Understanding the Block Header settings (all other settings function the same way).
The Block Header section allows you to brand, style, and structure the top portion of your gallery:
- Visibility Toggles: Use the Show switches to instantly enable or hide the global Block Header container, Block Main Title, or Block Sub Title text layers.
- Spacing & Margins: Fine-tune layout positioning by entering explicit numerical values for the Top, Right, Bottom, and Left margins. You can change units dynamically via the dropdown tool (e.g.,
remorpx). - Header Borders: Control visual separation boundaries by adjusting the border Width, Style (e.g., Solid), Color, and Radius.
- Call-to-Action Buttons: Toggle the Buttons switch to Show to append a functional header button. You can customize the Link Text (e.g., “View More”), assign a destination URL, and choose if it should Open in a new tab.
- Button Color & Borders: Match your site’s exact branding by picking custom text Color, Hover Color, Background Color, and Background Hover Color parameters along with a matching button border.
4. How to Display Your Gallery
Once you are happy with your configuration, save your changes and copy the display code to deploy it on your site.
Using Shortcodes
In the right-hand sidebar under the Shortcodes meta-box, you will find a unique snippet code block generated for your setup (e.g.,
[wpnd_mhpro_views id="x"]).
- Copy the shortcode snippet directly from the right sidebar panel box.
- Open your target WordPress Page, Post, or widget building canvas.
- Paste the shortcode block directly into the editor layout.
- Click Publish or Update to view your video gallery live on the front end!
Quick Reference Sidebar Checklist
- Status: Displays whether your active gallery layout is Published or saved as a Draft.
- Visibility: Protect access by toggling visibility rules between Public and Private.
- Update: Remember to click the dark Update button to write your styling adjustments to your site’s database.
🌟 Pro Tip: Keep the Live Preview window open at the top of the editor while you style. It updates in real-time as you toggle switches and pick colors, saving you from manually refreshing frontend pages to check your progress!