

Offload Media — Getting Started Guide
Set up secure, fast video streaming and media offloading with Bunny.net in just a few minutes — no technical experience needed.
What You Will Need Before Starting
- MediaHaven plugin installed
- A Bunny.net account — start with a 14-day free trial and power your videos with secure, reliable, and cost-effective global streaming infrastructure. Pay-as-you-go pricing applies after the trial — sign up at bunny.net
- Your videos or media files ready in your WordPress Media Library
PART 1 — Setting Up Bunny Stream (Free)
Bunny Stream handles your video files. Every video is automatically converted to secure HLS format — no technical steps needed from your side.
Step 1 — Create Your Bunny.net Account
- Go to bunny.net and click “Sign Up”
- Enter your email and create a password
- Verify your email address from your inbox
- Log in to your Bunny.net dashboard
Step 2 — Create a Stream Library
Your Stream Library is where all your videos will live on Bunny’s servers.
- From your Bunny dashboard, click “Stream” in the left sidebar
- Click the “Add Stream Library” button
- Give your library a name — e.g. “My WordPress Videos”
- Choose the primary region closest to your main audience
- 🇺🇸 New York — for US audience
- 🇬🇧 London — for European audience
- 🇸🇬 Singapore — for Asian audience
- Click “Add Library” to confirm
Your library is now created! You will land on the library’s settings page.
Step 3 — Copy Your Stream Library Details
You need 3 things from this page. Keep this tab open — you will paste these into your plugin shortly.
| What You Need | Where to Find It |
|---|---|
| API Key | Top of the library page — click the eye icon to reveal |
| Library ID | Shown in the URL or at the top of the library page |
| CDN Hostname | Under “CDN & Delivery” tab — looks like vz-xxxxxx.b-cdn.net |
💡 Tip: Click the copy icon next to each value to avoid typos.
Step 4 — Enable Token Authentication (Recommended)
Token Authentication keeps your videos secure and private — preventing anyone from directly accessing or downloading your video files.
- Inside your Stream Library, click the “Security” tab
- Toggle “Token Authentication” to ON
- You will see a Token Auth Key appear — copy it and save it somewhere safe
- Set your preferred Token Expiration time
3600= 1 hour36000= 10 hours (recommended)86400= 24 hours
- Click “Save”
PART 2 — Connecting the Plugin to Bunny Stream
Now let’s connect your WordPress plugin using the details you just copied from Bunny.
Step 5 — Open Plugin Settings
- Log in to your WordPress Admin Dashboard
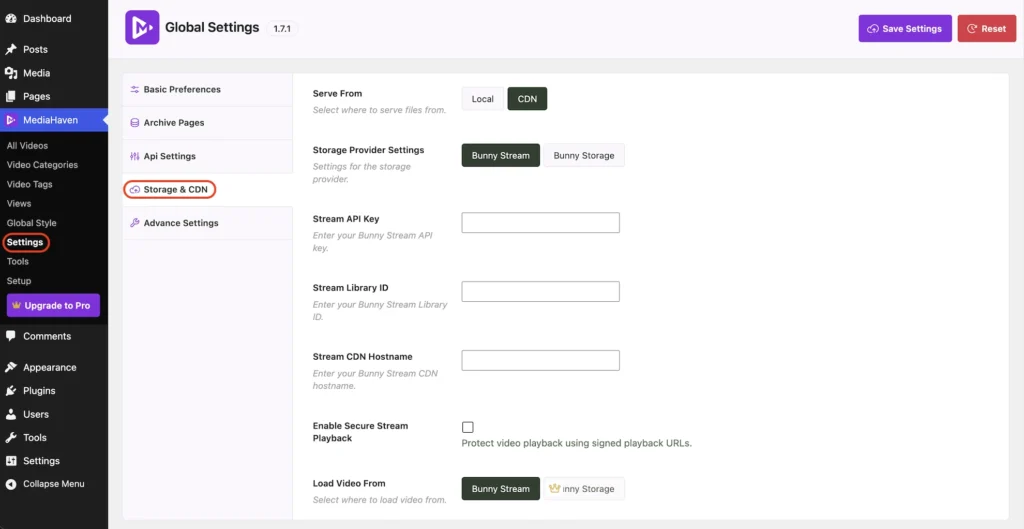
- In the left menu, find and click “MediaHaven -> Settings”
- Click on the “Storage & CDN” settings tab
Step 6 — Choose Your CDN Settings
- Under “Serve From”, select “CDN”
- Under “Storage Provider”, select “Bunny Stream”
The Bunny Stream configuration fields will now appear below.
Step 7 — Enter Your Bunny Stream Details
Fill in each field using the values you copied in Step 3:
| Plugin Field | What to Paste Here |
|---|---|
| Stream API Key | Your API Key from Bunny Stream library |
| Stream Library ID | Your Library ID number |
| Stream CDN Hostname | Your CDN hostname e.g. vz-xxxxxx.b-cdn.net |
Step 8 — Configure Secure Playback
- Toggle “Secure Stream Playback” to ON
- Paste your Token Auth Key (copied in Step 4) into the Token Auth Key field
- Set Token Expiration to
36000(recommended for most sites) - Click “Save Settings”
Your plugin is now connected to Bunny Stream!
Step 9 — Test Your First Video
- Go to Media Library in WordPress
- Upload any video file (MP4 recommended)
- From the Media Library, your media file and click Sync to Bunny Stream. The file will be securely transferred to your Bunny Stream cloud storage and prepared for streaming.
- Bunny Stream will automatically convert it to secure HLS format
- Your video should now play smoothly and reliably from the global CDN. The gallery will automatically serve the video from the cloud for faster loading and improved performance.

First conversion may take 1–3 minutes depending on video size. This is normal — Bunny is processing and securing your video.
PART 3 — Setting Up Bunny Storage (Pro)
Bunny Storage offloads ALL your media files — images, audio, documents, and more — to Bunny’s global CDN.
Step 10 — Create a Storage Zone on Bunny
- From your Bunny dashboard, click “Storage” in the left sidebar
- Click “Add Storage Zone”
- Give it a name — e.g. “my-wordpress-media”
- Choose the primary storage region closest to your audience
- Click “Add Storage Zone”
Step 11 — Connect a Pull Zone to Your Storage
A Pull Zone is what makes your files available through the CDN worldwide.
- Inside your new Storage Zone, click the “Connected Pull Zones” tab
- Click “Connect Pull Zone” or “Add Pull Zone”
- Give the Pull Zone a name
- Click “Connect”
- Copy the CDN Hostname shown — looks like
mysite.b-cdn.net
Step 12 — Get Your Storage API Key
- Go back to your Bunny dashboard
- Click your account name (top right) → “Account Settings”
- Scroll to “API” section
- Copy your API Key
Step 13 — Connect Storage to the Plugin
- Go back to Offload Media → Storage & CDN settings in WordPress
- Under “Storage Provider”, toggle to “Bunny Storage”
- Fill in the fields:
| Plugin Field | What to Paste |
|---|---|
| Storage API Key | Your Bunny account API Key |
| Storage Zone Name | The name you gave your storage zone |
| CDN Hostname | Pull Zone CDN hostname e.g. mysite.b-cdn.net |
- Click “Save Settings”
All media uploads will now automatically offload to Bunny Storage and be served from the global CDN!
Quick Setup Checklist
Use this to make sure everything is configured correctly:
- Bunny.net account created
- Stream Library created and named
- API Key, Library ID, and CDN Hostname copied
- Token Authentication enabled in Bunny Stream
- Plugin connected to Bunny Stream
- Secure playback enabled in plugin
- Test video uploaded and playing from CDN
- (Pro) Storage Zone and Pull Zone created
- (Pro) Storage connected in plugin settings
Common Questions
Q: How long does video conversion take?
Usually 1–3 minutes for a standard video. Longer videos (30min+) may take up to 10 minutes. You will see the video become playable once conversion is complete.
Q: Will my existing videos be offloaded?
Yes. To offload a video, open the WordPress Media Library and click the Sync to Bunny Stream button. The video will be uploaded and streamed from Bunny Stream.
Q: What video formats are supported?
MP4 is recommended and most compatible. Bunny Stream also accepts MOV, AVI, and MKV files.
Q: Is my video secure from downloading?
Yes — with Token Authentication and signed URLs enabled, your videos are delivered as encrypted HLS streams. Direct downloads are not possible.
Q: I entered my API key but it says invalid — what do I do?
Double check that you copied the Stream Library API Key (not your main Bunny account key). Each library has its own unique key.