You have a product video. You want people who watch it to buy. Right now, between “viewer watches video” and “viewer completes purchase,” there are four or more navigation steps — and each one loses buyers.
This guide shows you exactly how to close that gap by adding clickable product interactions directly inside your videos on WordPress, using MediaHaven.
No coding required. Works with WooCommerce. Deployable in under an hour.
What You’ll Build
By the end of this guide, your WordPress site will have:
- A product video gallery displaying WooCommerce products in a responsive, branded layout
- WooCommerce product overlays inside the video player — enabling direct add-to-cart or product page navigation from within the video
- VAST ad placements that generate revenue from video views (optional, for monetization)
- Schema.org video markup that makes your video content findable through organic search
- Ajax live filters letting buyers browse your video catalog by category, tag, or product type
Before You Start: Requirements
| Requirement | Details |
|---|---|
| WordPress version | 5.8 or higher (tested up to 6.9.4) |
| PHP version | 7.4 or higher (compatible through PHP 8.5) |
| WooCommerce | Required for product overlay features |
| MediaHaven Lite | Free — for core gallery setup |
| MediaHaven Pro | $79/year — required for product overlays, VAST ads, Ajax filters |
| Product videos | Self-hosted MP4 or hosted on any of 12 supported platforms |
Phase 1: Install and Configure MediaHaven
Step 1 — Install MediaHaven Lite
From your WordPress dashboard:
- Go to Plugins → Add New Plugin
- Search for “MediaHaven”
- Click Install Now on the MediaHaven Lite result, then Activate
WordPress redirects you to the MediaHaven Setup Wizard automatically.
Alternatively, download directly from wordpress.org/plugins/mediahaven-lite and upload via Plugins → Add New → Upload Plugin.
Step 2 — Complete the Setup Wizard
The Setup Wizard launches immediately after activation and guides you through four steps:
Step 2a — Basic Settings The wizard checks your permalink structure. MediaHaven requires “Post name” permalink format for clean video URLs. If you’re not already using this, the wizard will prompt you to update it under Settings → Permalinks.
Step 2b — YouTube API Connection (Optional) If you plan to display YouTube channel feeds or playlist content, enter your YouTube Data API v3 key. The wizard includes a direct link to the Google Cloud Console where you can generate a free API key:
- Go to console.cloud.google.com
- Create a new project (or use an existing one)
- Navigate to APIs & Services → Library
- Search for “YouTube Data API v3” → Enable
- Go to APIs & Services → Credentials → + Create Credentials → API key
- Copy the key and paste it into the MediaHaven wizard
You can skip this step and return later if you’re only using self-hosted or direct-embed videos.
Step 2c — Sample Content The wizard creates a sample video gallery in your theme so you can immediately see how MediaHaven displays content. Optional but recommended for first-time setup.
Step 2d — Next Steps Overview A summary of available features with documentation links. Click Finish to access the full MediaHaven dashboard.
Step 3 — Activate Your Pro License (Pro Only)
If you’ve purchased MediaHaven Pro, navigate to MediaHaven → Settings → License. Enter your license key (emailed after purchase from mediahaven.io) and click Activate. All Pro features unlock immediately.
MediaHaven Pro Plans:
| Plan | Price | Sites |
|---|---|---|
| 1 Site | $79/year | 1 domain |
| 5 Sites | $159/year | 5 domains |
| 10 Sites | $249/year | 10 domains |
| 50 Sites | $499/year | 50 domains |
All plans include a 14-day money-back guarantee and 1 year of updates and premium support.
Phase 2: Add Your Product Videos
Step 4 — Create Video Posts
Navigate to MediaHaven → Videos → Add New. For each product video, configure:
Basic Settings Tab:
- Title: Use a descriptive, keyword-rich title (e.g., “Waterproof Hiking Boots — Full Product Demo and Review”). This appears in gallery cards and in schema.org markup for SEO.
- Video Source: Select your format:
- Self-hosted: Upload an MP4 file directly (recommended for WooCommerce product videos — gives you most control over overlay timing)
- YouTube embed: Paste a YouTube URL
- Vimeo embed: Paste a Vimeo URL
- Other platforms: TikTok, Facebook, Instagram, LinkedIn, Twitch, Wistia, Dailymotion, Rumble, or HLS stream URL
- Thumbnail: Upload a custom image, or MediaHaven auto-generates one. Pro users can enable automatic WebP conversion for faster page load.
- Description: A product-focused description displayed in gallery cards and included in VideoObject schema metadata.
Categories and Tags Tab: Assign the video to relevant product categories and tags. These power the Ajax live filter in Pro and generate SEO-friendly filtered URLs.
Subtitles Tab: Upload a WebVTT (.vtt) or SRT (.srt) subtitle file if available. Improves accessibility and adds full-text indexable content to the video’s page for SEO.
Tip: Free tools like YouTube’s auto-caption export or Otter.ai can generate transcript files that you save in .vtt format — even if your video was never on YouTube.
Click Publish to save the video. Repeat for each product video in your catalog.
Step 5 — Organize by Product Category
Go to MediaHaven → Categories and create a category for each relevant product group — mirroring your WooCommerce product categories where possible. Consistent categorization ensures that your video gallery filters align with how buyers naturally navigate your store.
Phase 3: Build Your Video Gallery
Step 6 — Create a Gallery Shortcode
Navigate to MediaHaven → Views → Add New. The shortcode builder opens with a live preview panel (Pro) or configuration panel (Lite).
Layout Tab — Choose Your Format:
| Layout | Best For |
|---|---|
| Grid | Product category pages, product-focused galleries |
| Carousel | Homepage sections, featured product showcases |
| Multi-row Carousel | Brand video hubs, large catalog displays |
Source Settings: Select “All Videos,” filter by a specific category, or choose specific video IDs for a curated gallery. For a product category page, match the video category to the WooCommerce category.
Responsive Columns: Set column counts for each breakpoint:
| Breakpoint | Recommended |
|---|---|
| Extra-small (mobile) | 1 column |
| Small (large phone) | 1–2 columns |
| Medium (tablet) | 2 columns |
| Large (desktop) | 3 columns |
| Extra-large (wide) | 3–4 columns |
MediaHaven 1.6.4 (February 2026) introduced dedicated controls for extra-small and extra-large breakpoints, giving you precise responsive control at all screen sizes.
Card Display Settings: Toggle which elements appear on each video card:
✅ Title and description (recommended for product galleries)
✅ View count (social proof)
✅ Like/dislike buttons (engagement)
✅ Author, date (show for editorial; hide for product galleries)
✅ Categories and tags (show if using filter navigation)
Pagination:
- Page numbers: Standard numbered pagination
- Load More (AJAX): Adds videos without page reload
- Infinite Scroll: Auto-loads as user scrolls (best for discovery-focused galleries)
Click Save. MediaHaven generates a unique shortcode ID visible in the Views list.
Step 7 — Customize Gallery Appearance
In the shortcode settings, navigate to the Styles tab:
- Colors: Primary color, text color, card background, hover states — match your brand palette
- Typography: Select from Google Fonts with full size, weight, and line-height control
- Card layout (Pro — Visual Order tab): Drag and drop card sections to reorder them. Move media above or below title. Adjust section spacing. Add card borders, radius, and shadow with hover effects.
- Carousel controls: If using carousel layout, configure navigation arrow style, pagination dots, and autoplay settings
Step 8 — Embed the Gallery
Copy the shortcode from the Views list (format: [wpnd_mhpro_views* id="123"]).
In Gutenberg (Block Editor):
- Add a new block → search “MediaHaven Shortcode View” or “Shortcode”
- Paste the shortcode
- The Gutenberg block renders a live preview in the editor
- Publish or Update the page
In Page Builders: Add a Shortcode or HTML widget to your layout and paste the MediaHaven shortcode. Works with Elementor, WPBakery, Divi, Beaver Builder, and all major builders.
Placement strategy:
- Product category pages → filter by matching video category
- Individual product pages → filter by specific video IDs for that product
- Homepage section → Carousel layout with featured product videos
- Dedicated video hub page → Multi-row Carousel with Ajax filters enabled
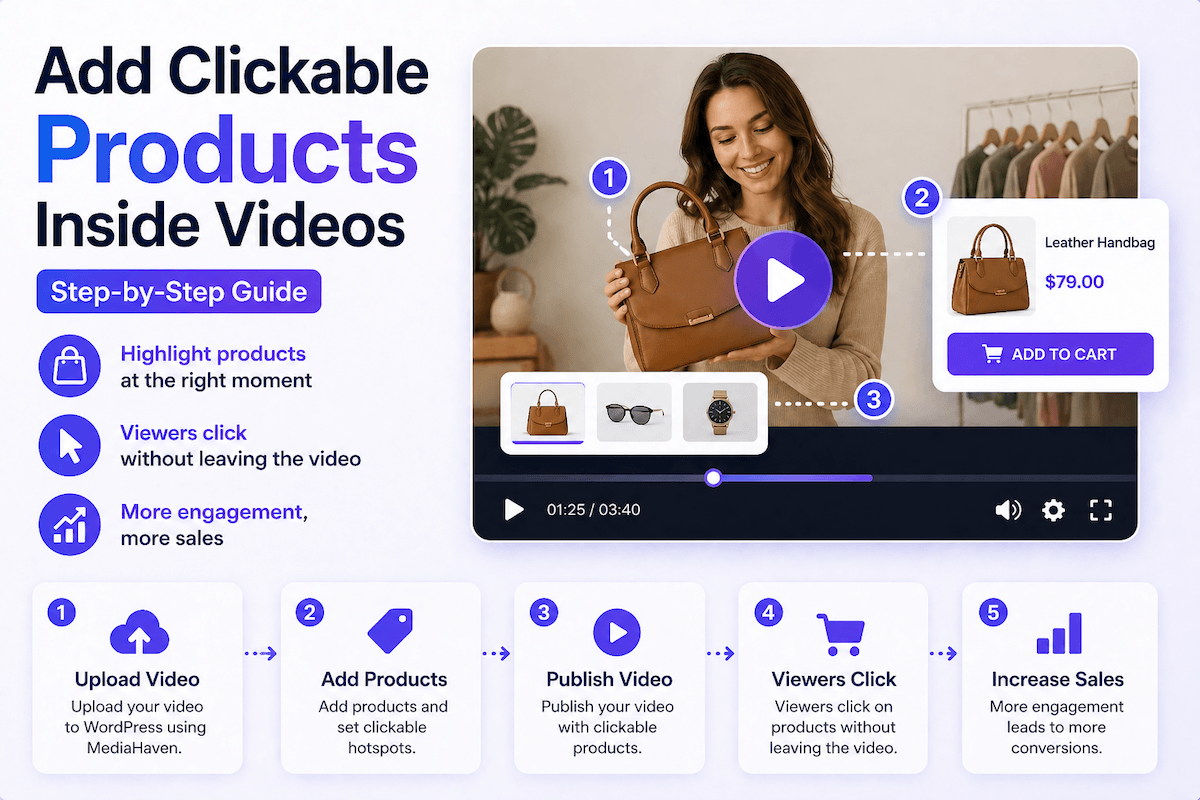
Phase 4: Add Clickable Product Overlays (Pro — Core Feature)
This is the step that transforms a standard video gallery into a shoppable video experience.
Step 9 — Enable WooCommerce Integration
Navigate to MediaHaven → Settings and locate the WooCommerce integration section. Enable WooCommerce product video overlays. Save settings.
Step 10 — Configure Overlays Per Video
Return to MediaHaven → Videos and edit each product video. With overlays enabled, you will see a Product Promotion tab in the video settings. Configure:
Linked Product: Search for and select the WooCommerce product associated with this video. You can link:
- A single specific product (recommended for focused product demos)
- A product category (for videos covering multiple products or a product line)
CTA Button Label: Customize the button text displayed in the overlay:
- “Add to Cart” — for direct purchase action
- “View Product” — for high-consideration products where buyers need the full product page
- “Shop Now” — for promotional videos
- Any custom text — set via the Ad Button Label field added in MediaHaven 1.6.5 (March 2026)
Overlay Timing: Choose when the product prompt appears:
| Timing | Best For |
|---|---|
| Video start | Immediate awareness — product always visible |
| Custom timestamp | After showing the product’s key feature or benefit (highest conversion impact) |
| Video end | Post-demonstration capture — viewer has seen the full pitch |
Ad Position: MediaHaven Pro supports nine screen positions for overlay placement — top left through bottom right — allowing precise positioning that doesn’t obstruct key video content.
Click Update to save. The overlay is now live on every MediaHaven gallery instance where this video appears.
Step 11 — Test the Shoppable Experience
Open the gallery page in an incognito/private browser window (to see it as a first-time visitor):
- Click Play on a video with an overlay configured
- Verify the product prompt appears at the configured timing
- Verify the CTA button displays your configured label
- Click the button — confirm it routes to the correct WooCommerce product page or triggers add-to-cart
Troubleshooting:
- Overlay not appearing → Check that MediaHaven Pro license is active under MediaHaven → Settings → License
- Wrong product linked → Re-edit the video’s Product Promotion tab and re-save
- Timing off → Adjust the timestamp in the overlay timing settings
Phase 5: Configure VAST Ads (Pro — Optional Monetization)
Step 12 — Connect Your Ad Network
Navigate to MediaHaven → Settings → Ad Settings. MediaHaven Pro supports any VAST-compliant ad network. Enter your VAST ad tag URL — provided by your ad network when you create a video ad unit.
Step 13 — Configure Ad Placements
For each video (or globally), configure:
| Setting | Options |
|---|---|
| Ad position | Pre-roll, mid-roll (custom timestamp), post-roll |
| Ad format | Video ad (plays in player), banner overlay, text/link ad |
| Screen position | 9 positions: top-left through bottom-right |
| Audio | Muted or unmuted for banner/link ads |
| Clickable | Enable click-through to landing URL |
Strategic placement tips:
- Pre-roll → Maximum impressions; best for brand awareness campaigns
- Mid-roll at natural content break → Highest engagement; best for complementary product promotion
- Post-roll → Reaches committed viewers; best for upsell and cross-sell offers
- Banner overlay at bottom-right → Non-intrusive; runs alongside video without interruption
Save settings. VAST ads display automatically on configured videos.
Phase 6: Optimize for SEO and Discoverability
Step 14 — Verify Schema.org Markup
MediaHaven automatically generates VideoObject schema for every video. To verify:
- Copy the URL of a page containing your video gallery
- Paste it into Google’s Rich Results Test
- Confirm VideoObject structured data appears for each video
If schema isn’t appearing: Verify the gallery is on a publicly accessible, published page (not a draft or password-protected page) and that your permalink structure is set to “Post name.”
Schema indexing typically takes 2–4 weeks after publishing before rich results begin appearing in Google Search.
Step 15 — Activate Ajax Live Filters (Pro)
Navigate to MediaHaven → Views, edit your gallery shortcode, and open the Filter tab. Enable the Ajax Video Live Filter. Configure:
✅ Category filter — browse by product type
✅ Tag filter — granular attribute filtering (color, size, use case)
✅ Duration filter — differentiate short demos from long tutorials
✅ Featured filter — surface highlighted or best-selling products
✅ SEO-friendly URL mode — ensures filter combinations create indexable URLs
Save the shortcode settings. Each filter combination now generates a unique, indexable page capturing specific long-tail search queries.
Step 16 — Add Subtitles for Accessibility and SEO
For each product video, upload a WebVTT subtitle file in the video’s Subtitles tab. MediaHaven renders a subtitle toggle automatically in the video player. The full transcript text becomes indexable content associated with the video’s URL — significantly expanding keyword coverage without additional content creation.
Phase 7: Launch, Measure, and Optimize
Step 17 — Full Experience Test
Before promoting your gallery, run a complete test:
- Gallery loads correctly on desktop and mobile
- Product overlay appears at configured timing on all overlay videos
- CTA button routes to the correct product/category
- Ajax filter operates without page reloads; URLs update correctly
- Videos are fully responsive at all screen sizes
- Subtitles toggle works if subtitle files are uploaded
- Schema markup validates in Google Rich Results Test
Step 18 — Connect Analytics and Measure ROI
MediaHaven built-in metrics (available in MediaHaven dashboard):
- View count per video
- Like/dislike engagement per video
WooCommerce + Google Analytics 4:
- Track sessions that include visits to MediaHaven gallery pages
- Set up GA4 events for video play and overlay CTA clicks
- Compare conversion rate on video gallery pages vs. non-video pages
Google Search Console:
- Monitor video-rich result impressions 2–4 weeks after publishing
- Track click-through rates from video search results
- Identify which video pages are driving organic traffic
Core metrics to track (before vs. 60 days after implementation):
| Metric | Target Improvement |
|---|---|
| Conversion rate on product pages with video | +25–86% |
| Average order value on video-influenced orders | +30% |
| Return rate on orders preceded by video view | −40% |
| Organic search impressions for video pages | Progressive increase over 60–90 days |
| Session duration on gallery pages | +88% |
Quick-Reference: MediaHaven Shortcode Patterns
[wpnd_mhpro_views id="123"]
Display gallery by shortcode ID
The MediaHaven → Views list shows each gallery’s complete shortcode with its unique ID. The Gutenberg Shortcode View block lets you select and preview shortcodes visually without typing them manually.
Summary: Everything You’ve Built
| Feature | Status After This Guide |
|---|---|
| Responsive video gallery | ✅ Live |
| WooCommerce product overlays | ✅ Live (Pro) |
| VAST ad monetization | ✅ Configured (Pro) |
| Schema.org video markup | ✅ Auto-generated (Free + Pro) |
| Ajax live filters with SEO URLs | ✅ Active (Pro) |
| WebP thumbnail optimization | ✅ Enabled (Pro) |
| Video subtitles | ✅ Uploaded |
| Gutenberg block integration | ✅ Embedded |
| Mobile-responsive layout | ✅ Fully responsive |
With these steps complete, your WordPress site has shoppable video infrastructure that most dedicated e-commerce platforms charge significantly more to provide — and it lives entirely within your existing WordPress environment, giving you full control over data, design, and customer experience.
Get Started
MediaHaven Lite — Free Download from WordPress.org Core galleries, schema.org markup, YouTube feeds, Gutenberg block, unlimited shortcodes
MediaHaven Pro — From $79/year Upgrade at mediahaven.io WooCommerce overlays + VAST ads + Ajax filters + drag-and-drop builder + WebP + unlimited styles 14-day money-back guarantee • No credit card for free version
Plugin version referenced: MediaHaven 1.6.5 (March 2026). Compatible with WordPress 5.8–6.9.4, PHP 7.4–8.5, WooCommerce (current).
Leave a Reply