


You don’t need a developer, a page builder license, or a single line of custom PHP to add product videos to your WooCommerce store. MediaHaven Pro handles the entire process — video hosting, gallery layout, product assignment, and even shoppable Add to Cart overlays — through plain WordPress admin screens.
This guide walks through the exact, real click-by-click process (based on MediaHaven’s official documentation) so you can add your first product video today, with zero code.
What “No-Code” Actually Means Here
Most WooCommerce video tutorials eventually hit a wall: “now open your functions.php file” or “add this hook to your theme.” MediaHaven avoids that entirely. Every step below happens in a WordPress admin screen you already know how to use — the same interface where you edit a blog post or a product listing.
You will use exactly three screens:
- MediaHaven → Views — where you build the video gallery layout
- Products → All Products → [Your Product] — the same product editor you already use
- MediaHaven → Videos (Pro) — where you configure shoppable overlays, if you want them
No shortcodes to memorize (though one is generated for you automatically). No theme file editing. No hook names to look up.
Step 1: Install MediaHaven (5 minutes, no code)
- In your WordPress dashboard, go to Plugins → Add New Plugin
- Search “MediaHaven”
- Install “MediaHaven – Video Gallery, HLS Player & WooCommerce Product Videos” by WPninjaDevs
- Click Activate
MediaHaven’s Setup Wizard opens automatically. It checks your permalink structure (MediaHaven requires the “Post name” permalink setting for clean video URLs — the wizard will prompt you to fix this under Settings → Permalinks if needed) and optionally connects a YouTube API key if you plan to use YouTube feeds. You can skip the API key step if you’re only using self-hosted product videos.
To unlock WooCommerce features, purchase MediaHaven Pro at mediahaven.io/pricing (from $79/year, 14-day money-back guarantee). Install the Pro plugin via Plugins → Add New → Upload Plugin, then activate your license key in MediaHaven → Settings → License — again, no code, just paste the key you received by email.
⚠️ Prerequisite: WooCommerce must already be installed and activated. If it isn’t, the product video options described below simply won’t appear in your product editor.
Step 2: Build Your Video Gallery Layout (No Code — Visual Editor Only)
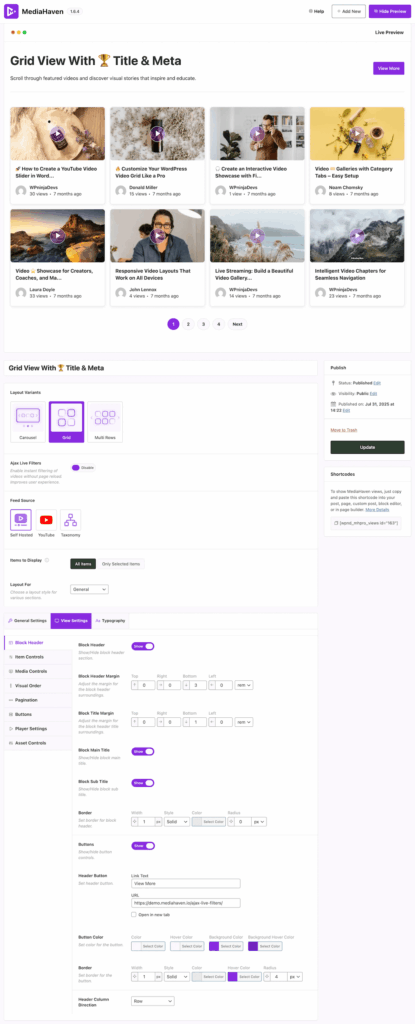
Before assigning videos to products, you create the gallery layout once. Go to MediaHaven → Views → Add New.
Layout Variants — choose visually from a dropdown:
- Carousel or Multi Rows — a swipeable horizontal slider
- Grid — a fixed layout, best for showing several product angles at once
Gallery Type — set to WooCommerce to enable e-commerce-specific display triggers.
Feed Source — choose where your videos come from:
- Self Hosted — videos uploaded directly to your WordPress media library (most control, recommended for product demos)
- YouTube — streamed externally via YouTube links or playlists
- Taxonomy — loaded dynamically by category or tag
Responsive columns — set column counts per screen size using simple number fields (Extra-small, Small, Medium, Large, Extra-large). No CSS media queries to write — MediaHaven 1.6.4 added dedicated controls for every breakpoint.
Card Display Settings — a series of toggle switches: title, description, view count, like/dislike, author, date, categories, tags. Click to show or hide — no template editing.
Click Save. MediaHaven automatically generates a shortcode (something like ) — but you won’t need to type this manually in most cases, as the next step handles the assignment visually.

Step 3: Assign Your Video Gallery to a Product (Point and Click)
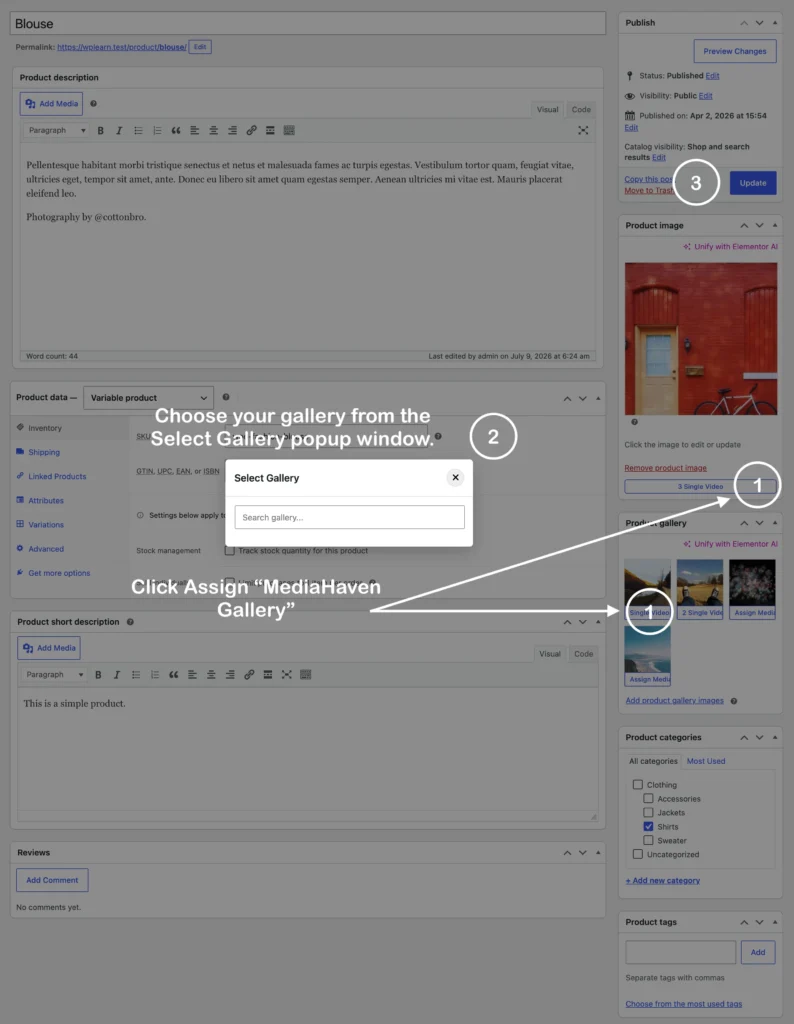
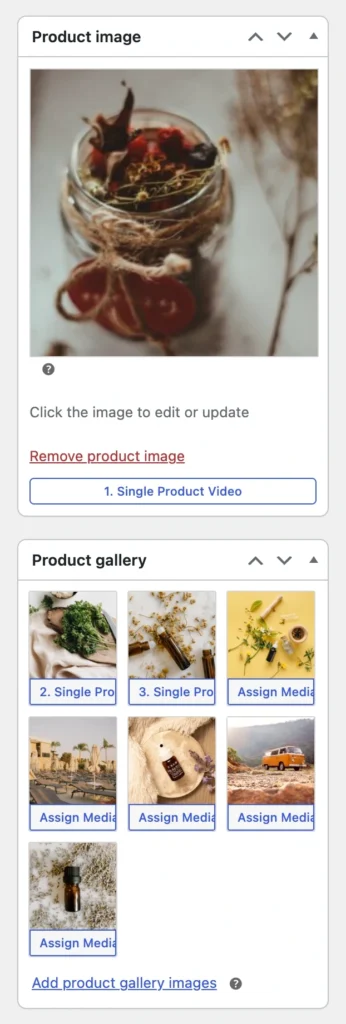
This is the step that replaces the video with — or adds it alongside — your product images. Based on MediaHaven’s official documentation:
- Go to Products → All Products and click the product you want to edit
- Look at the right-hand sidebar of the product editor — find the Product image or Product gallery meta boxes
- Click the Assign MediaHaven Gallery button located directly inside these image boxes
- A Select Gallery popup window appears — use the search bar or list to choose the video layout you created in Step 2
- Scroll back up to the Publish meta box and click Update
That’s it. Your video gallery is now live on that product’s page — assigned entirely through point-and-click selection, with no shortcode typing, no PHP, and no template files touched.
Step 4: Add a Dedicated Video Tab (Also No Code)
If you’d rather show product videos in their own tab — alongside “Description” and “Reviews” — instead of replacing the image gallery, MediaHaven Pro handles this through a separate visual configuration, no coding required.
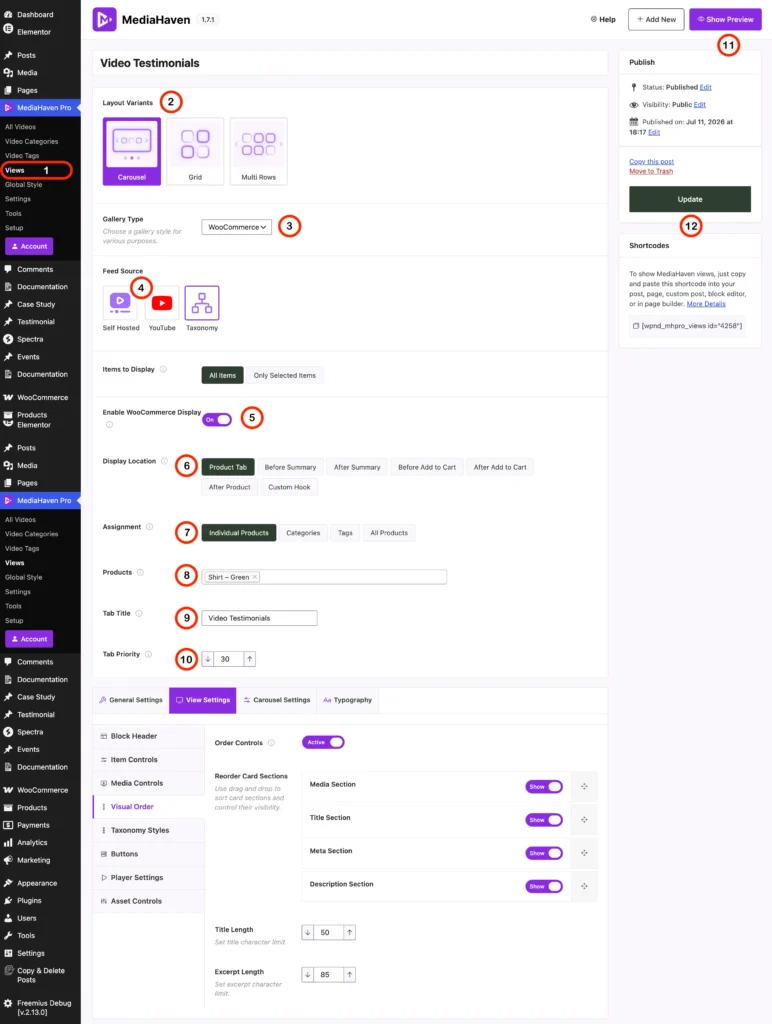
Go to MediaHaven → Views, open your gallery (or create a new one), and configure:
| Setting | What You Click |
|---|---|
| Enable WooCommerce Display | Toggle switch → On |
| Display Location | Dropdown → select “Product Tab” |
| Assignment | Dropdown → select “Individual Products” |
| Products | Search field → type product name, select it (e.g., “Shirt – Green”) |
| Tab Title | Text field → type your label (e.g., “Video Testimonials”) |
| Tab Priority | Number field → lower numbers appear first (e.g., 30) |
Every field here is a dropdown, toggle, search box, or text field — the same input types you use anywhere in WordPress. Click Show Preview to see exactly how your tab will look before publishing, then click Update.
Step 5: Add Shoppable Add-to-Cart Overlays (No Code, Pro Feature)
The most advanced MediaHaven feature — clickable product cards inside the video itself — is also configured entirely without code, through the Video Monetization tab in each video’s settings.
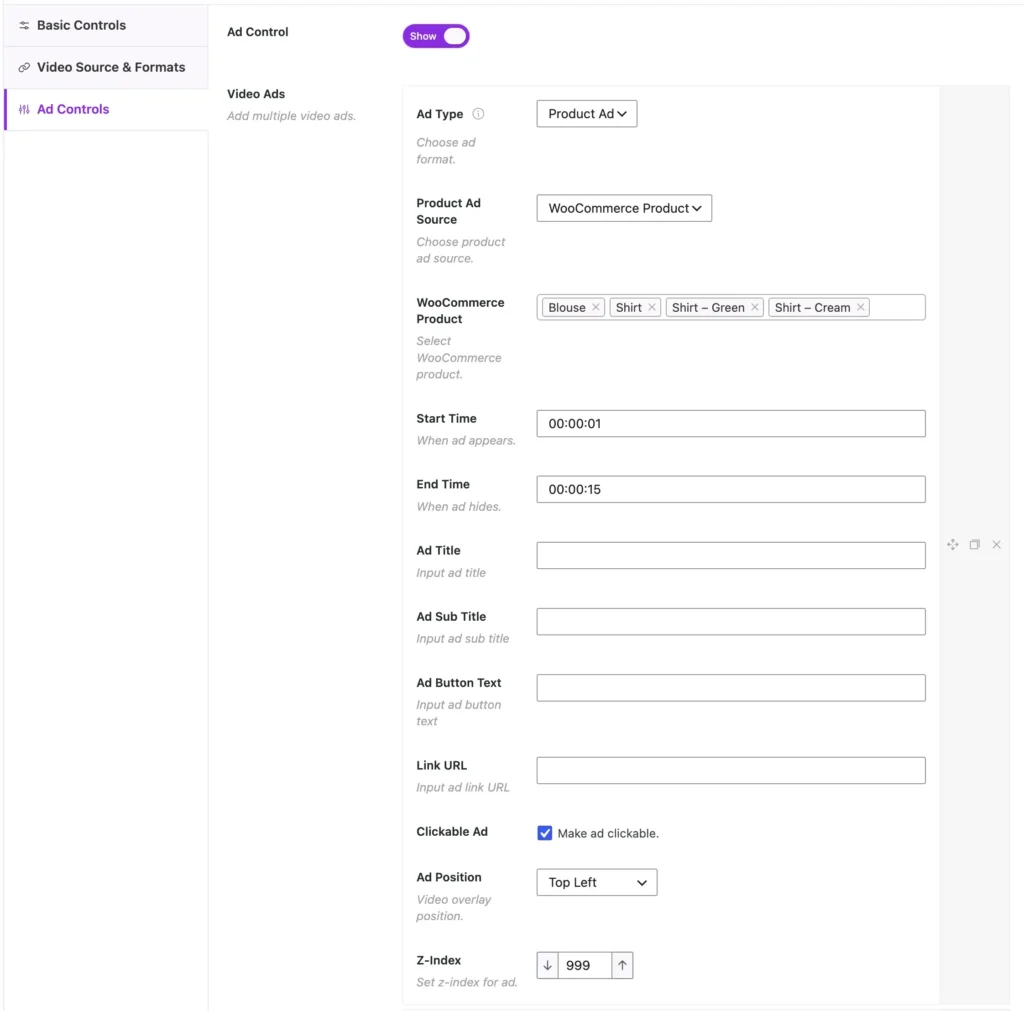
Go to MediaHaven → Videos, open a product video, and click the Video Monetization tab in the left sidebar:
- Toggle Show to ON
- Ad Type → leave as “Product Ad” (the default, optimized specifically for WooCommerce)
- Product Ad Source → leave as “WooCommerce Product” (this pulls live pricing, images, and variants directly from your catalog — no manual data entry)
- WooCommerce Product field → search and select one or more products to tag. Selecting multiple products makes them rotate randomly across viewer sessions
- Start Time / End Time → type the timestamp (format
HH:MM:SS) for when the overlay should appear and disappear during playback - Ad Title / Ad Sub Title → plain text fields for a headline and supporting line (e.g., “Limited Stock — Shop Now” / “Free shipping · Easy returns”)
- Ad Button Text → plain text field for your CTA label (e.g., “Add to Cart,” “Shop Now,” “Get Yours”)
- Ad Position → dropdown to choose where the overlay sits on screen (Top Left, Top Right, Bottom Left, Bottom Right)
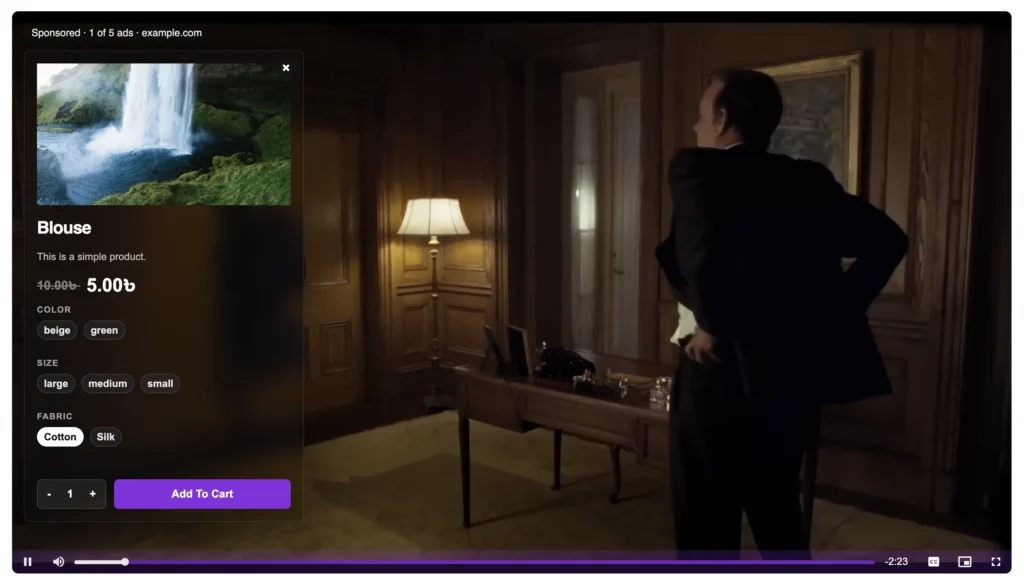
Click Update. Because the product data — image, name, price, sale price, and variants (Color, Size, Fabric) — is pulled live from WooCommerce, you never manually type product details into the overlay. Change the price in WooCommerce, and the overlay updates automatically.
Why This No-Code Approach Actually Matters for Your Business
Skipping code isn’t just about convenience — it changes who can maintain your store.
Any team member can add product videos. A marketing assistant, a store manager, or you personally can add a new product video in minutes without needing developer time or waiting in a support queue.
Nothing breaks during theme updates. Because MediaHaven integrates through the standard WooCommerce product editor screens rather than hard-coded theme template overrides, updating your WooCommerce theme won’t silently remove your video galleries.
Changes are instant. Editing a product’s video assignment, swapping which products rotate in a shoppable overlay, or adjusting a CTA button label takes effect the moment you click Update — no cache-clearing developer deployment cycle required (though your caching plugin should still be told to clear its own cache after edits).
Common No-Code Questions
Do I need to know shortcodes at all? No. The gallery-to-product assignment (Step 3) is done entirely through the “Assign MediaHaven Gallery” button and a search popup. The shortcode is generated automatically for cases where you want to manually place a gallery somewhere else — like inside an Elementor layout or an arbitrary blog post — but it’s optional, not required, for standard WooCommerce product pages.
Can I use a YouTube video without touching code? Yes — in the gallery’s Feed Source setting, select “YouTube” and paste the video URL or playlist link into the field provided. No API programming required (though a free YouTube Data API key is needed if you want live channel feeds, and the Setup Wizard walks you through getting one via a direct link to Google Cloud Console).
What if my theme is heavily customized? MediaHaven integrates at the standard WooCommerce product gallery and product tab level, which most WooCommerce-compatible themes support natively. If your theme has been aggressively customized with a page builder, test the display after activation — MediaHaven’s Show Preview feature lets you verify the layout before publishing to your live store.
Is there a limit to how many products or videos I can add without a developer? No plugin-imposed limit exists in MediaHaven Pro for the number of product videos, galleries, or shoppable overlays you configure — you can scale your entire catalog through the same point-and-click screens.
- Install free: wordpress.org/plugins/mediahaven-lite
- Official documentation: mediahaven.io/docs/
- Get Pro access: mediahaven.io/pricing — $79/year · 14-day money-back guarantee
- Support: support@wpninjadevs.com
Leave a Reply