

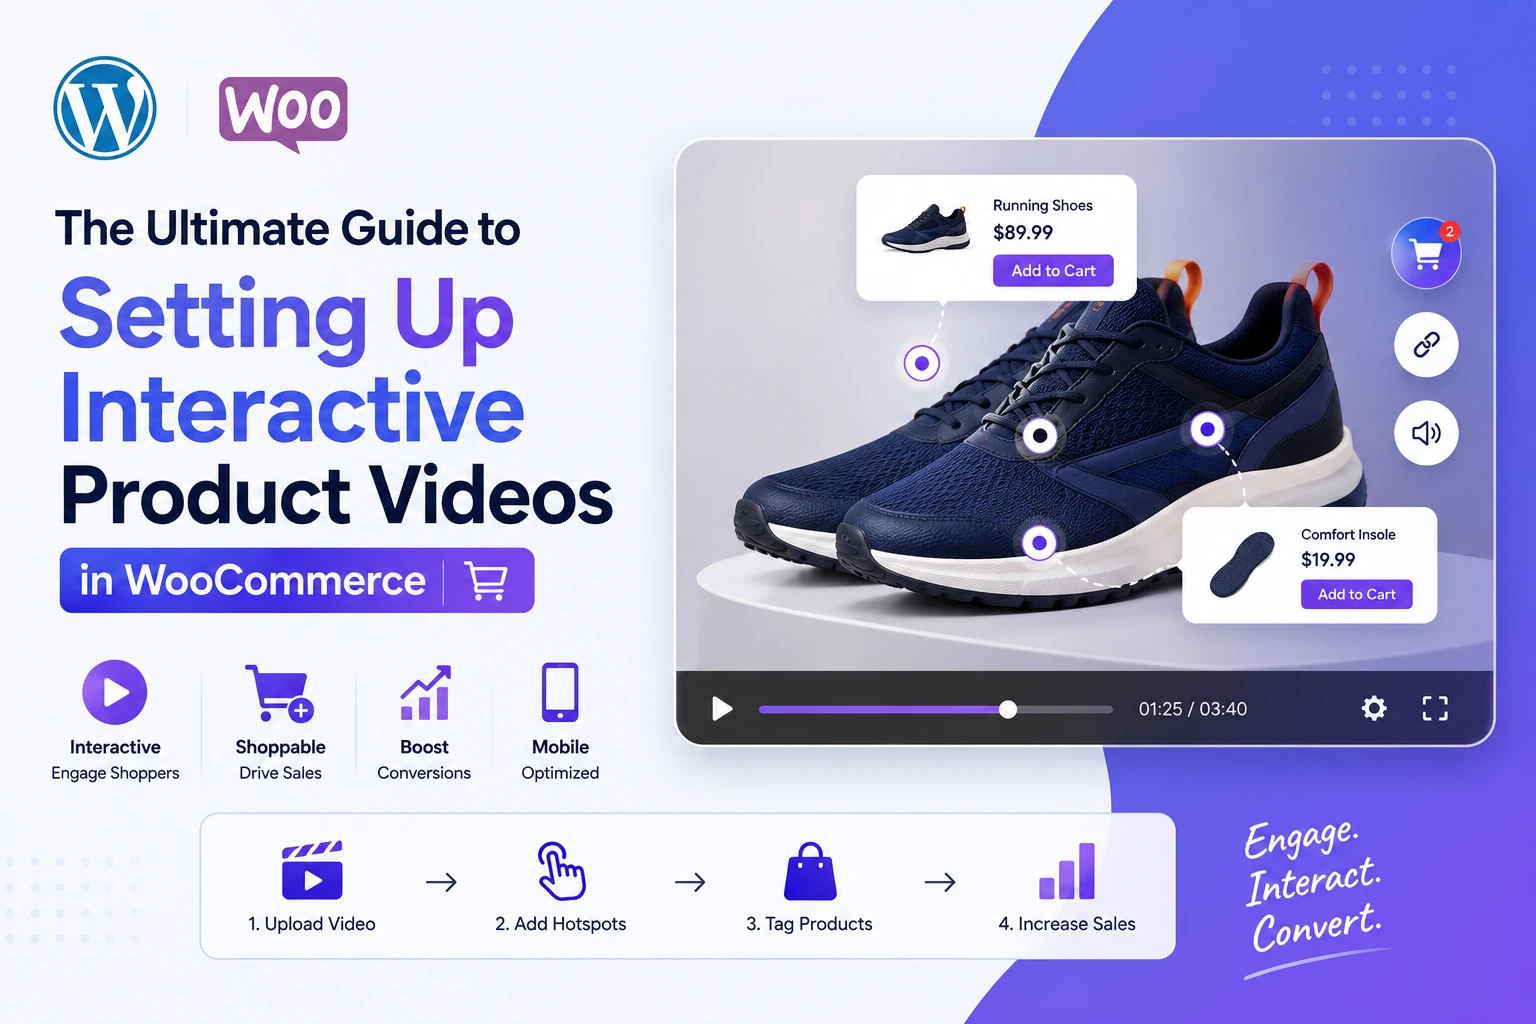
If you’ve decided to add video to your WooCommerce product pages, the next question isn’t “should I?” — it’s “how, exactly?” This guide is the answer. It walks through every stage of setting up interactive product videos in WooCommerce using the MediaHaven plugin, from installing the plugin to configuring CDN delivery to layering in clickable shopping overlays, with the specific settings and menus involved at each step.
This is written for store owners setting this up themselves — no developer required, though everything here also works cleanly if you hand it off to one.
What You’ll Have by the End of This Guide
- A WooCommerce product page with video in a tab or placed before/after the summary
- Fast, secure video delivery through a global CDN
- (Pro) Interactive shoppable overlays: Feature clickable product cards and in-video Add to Cart buttons to increase conversions and reduce cart abandonment.
- A video library that’s searchable, filterable, and fast on mobile
Part 1: Install and Configure MediaHaven
Step 1 — Install the Plugin
- In your WordPress dashboard, go to Plugins → Add New.
- Search for MediaHaven.
- Install and activate MediaHaven Lite (the free version on WordPress.org).
Step 2 — Run the Setup Wizard
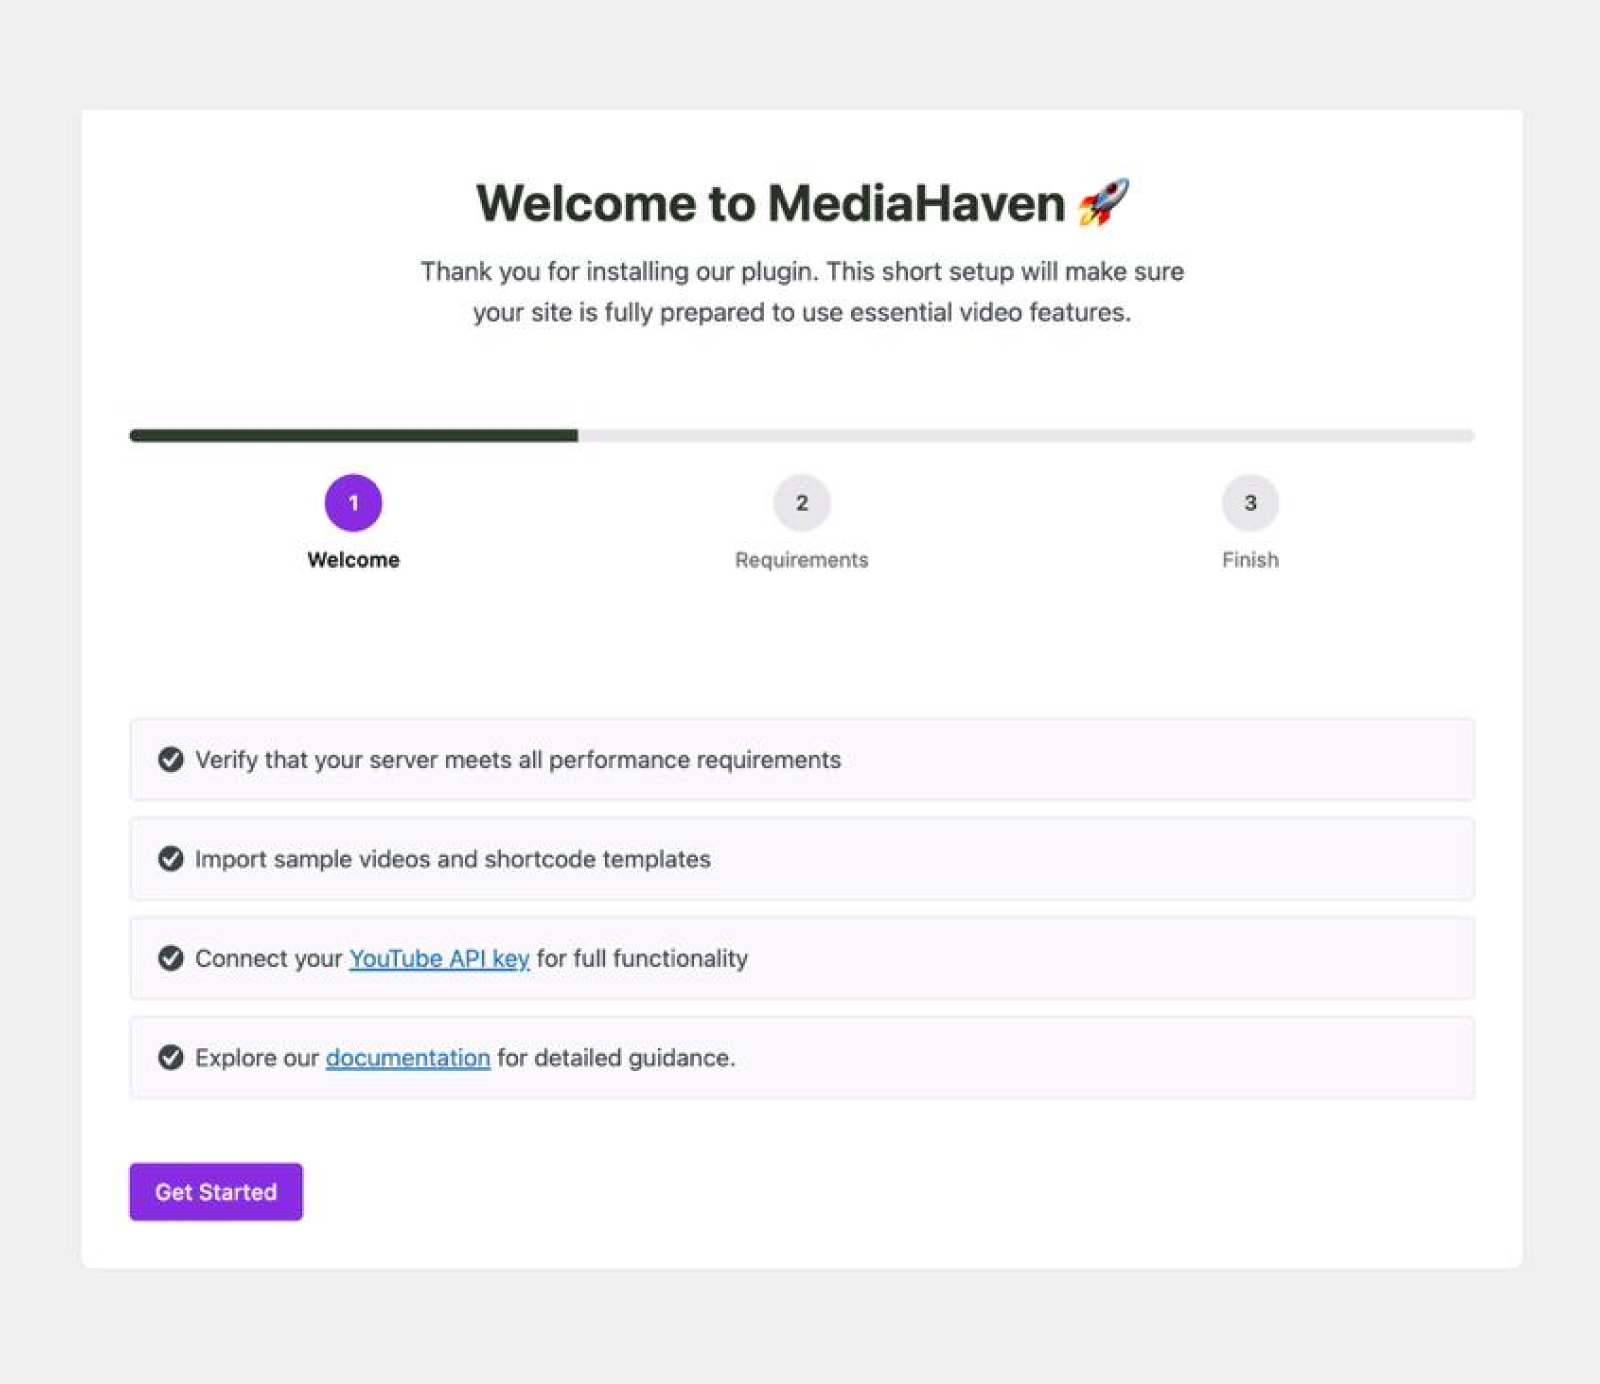
MediaHaven includes a guided Setup Wizard that walks you through your first video gallery configuration. It’s the fastest way to get a working gallery live without digging through every settings tab manually. A YouTube API key can be added here if you plan to pull in YouTube feeds, but it’s optional — the wizard works without one.
Step 3 — Create Your First Video
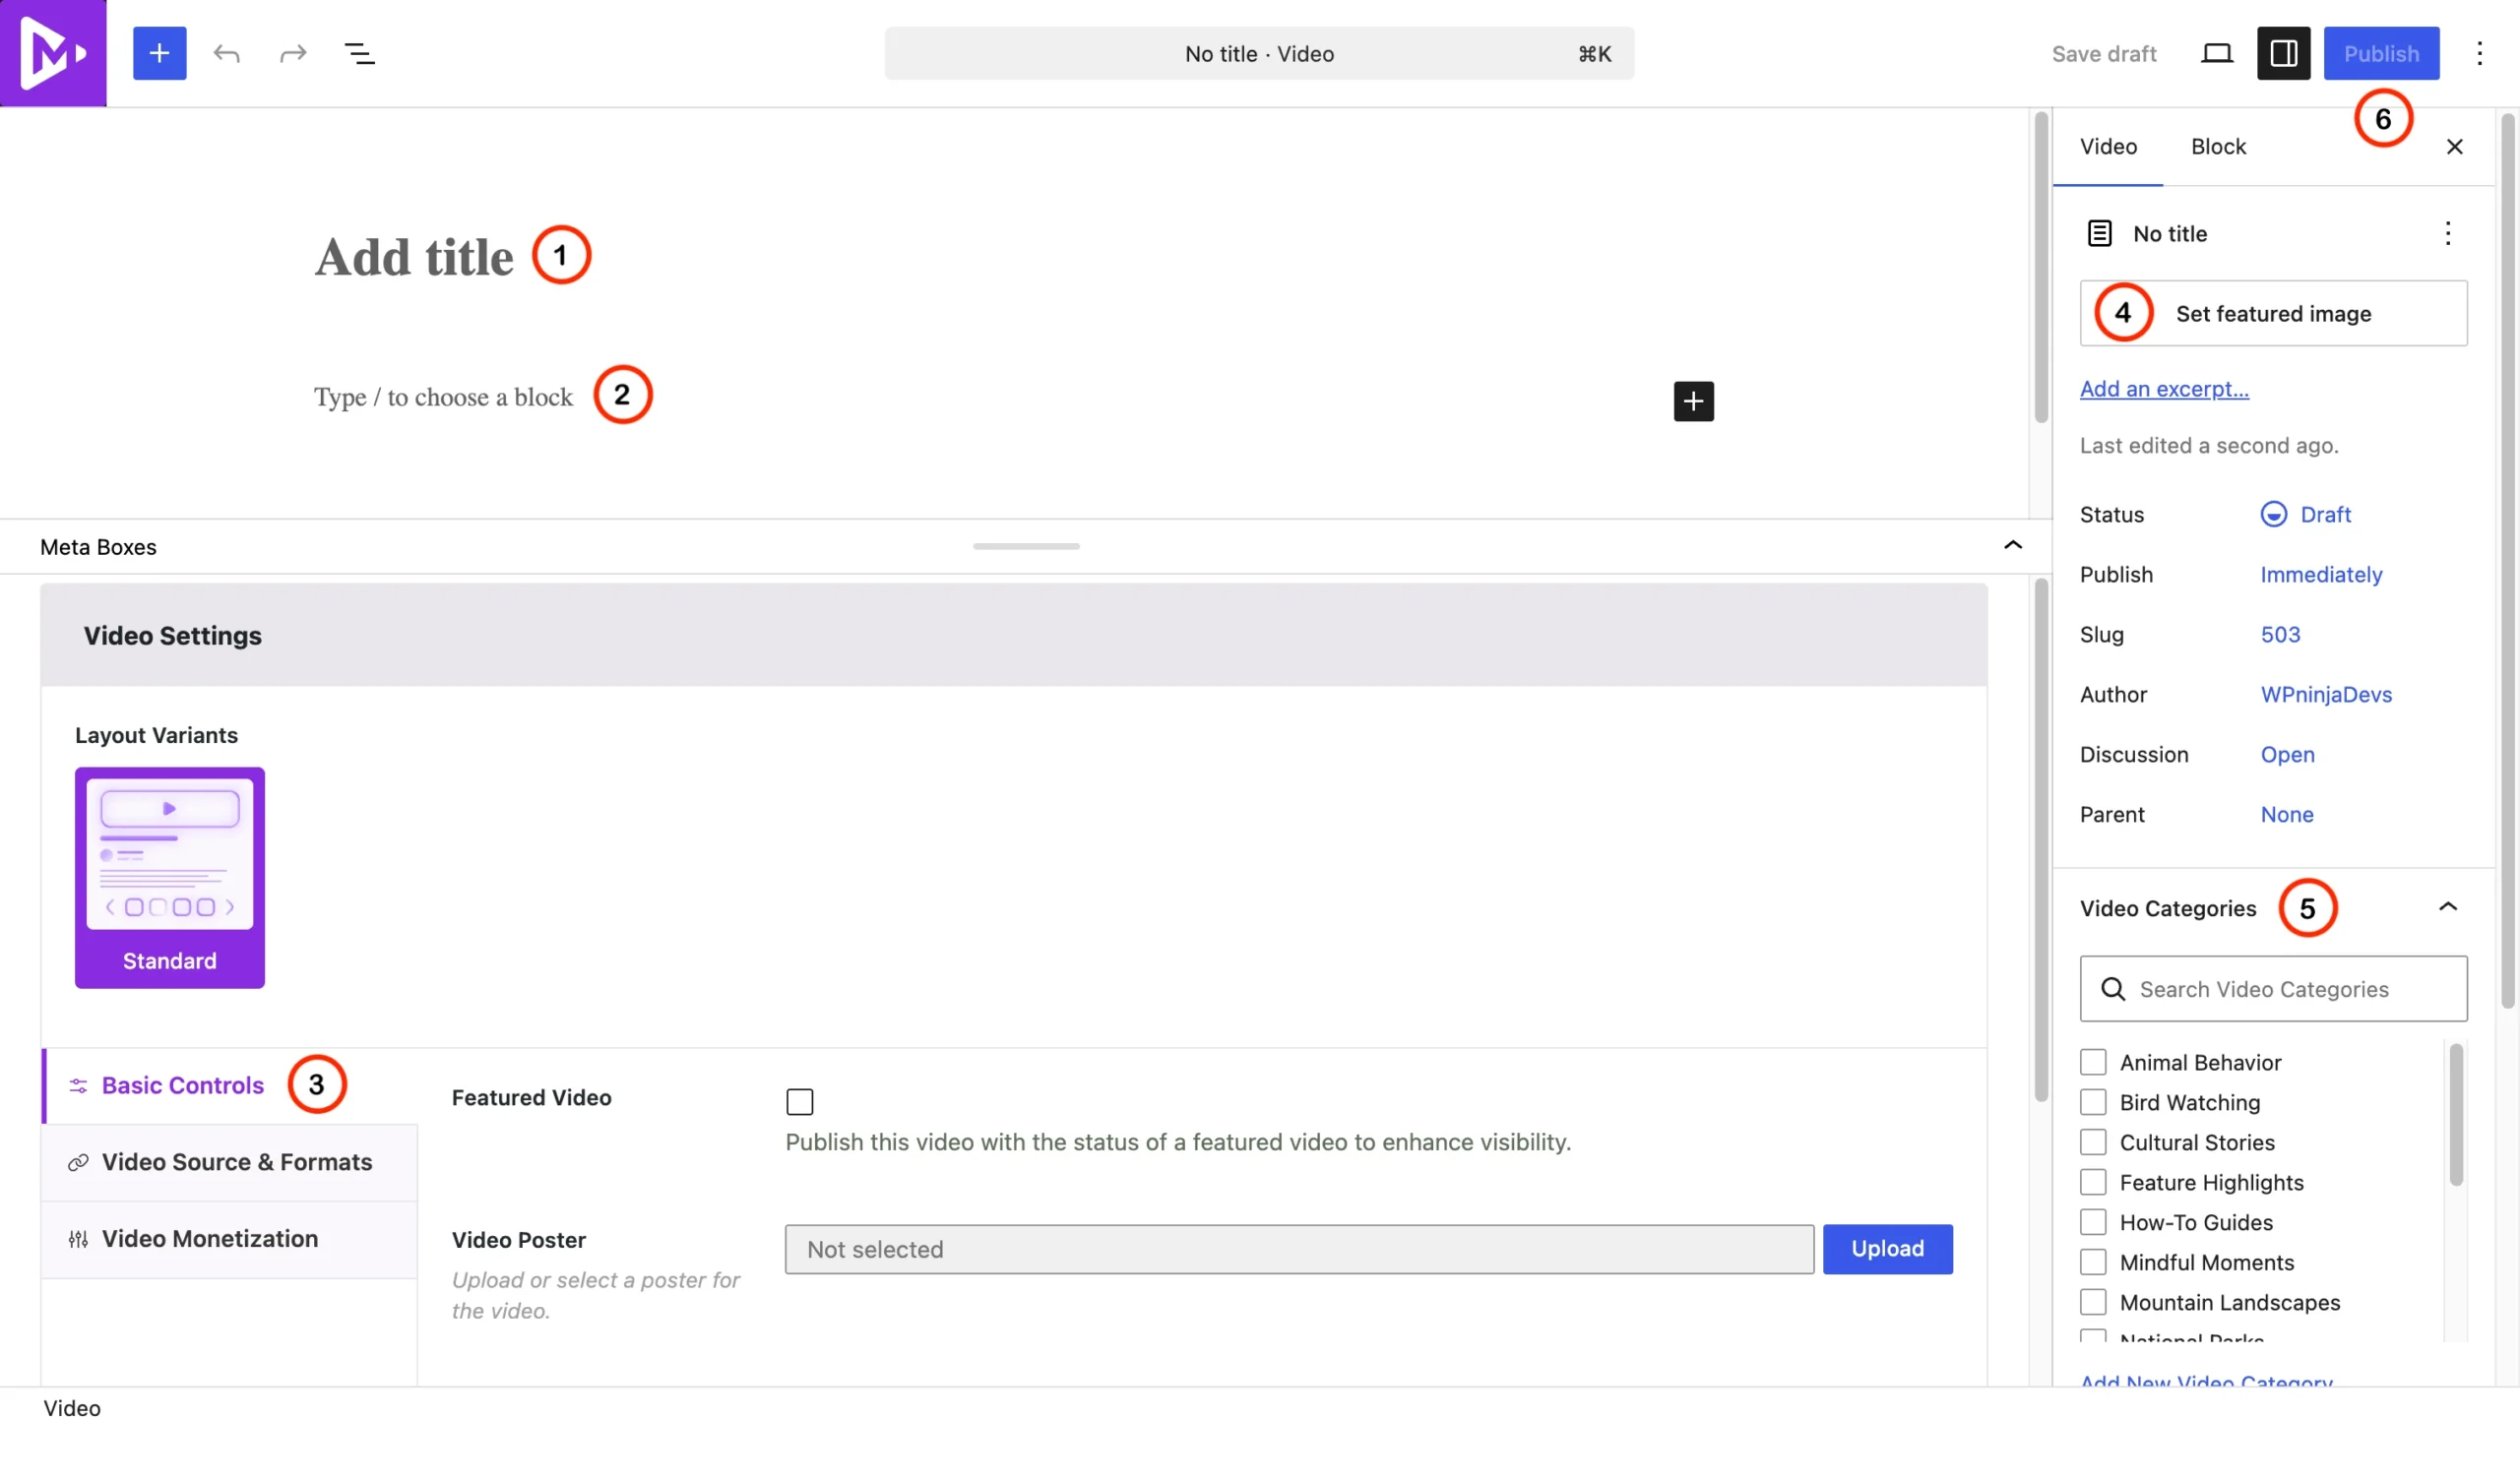
- Go to MediaHaven → Add New.
- Choose your video source: self-hosted upload, YouTube, Vimeo, TikTok, Twitch, Wistia, Dailymotion, Rumble, Facebook, Instagram, LinkedIn, or an HLS/M3U8 stream.
- Add a title, description, and thumbnail.
- Assign the video to a gallery (or create a new one).
- Publish.
Learn more Add Your First Video and Configure External Video Sources
Step 4 — Build a Gallery Shortcode
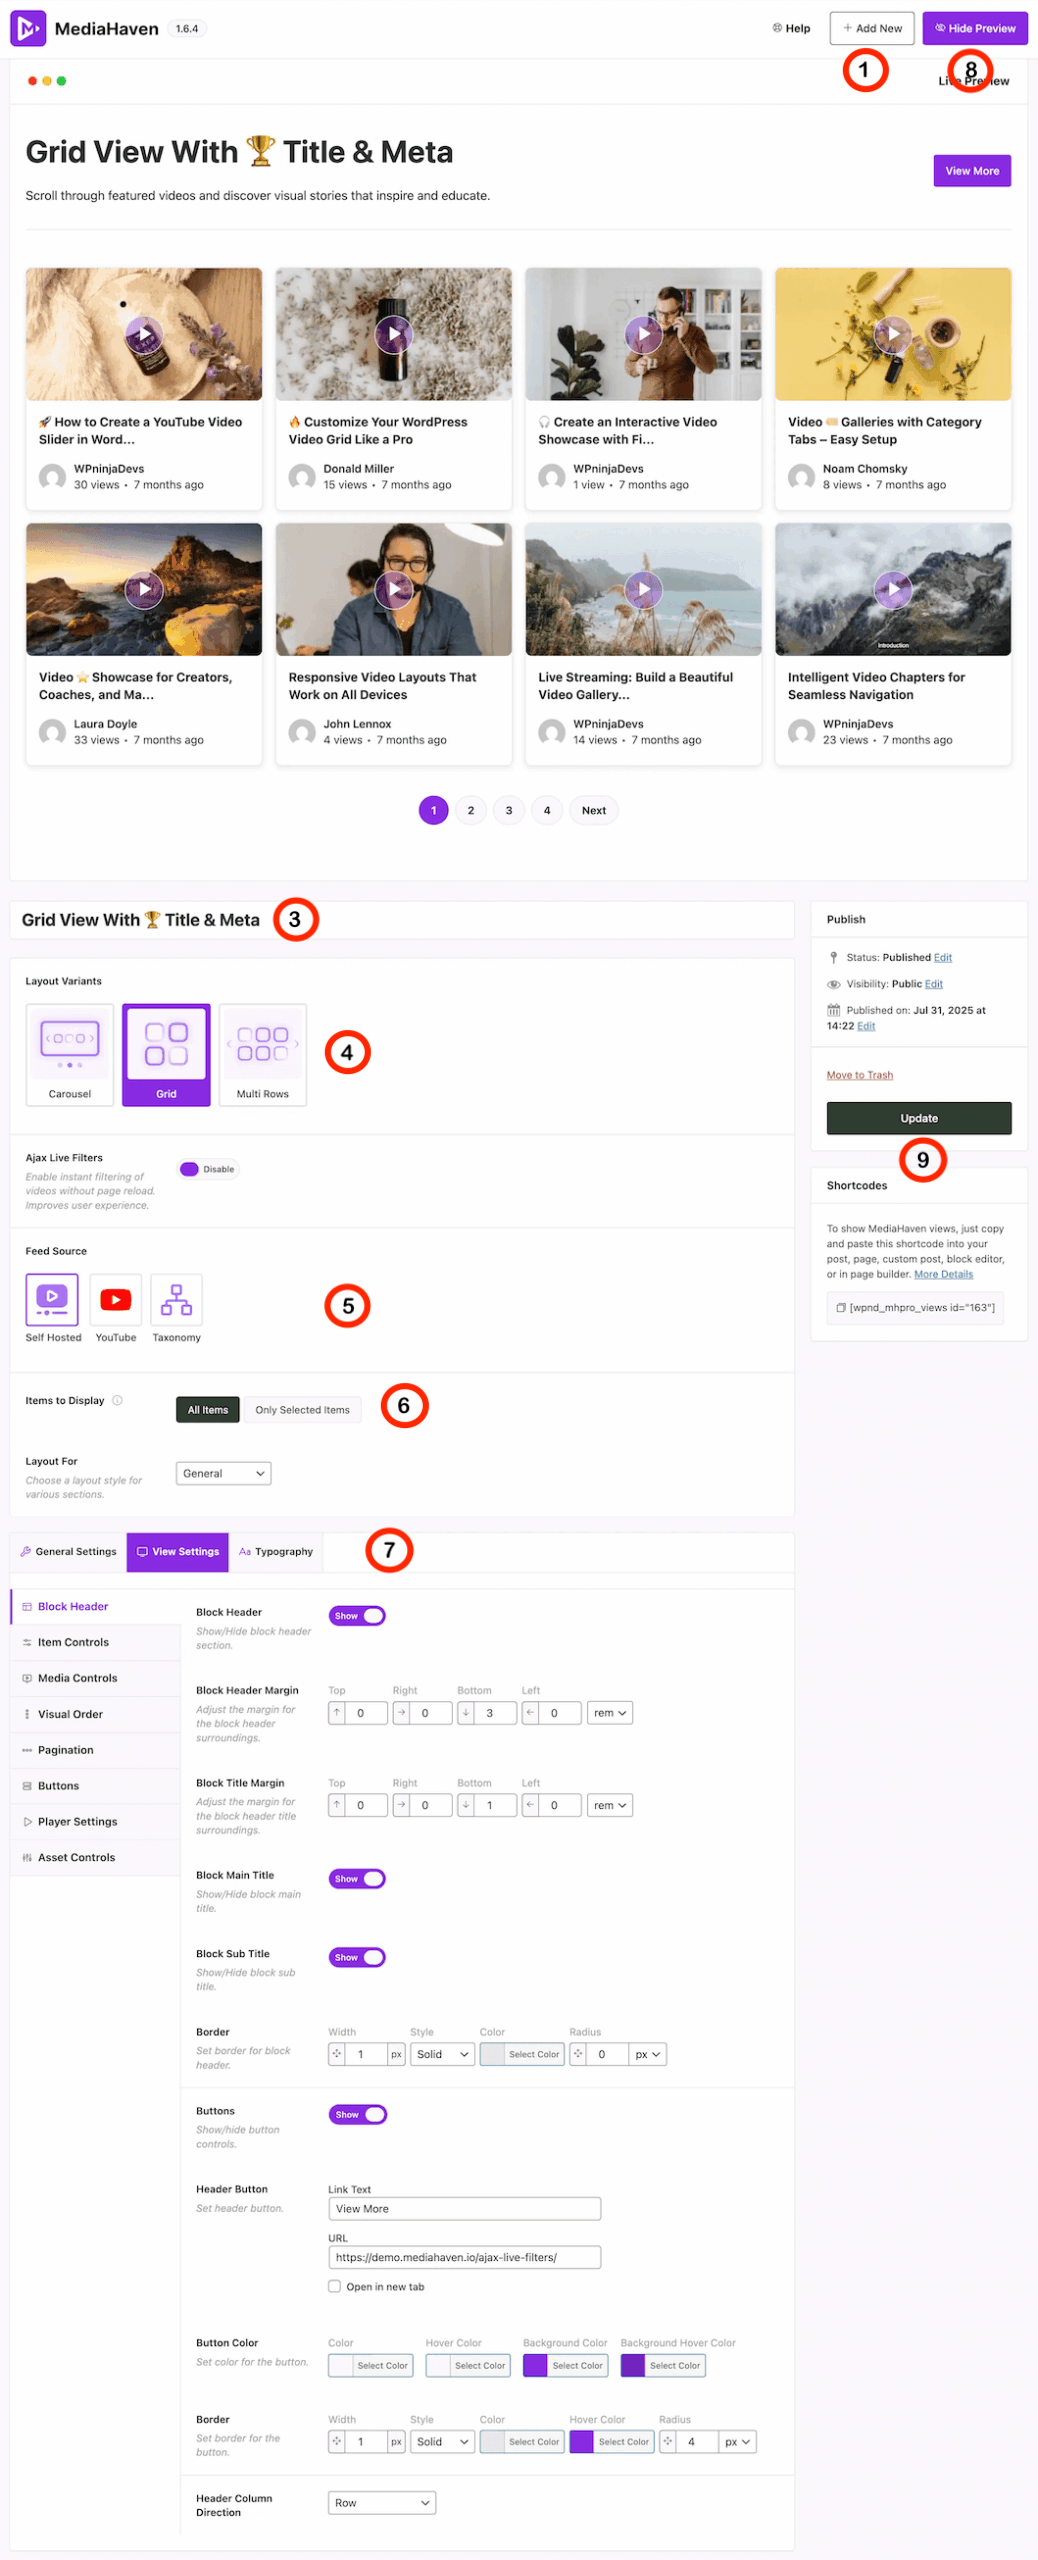
- Go to MediaHaven → Shortcode Builder.
- Choose a layout: Grid, Carousel, or Multi-row Carousel — all three are fully responsive.
- Copy the generated shortcode.
- Paste it into any page, post, or Gutenberg block. It also works inside Elementor, WPBakery, Divi, Beaver Builder, and Bricks Builder shortcode elements.
Learn more How to Create a Professional Video Gallery in WordPress with MediaHaven
Part 2: Attach Video to a WooCommerce Product
As of version 1.7.3, MediaHaven added native WooCommerce product video support in the free Lite version.
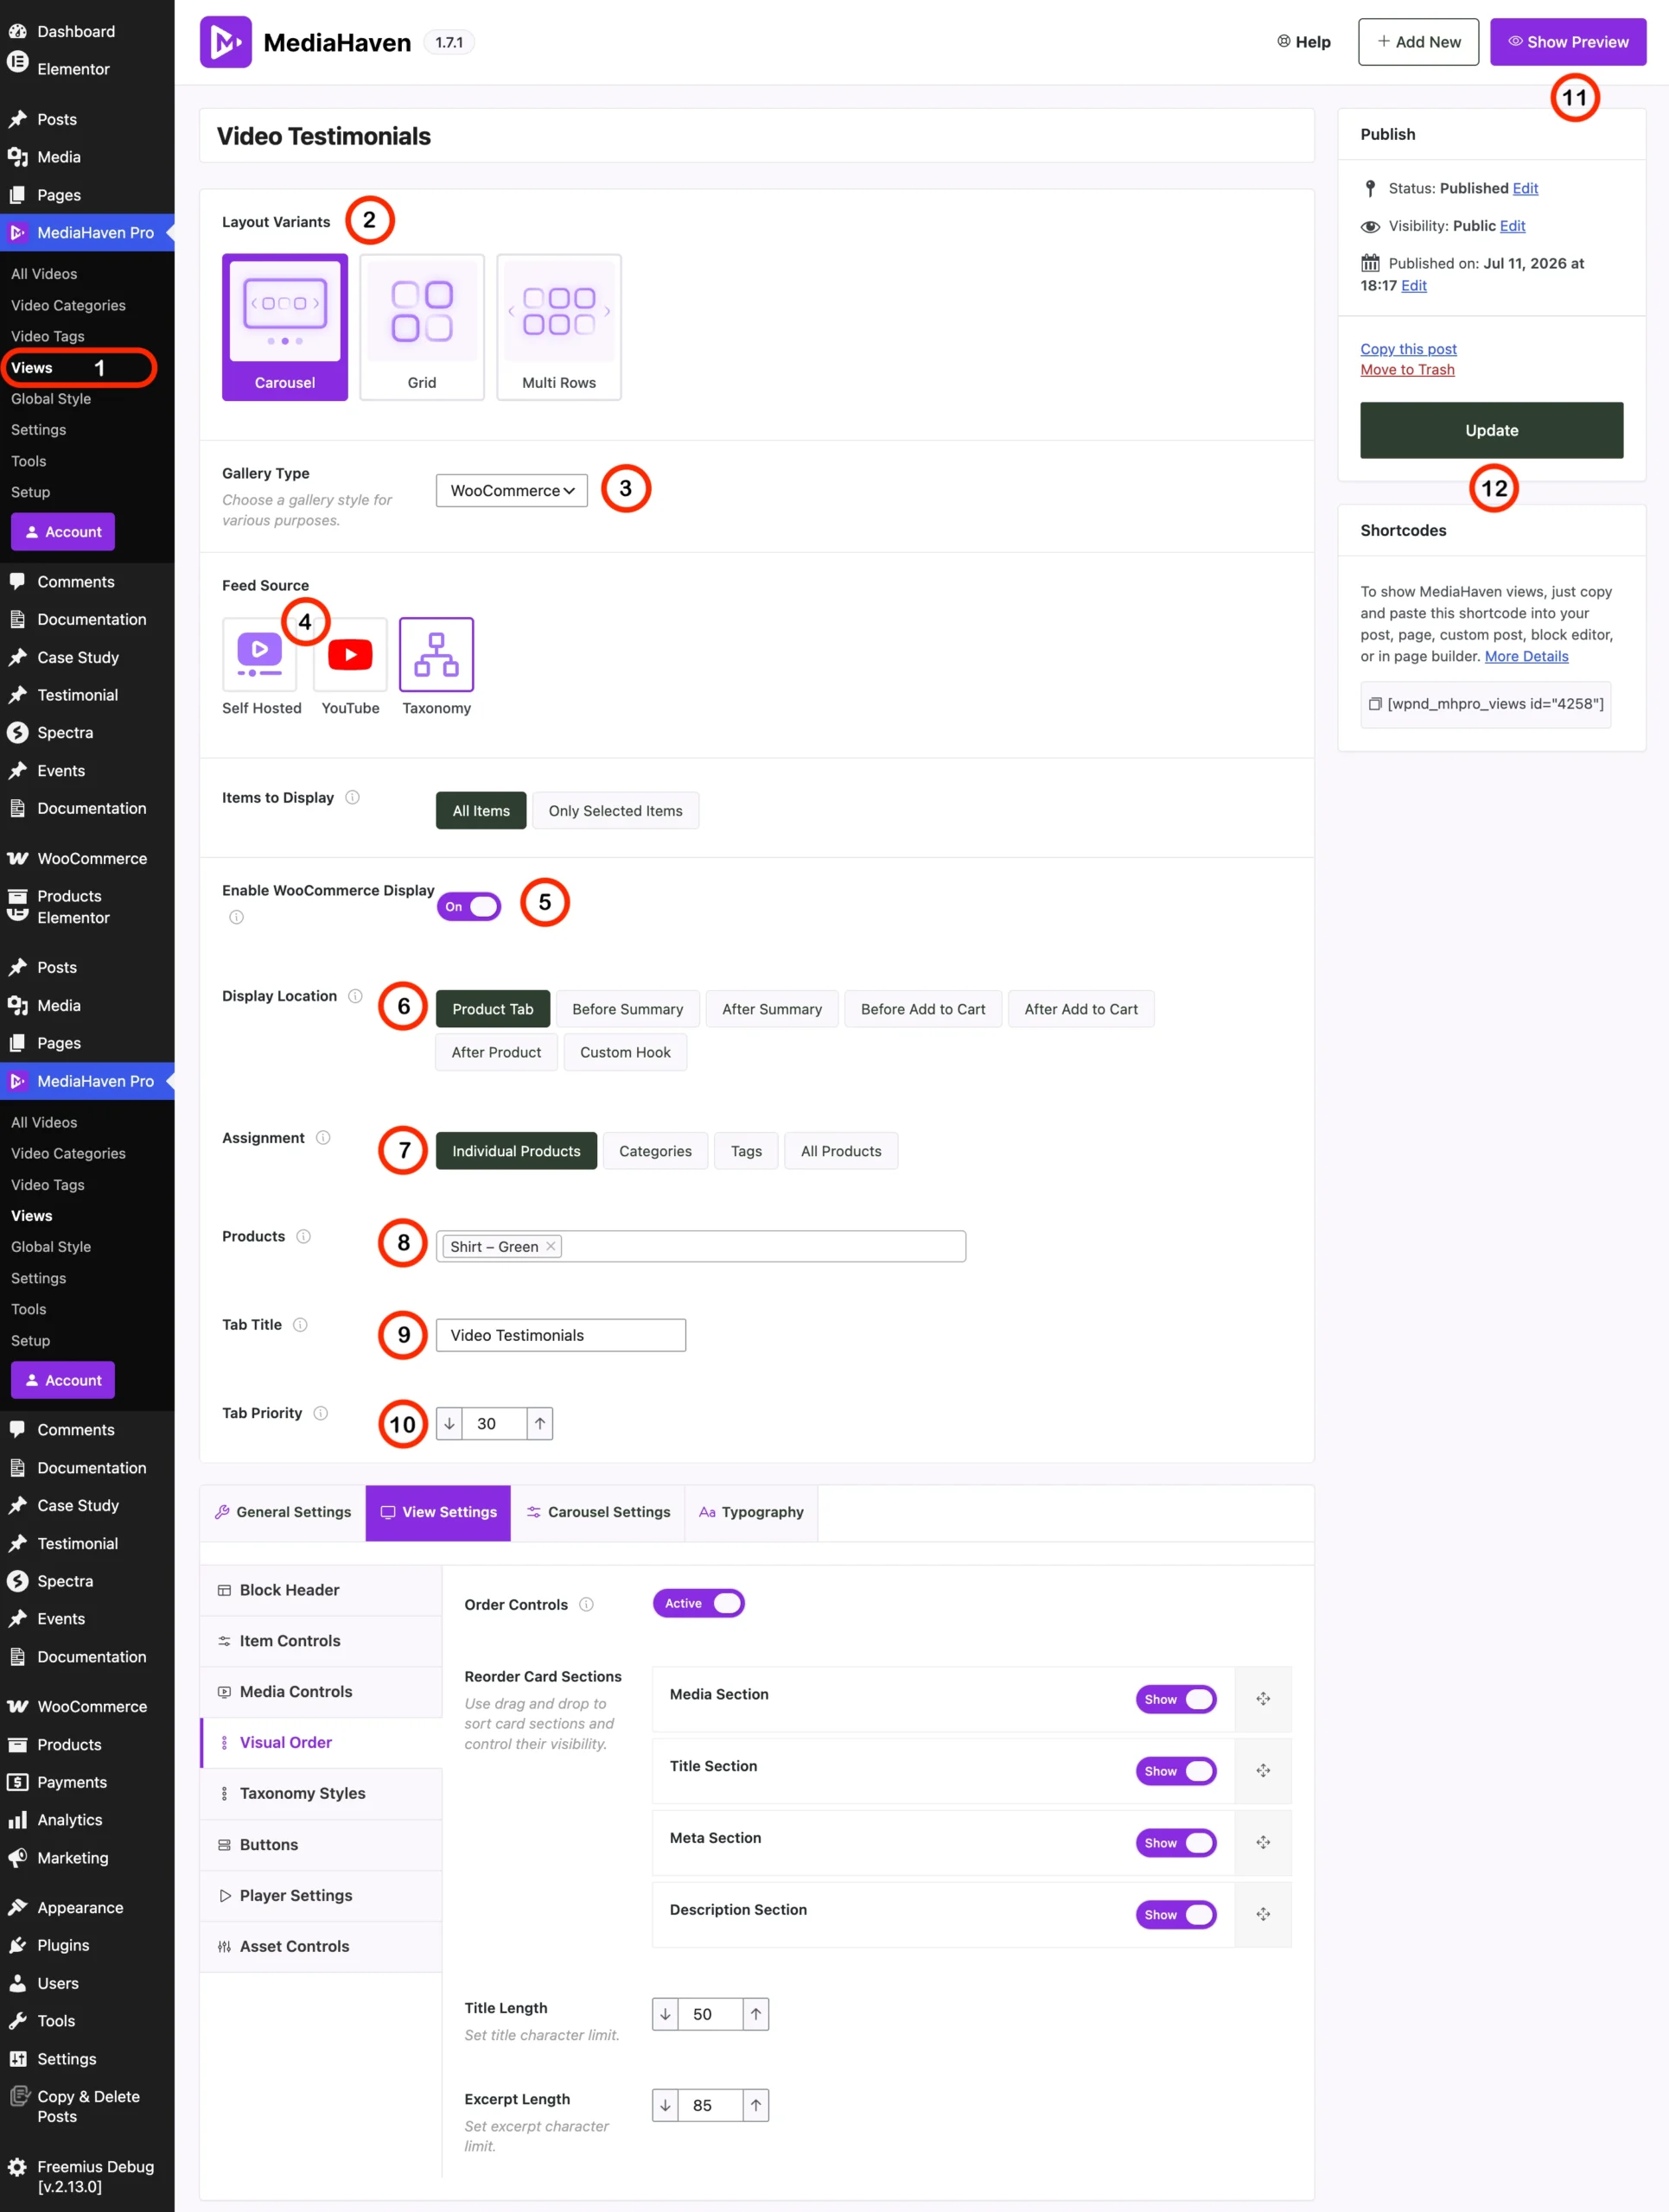
- Open the WooCommerce product editor for the product you want to add video to.
- Locate the MediaHaven product video field.
- Assign the gallery or specific video you created in Part 1.
- Choose the placement:
- Product Video Tab — a separate tab on the product page
- Before Summary — video displays above the price/Add to Cart area
- After Summary — video displays below it
- Update the product and preview the live page.
At this stage, you already have a working interactive product video experience: shoppers can watch, play/pause, go fullscreen, and use built-in keyboard shortcuts (space to play/pause, F for fullscreen, M to mute, arrow keys to seek and adjust volume).
Part 3: Deliver Video Fast With Bunny Stream CDN
Video is only as good as its playback speed. This step is free and takes about 10 minutes.
- Create a free account at bunny.net.
- Create a Stream Library inside your Bunny.net dashboard.
- Copy your API Key, Library ID, and CDN Hostname.
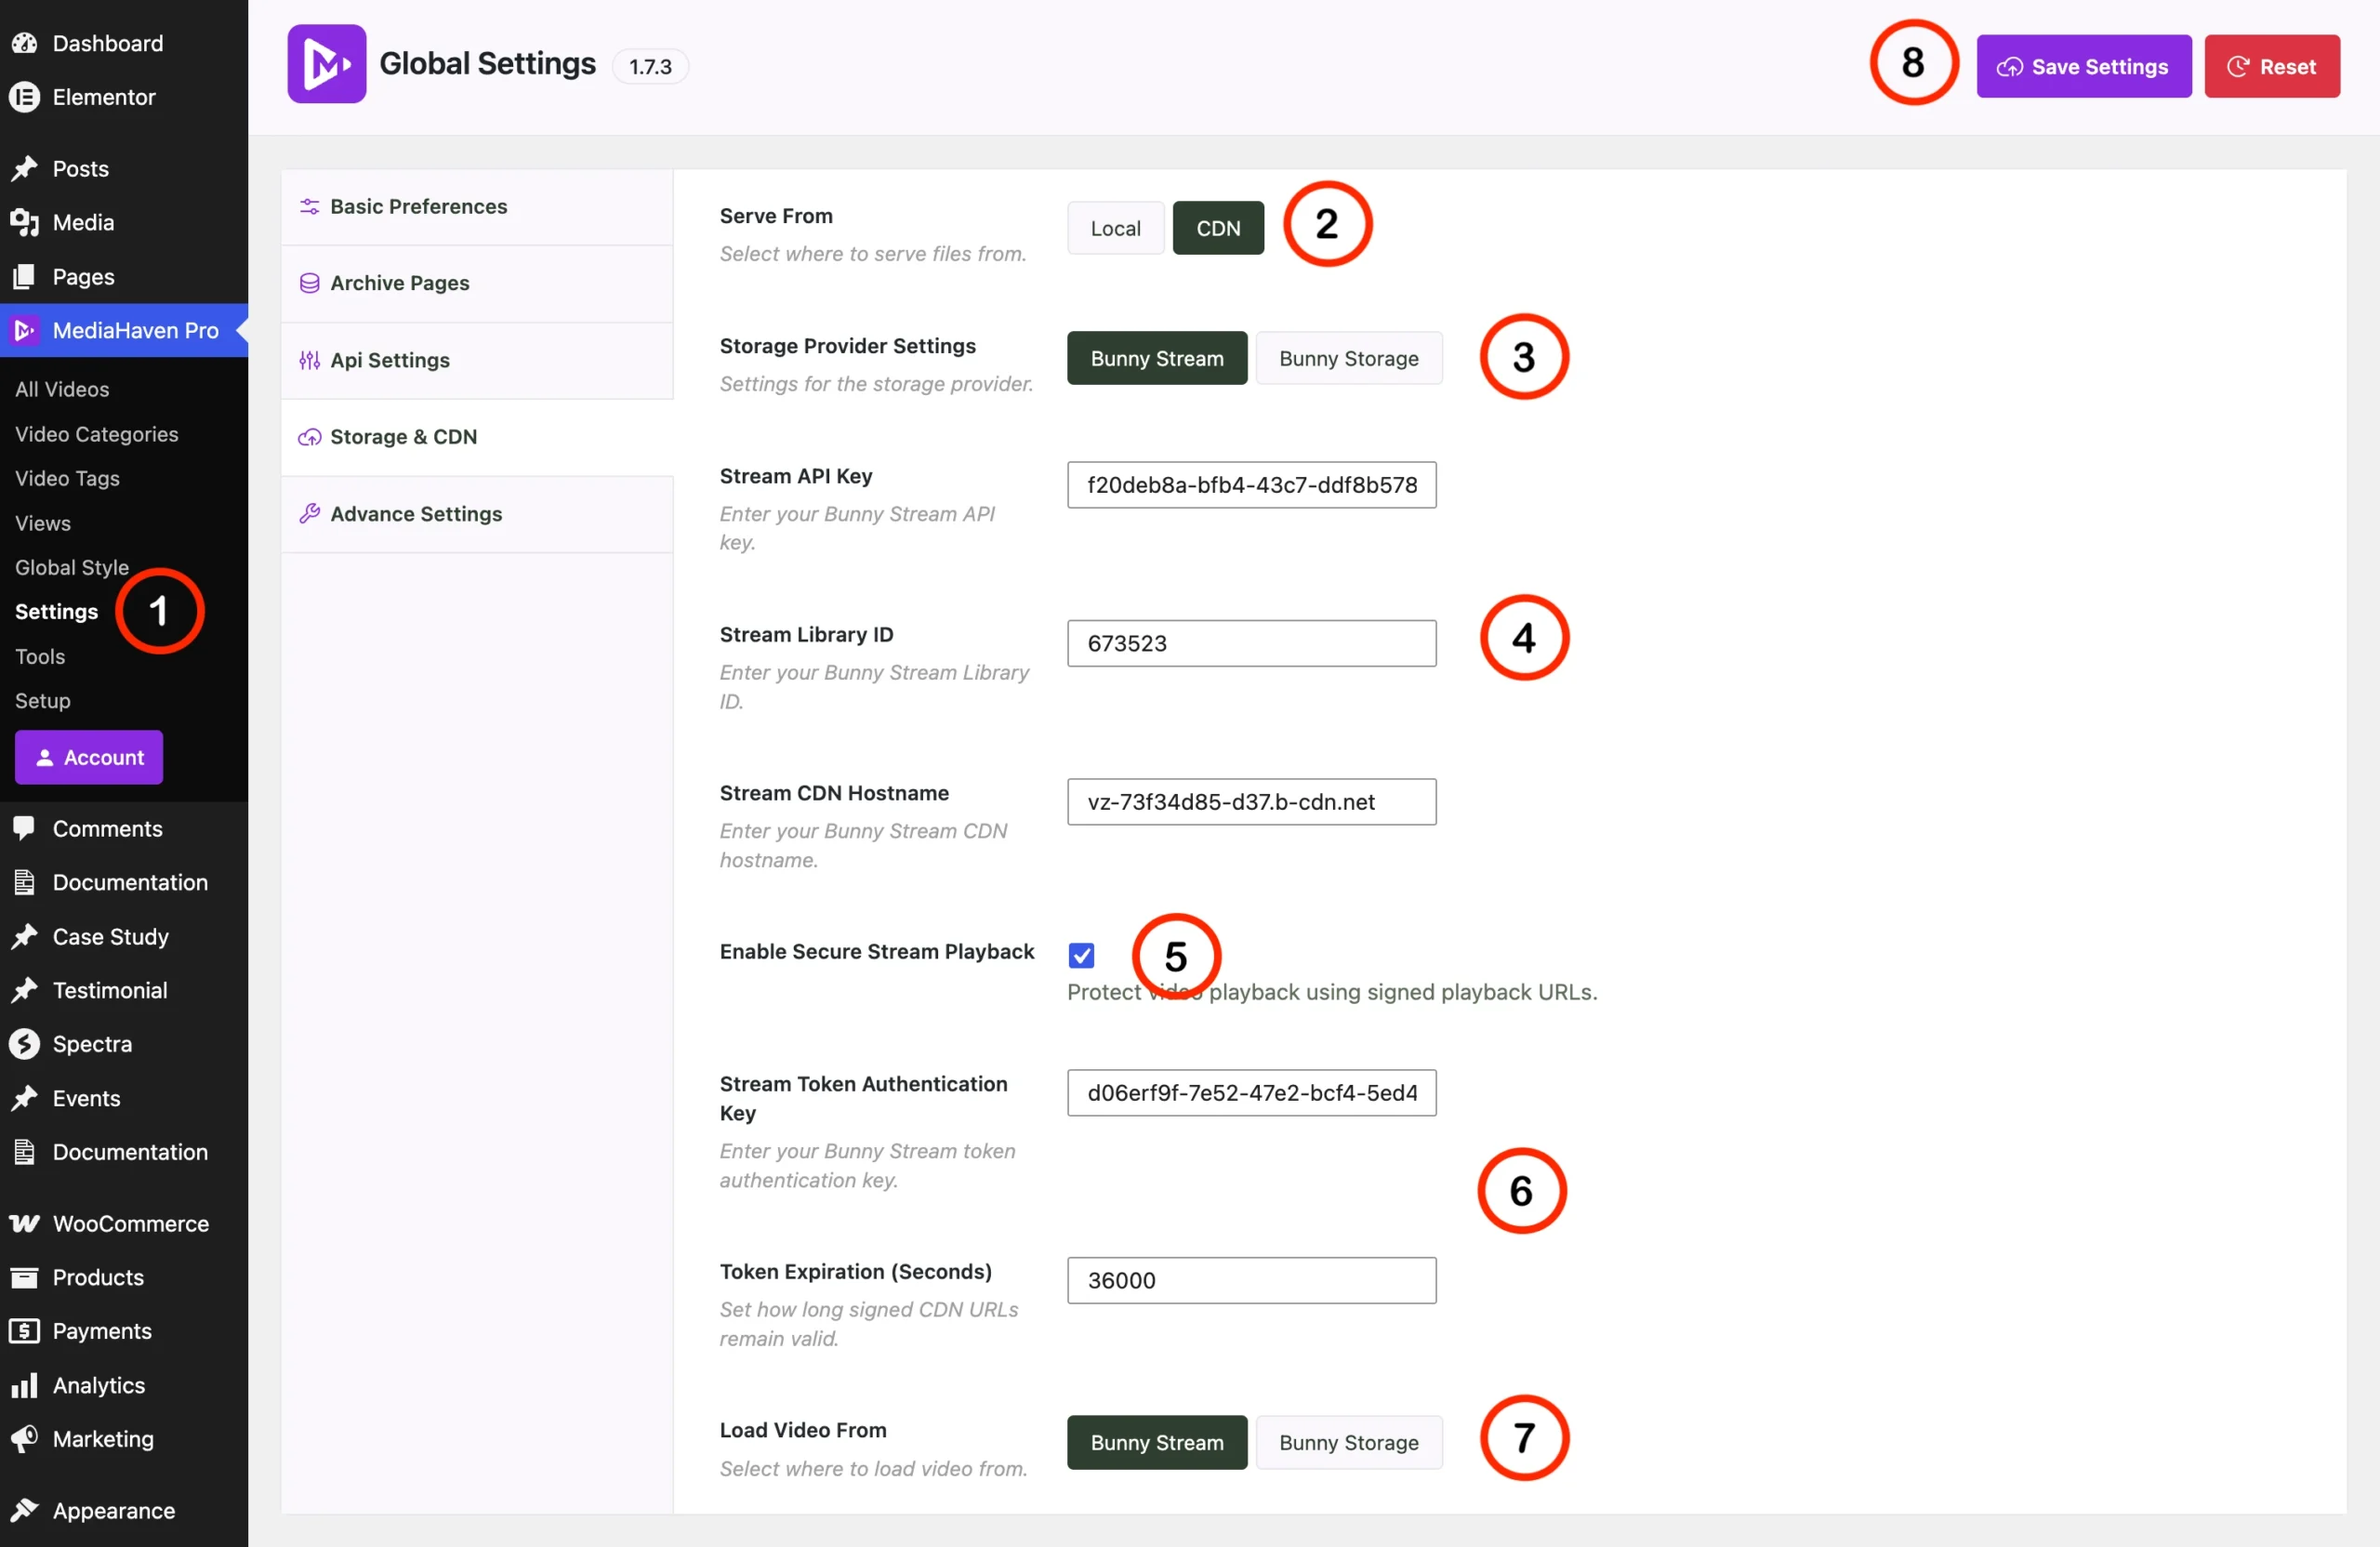
- In WordPress, go to MediaHaven → Settings → Storage & CDN.
- Under Serve From, select CDN.
- Under Storage Provider, select Bunny Stream.
- Paste in your API Key, Library ID, and CDN Hostname.
- Enable Secure Stream Playback (this activates signed URLs and token authentication).
- Save settings.
- Upload a test video and click Sync to push it to Bunny Stream.
Once synced, that video is automatically converted to secure, adaptive HLS format, delivered through Bunny’s global CDN, with zero load on your own server. Playback quality adjusts automatically to the viewer’s connection speed, so mobile shoppers on a weak signal still get smooth playback instead of a spinning loader.
Part 4: Turn It Into a Shoppable, Interactive Product Video (Pro)
This is where the video stops being passive and becomes interactive commerce. This step requires MediaHaven Pro.
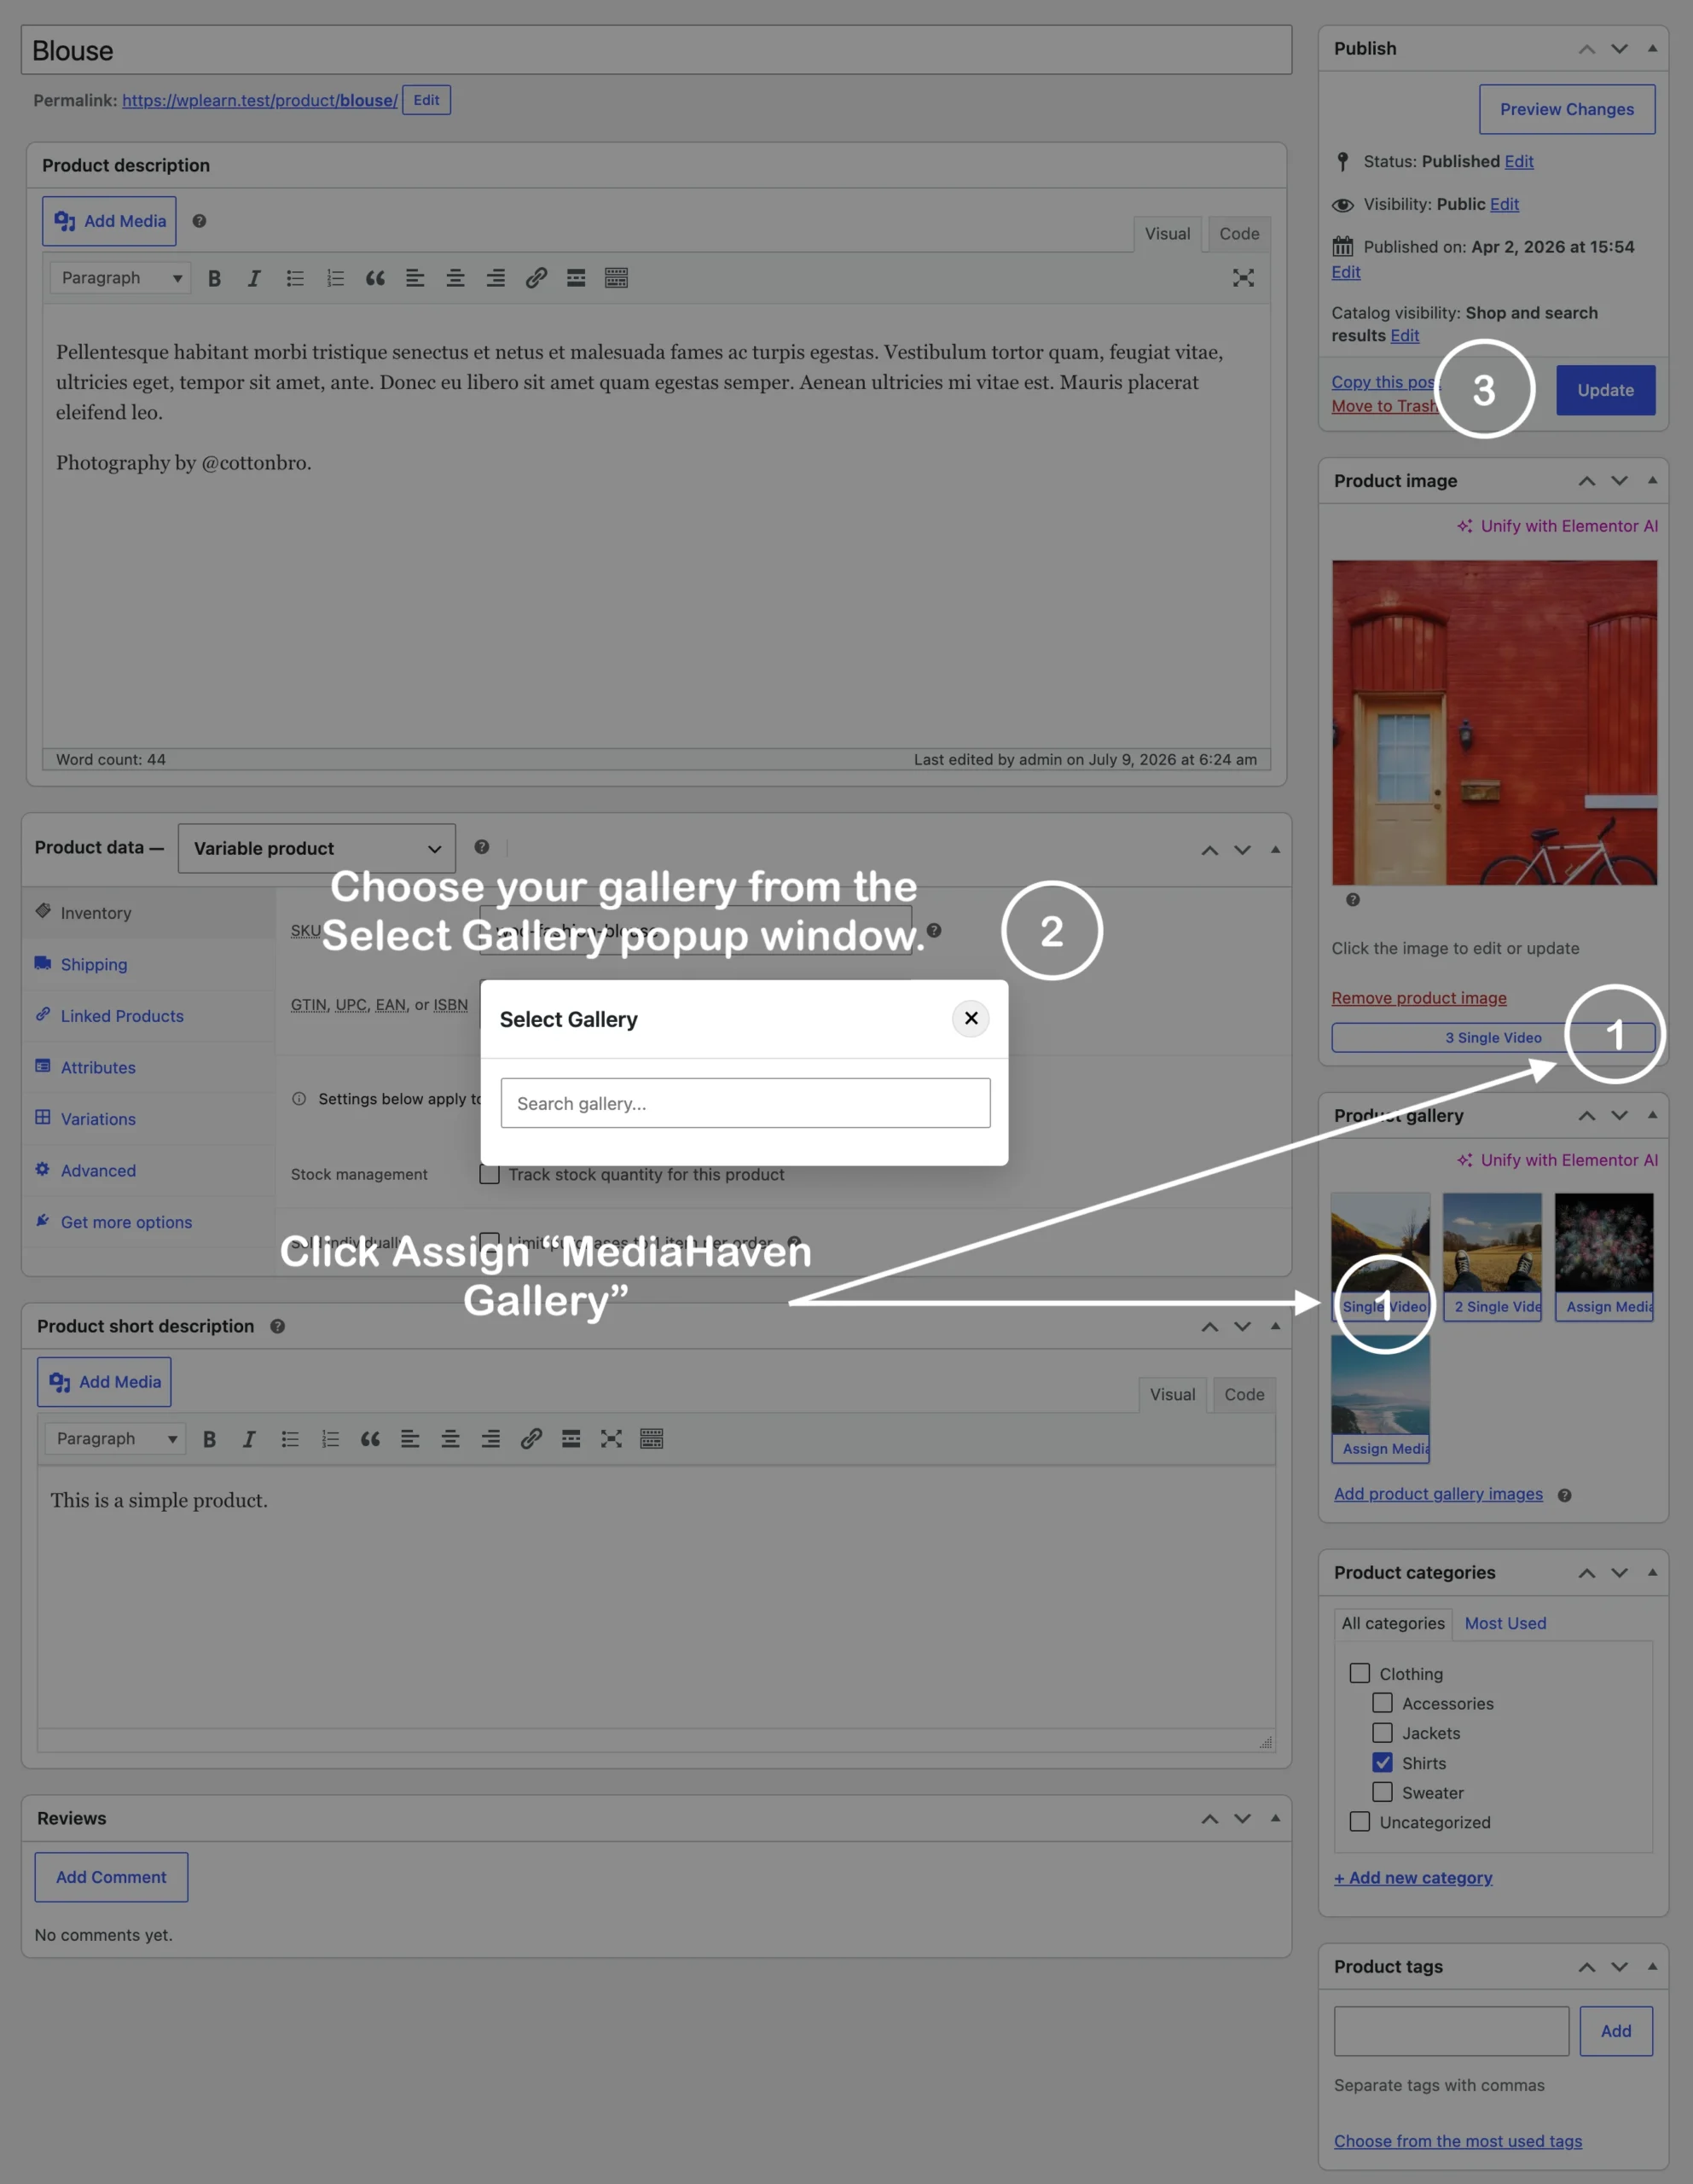
Step 1 — Replace or Supplement the Product Gallery
In the product editor, choose whether the video replaces the default WooCommerce gallery images or displays alongside them.
Step 2 — Add the Shoppable Overlay
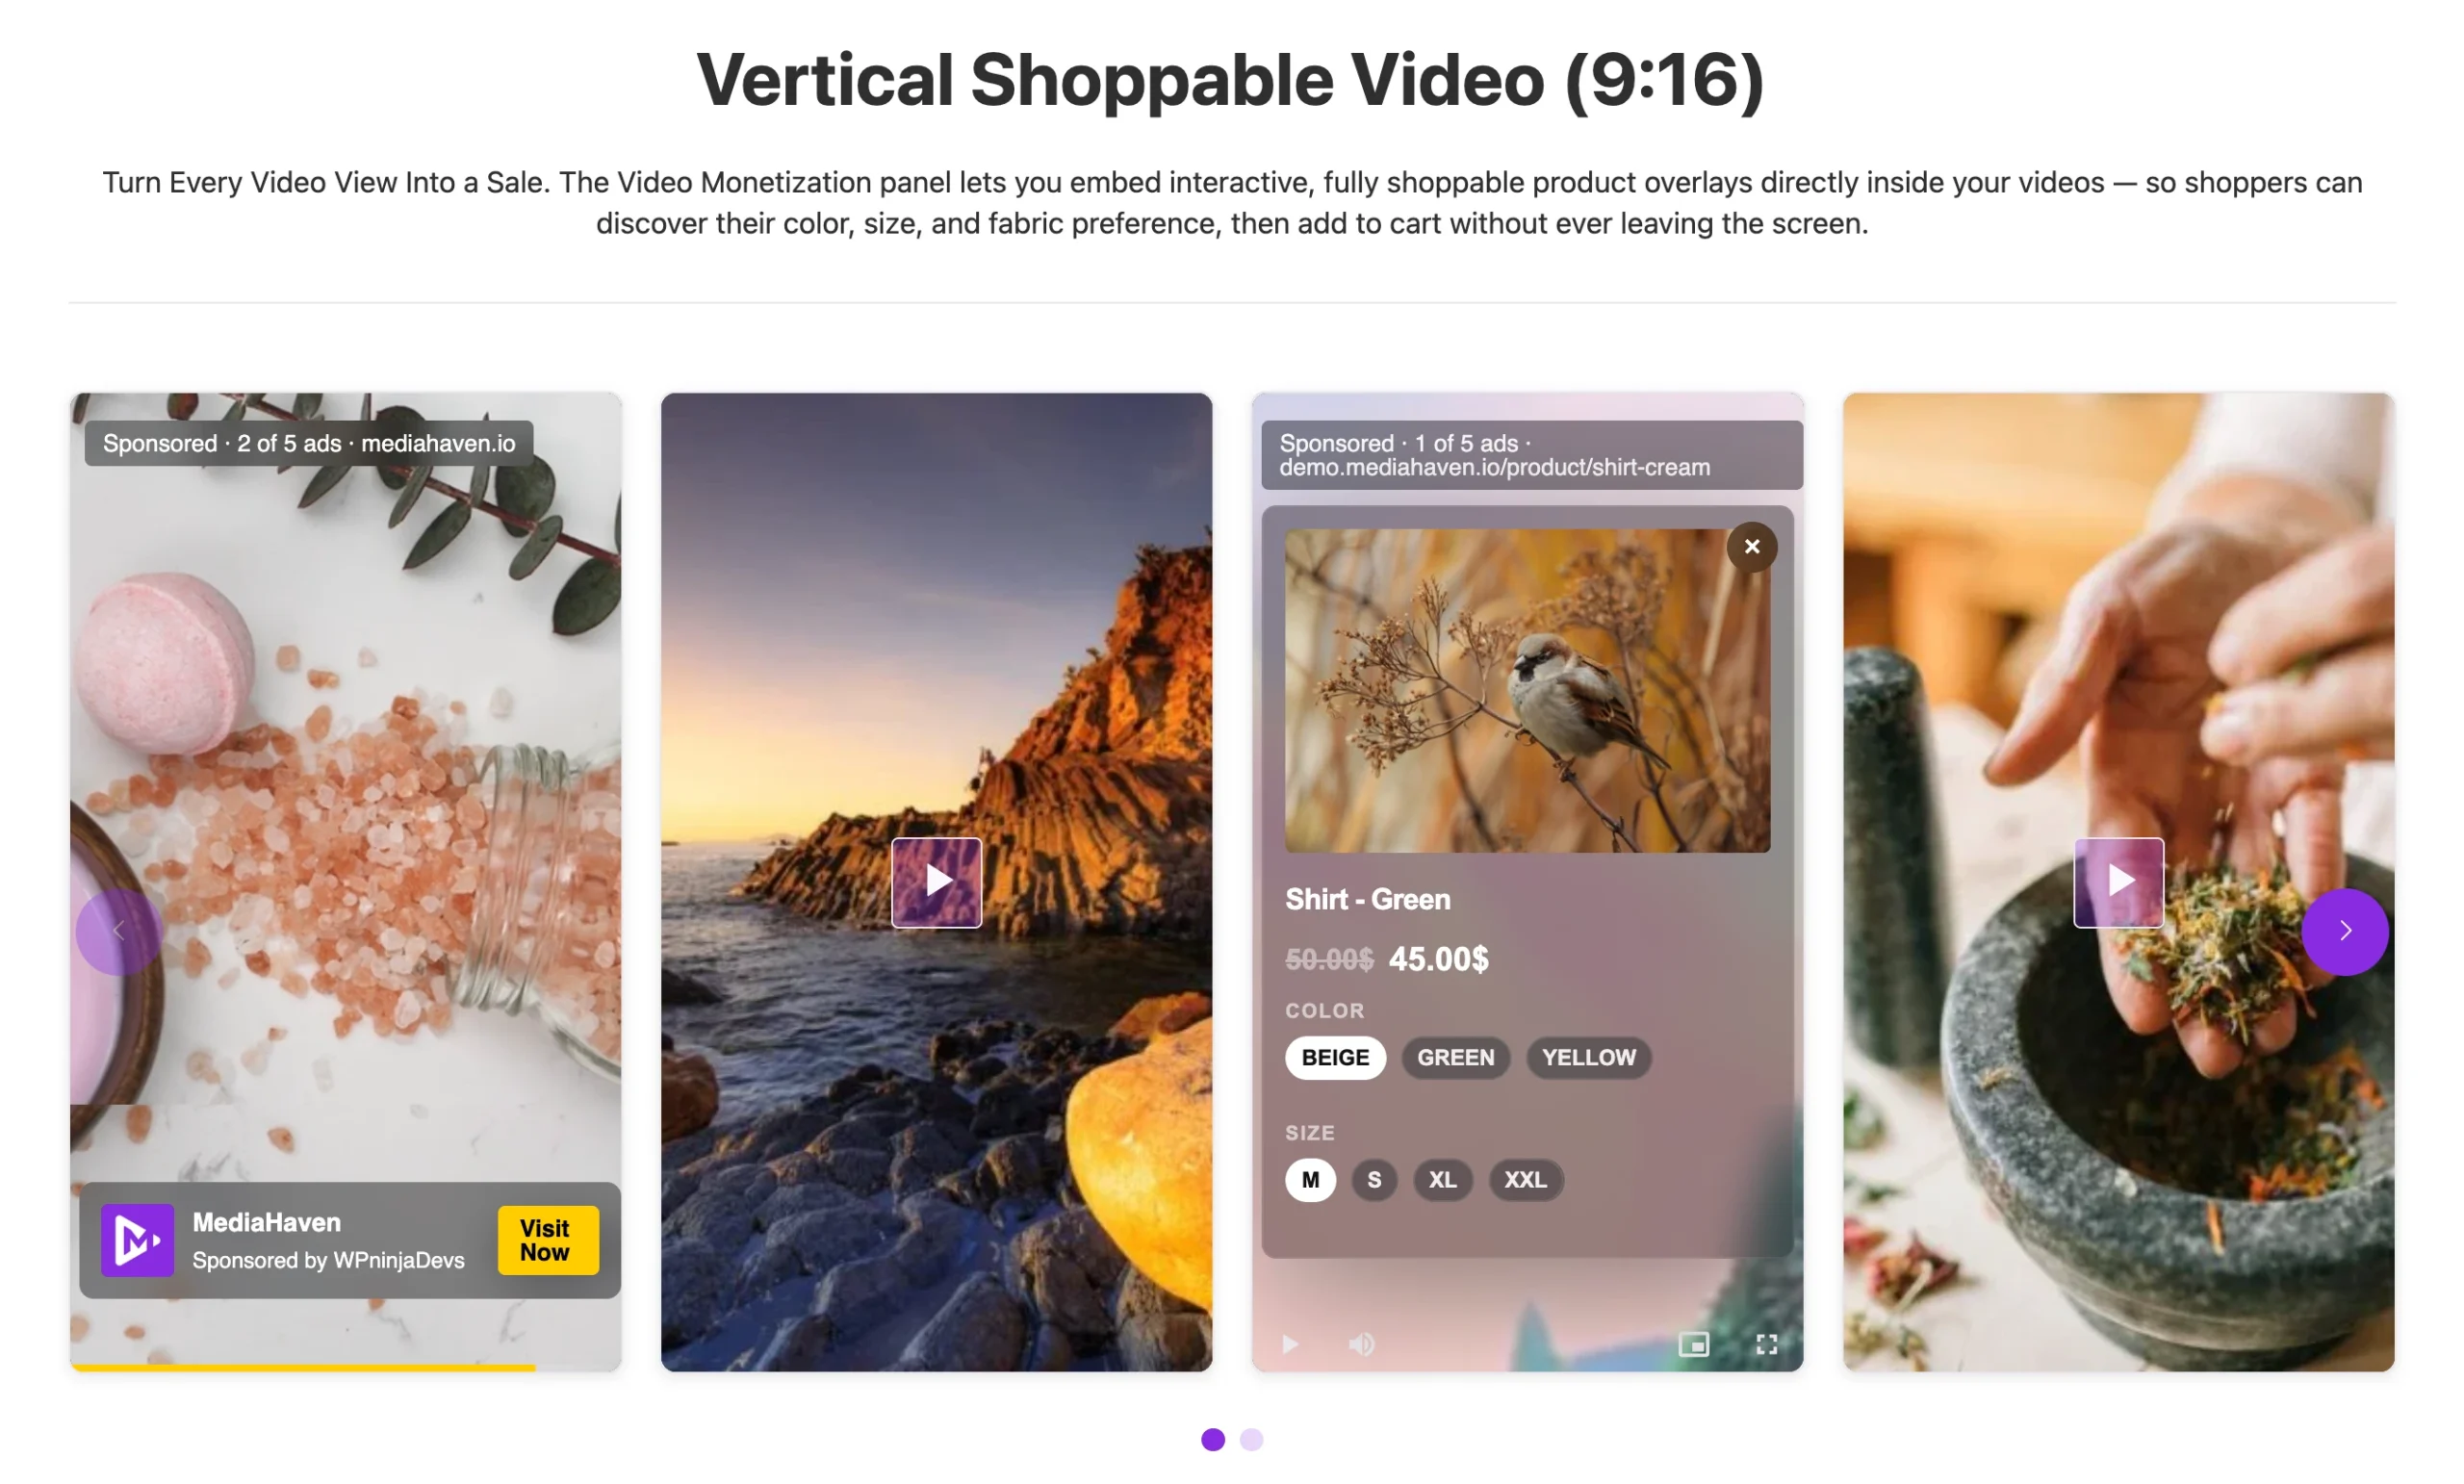
With Pro active, open the video’s shoppable settings and add:
- Clickable product cards — link to the current product, a variation, or a related product
- Live pricing that pulls from your actual WooCommerce product data
- Variation and quantity selectors inside the player
- Coupon code / promotional banners timed to appear at a specific point in the video
- Add to Cart button that fires without leaving the video
Step 3 — Time the Overlays
Set the exact second each element appears and disappears. A common pattern:
- 0:05 — product card with the current variation
- 0:15 — promotional banner with a discount code
- 0:30 — Add to Cart button, pre-filled with the size/color being shown
Step 4 — Scale Across Your Catalog
Instead of configuring every product individually, use automatic assignment by category, tag, or storewide so new products in a category automatically inherit the shoppable video setup.
Step 5 — Extend to FluentCart or SureCart
If your store uses FluentCart or SureCart instead of (or alongside) WooCommerce, the same shoppable overlay system applies there too.
Important: Shoppable overlays and VAST ads work with self-hosted video, HLS, and Bunny Stream content. YouTube, TikTok, Vimeo, and other embedded videos display fine in your galleries, but the interactive shopping layer doesn’t apply to them, since those platforms run their own player.
Part 5: Make Longer Videos Easier to Navigate (Pro)
For demo videos, tutorials, or comparison videos longer than a minute or two:
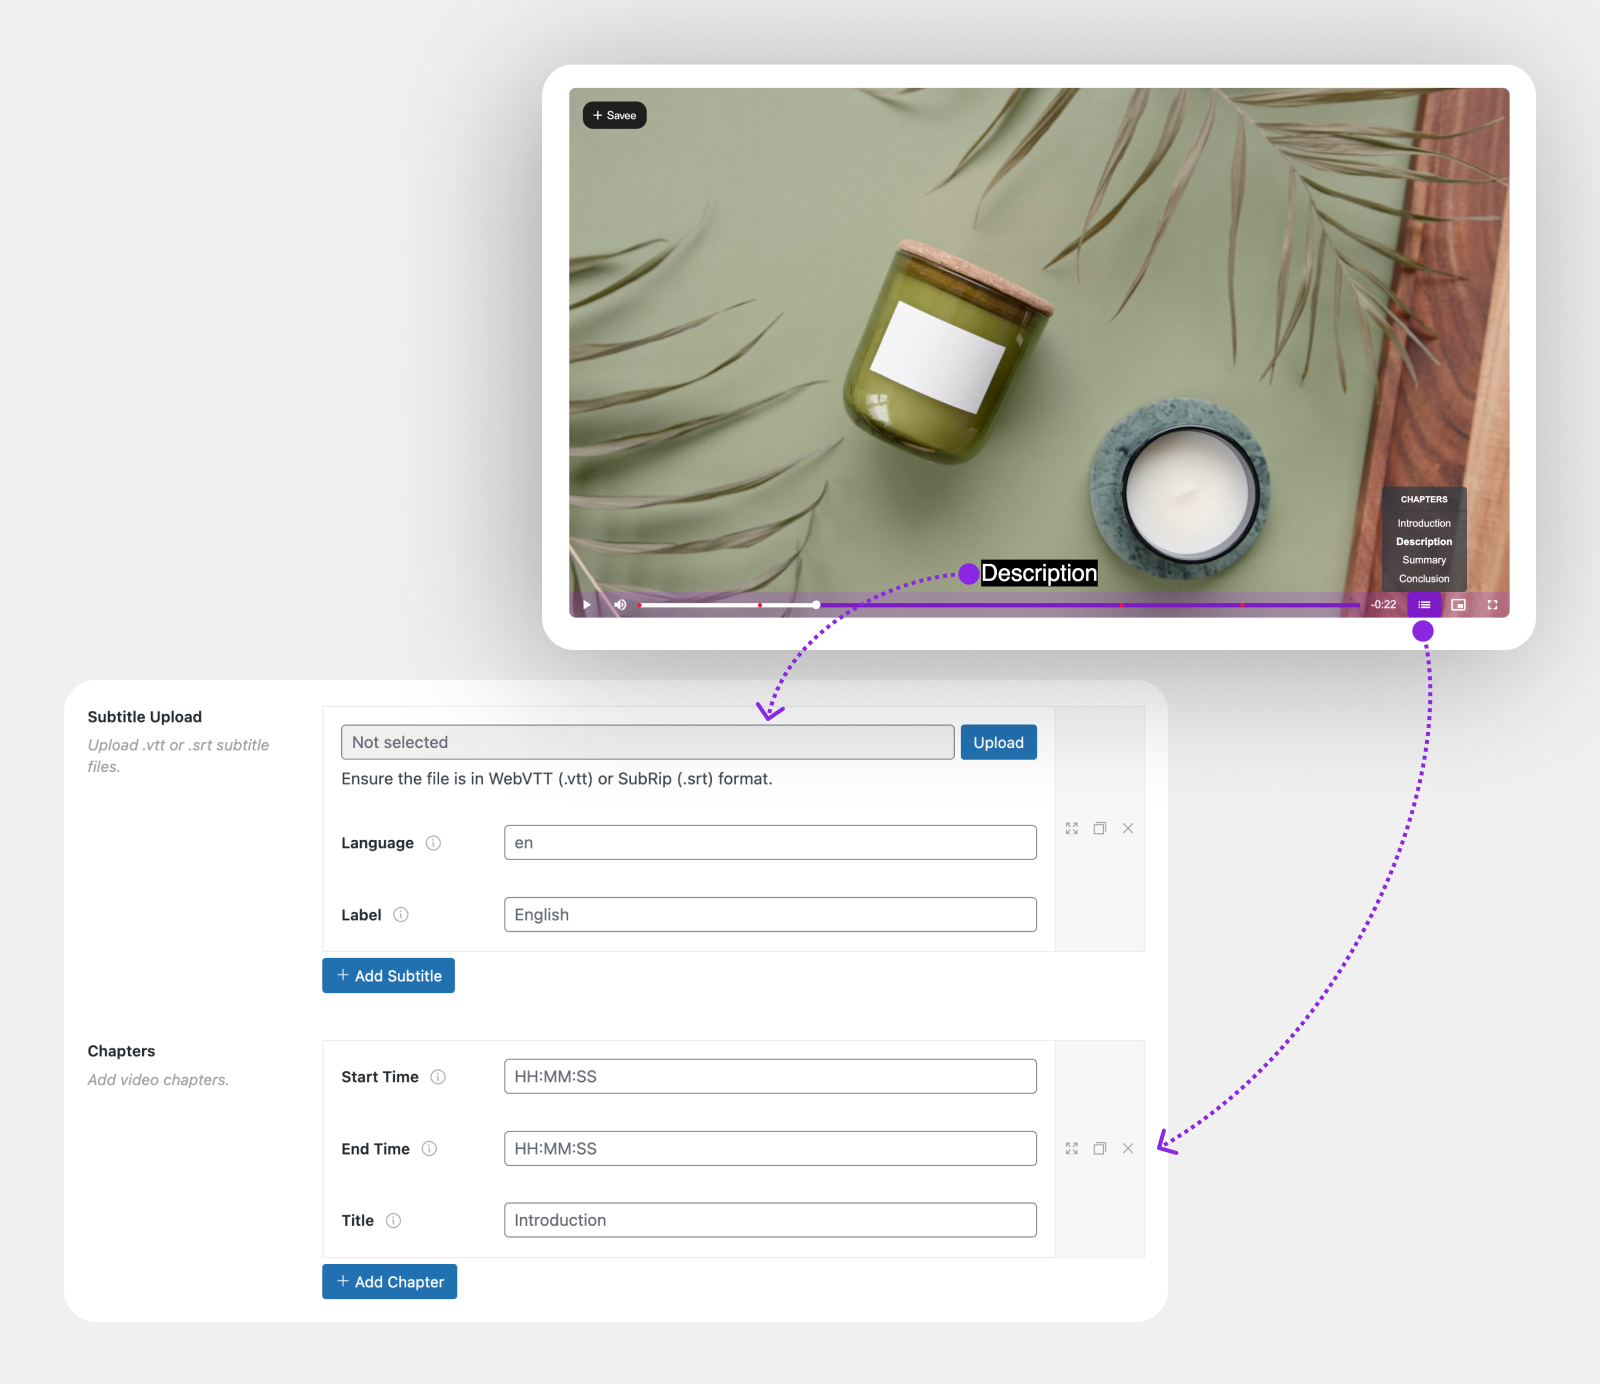
- Interactive Video Chapters (Pro) — add clickable, structured chapter markers so viewers can jump straight to the section they care about (e.g., “Sizing,” “Materials,” “Care Instructions”).
- Dynamic Subtitles (Pro) — add precisely timed, multi-language subtitles. This helps accessibility, reaches international shoppers, and gets indexed by search engines since subtitle text is crawlable.
The free version includes basic single-language subtitle support; multi-language and precise timing controls are part of Pro.
Part 6: Help Shoppers Find the Right Video (Pro)
Once you have more than a handful of product videos, discoverability becomes the bottleneck.
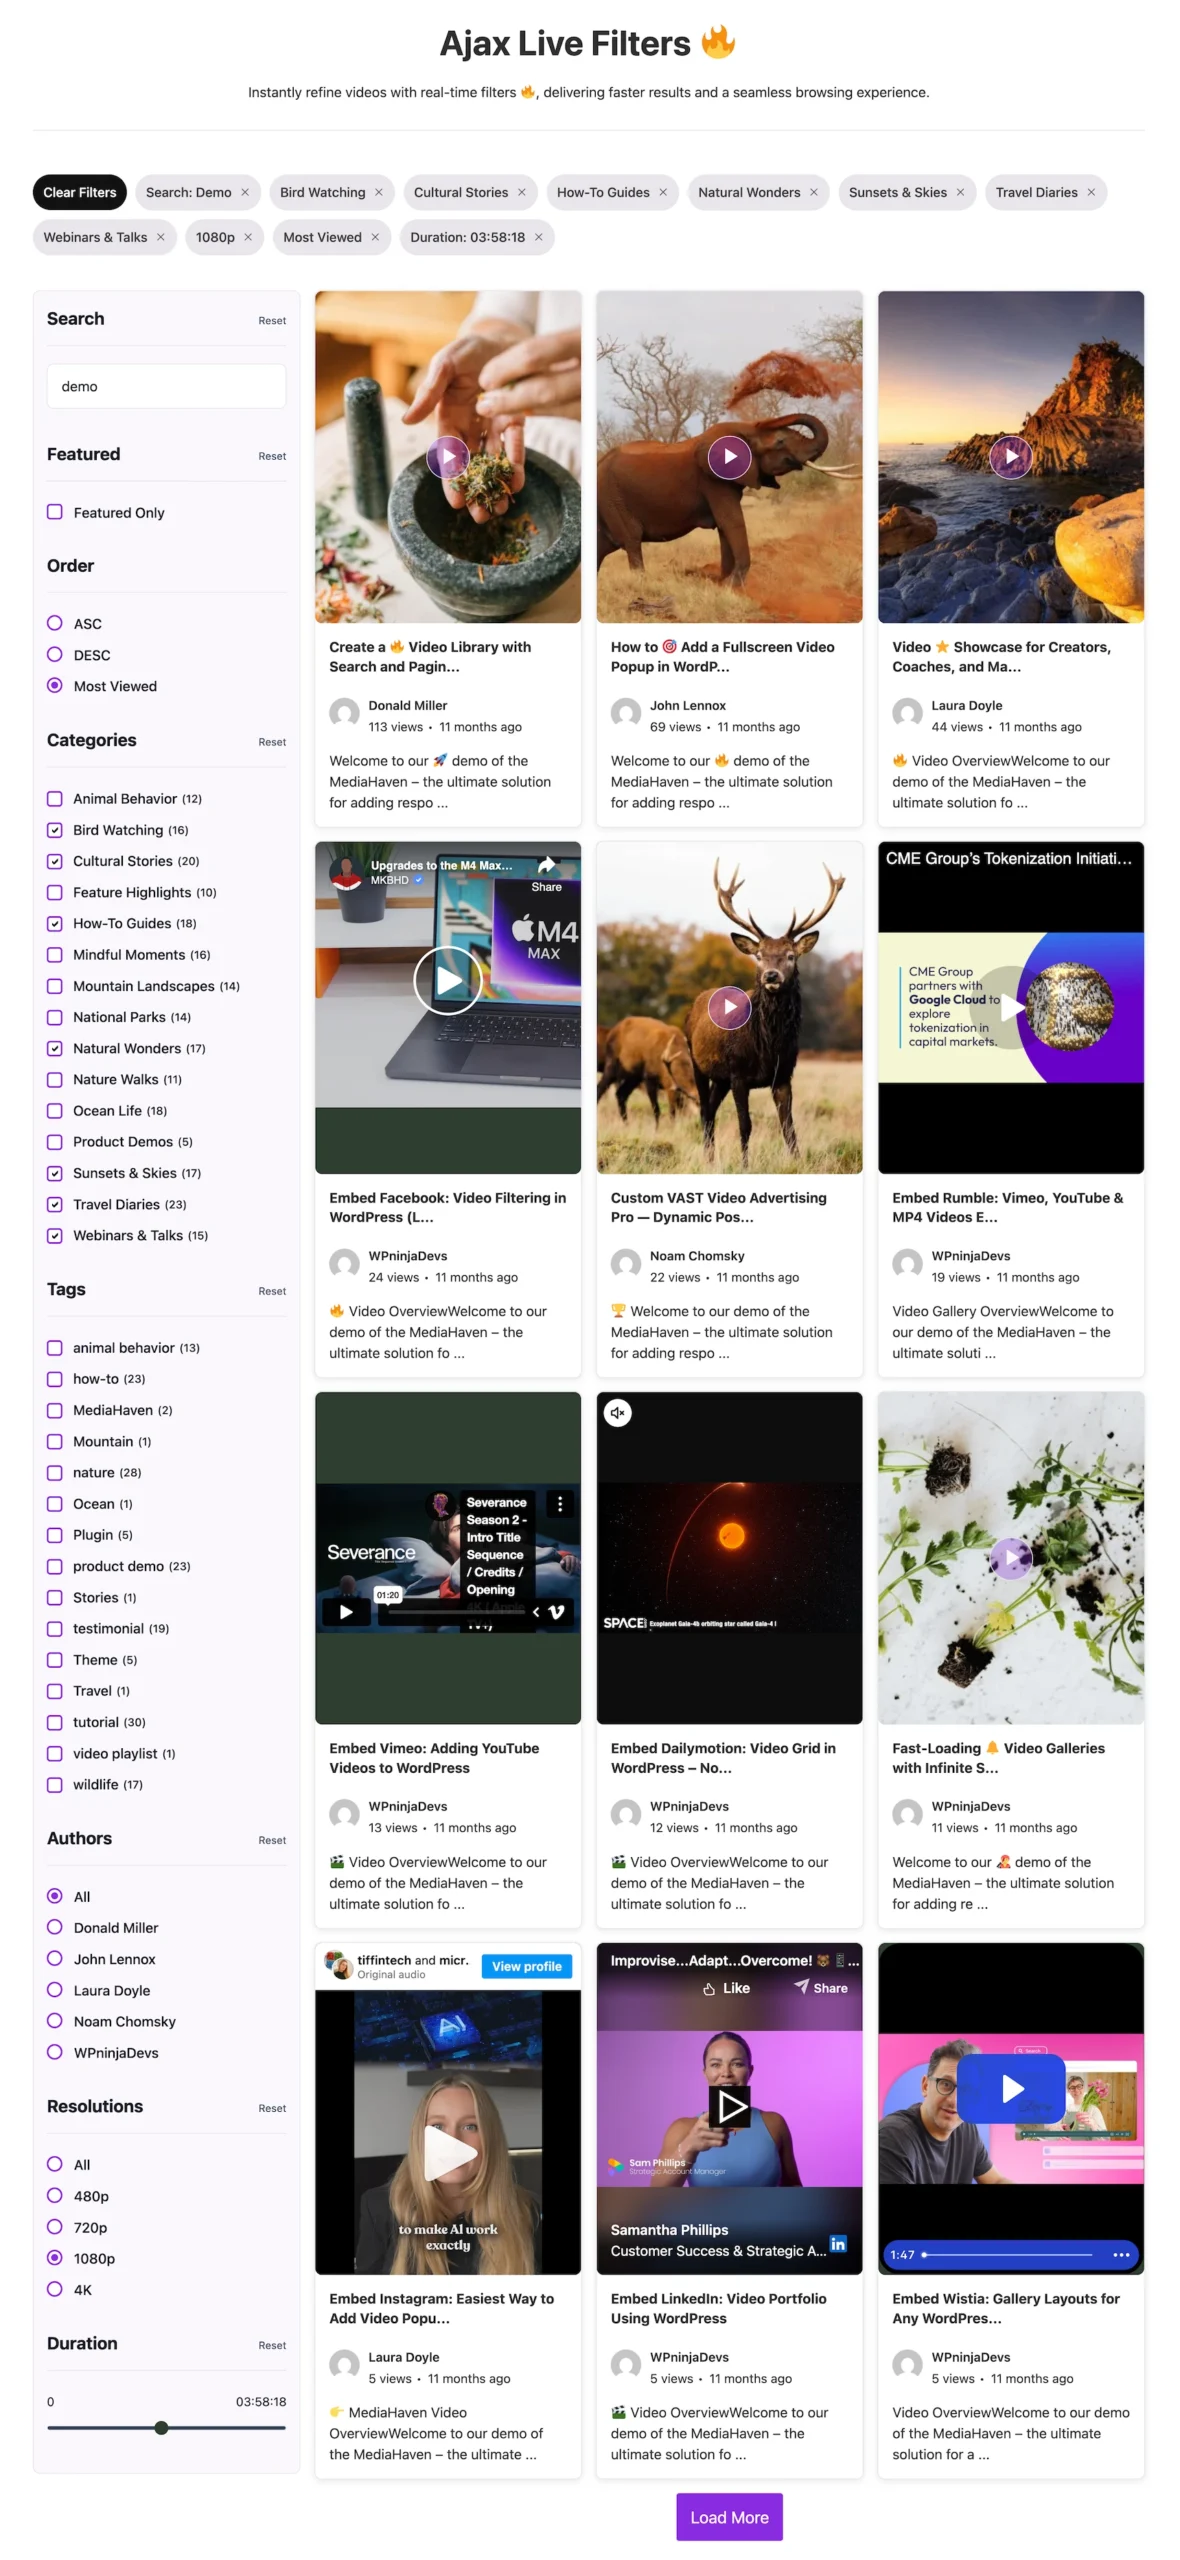
- Ajax Video Live Filter (Pro) — lets visitors search and filter your video library instantly, without page reloads, by category, tag, author, duration, resolution, or featured status.
- Choose pagination style: numbered pages, Load More, or Infinite Scroll.
- Filter URLs are SEO-friendly and shareable/bookmarkable.
Part 7: Style the Player to Match Your Brand (Pro)
- Use the Drag & Drop Layout Builder to rearrange video card sections (media, title, meta, description).
- Customize player colors: play button, control bar, volume bar, progress bar.
- Apply Google Fonts and typography controls.
- Convert thumbnails to WebP format for faster loading.
Free-tier users still get automatic image optimization, lazy loading, and per-shortcode smart asset loading — so a Lite-only setup stays fast even without these style controls.
Part 8: Verify Everything Works
Before considering the setup finished, check:
- Video loads and plays on desktop, tablet, and mobile
- Keyboard shortcuts work (space, F, M, arrow keys, number keys)
- Bunny Stream sync completed and playback is smooth on a throttled mobile connection
- Shoppable overlay elements appear at the correct timestamps (Pro)
- Add to Cart from inside the video actually adds the correct product/variation to the WooCommerce cart (Pro)
- Page load speed hasn’t regressed — check Core Web Vitals before and after
- Schema.org markup is present (view page source or use Google’s Rich Results Test)
Common Setup Issues and Fixes
| Issue | Likely Cause | Fix |
|---|---|---|
| Video doesn’t appear on product page | Gallery not assigned in product editor | Re-check the MediaHaven product video field on that specific product |
| Video buffers or loads slowly | Not yet synced to Bunny Stream | Go to the video, click Sync, confirm CDN settings are saved |
| Shoppable overlay not clickable | Video source is YouTube/TikTok/Vimeo | Overlays require self-hosted, HLS, or Bunny Stream video |
| Filters not showing (Ajax Live Filter) | Pro not active, or filter shortcode not placed | Confirm Pro license is active; re-check filter shortcode placement |
| Permalinks/404 on video pages (Already added built-in fix in version 1.6.6) | Rewrite rules not flushed after update | Visit Settings → Permalinks and click Save (no changes needed) to flush rules |
Frequently Asked Questions
1. Do I need coding skills to set up interactive product videos in WooCommerce? No. Every step in this guide uses the plugin’s dashboard, Setup Wizard, and shortcode builder — no custom code is required, though the plugin is also developer-friendly if you want to extend it.
2. Can I test this before buying MediaHaven Pro? Yes. Start with the free MediaHaven Lite version to add standard product video to your WooCommerce pages and connect Bunny Stream for CDN delivery. Upgrade to Pro when you’re ready to add the interactive shoppable overlay.
3. How long does the full setup take? Basic product video with the free version can be live in under an hour. Adding Bunny Stream CDN delivery takes about 10 minutes. Building out full shoppable overlays with timed product cards realistically takes an afternoon per product template once you’re familiar with the settings.
4. Can I use my existing YouTube videos for this? Yes, for display — YouTube, Vimeo, TikTok, and other embedded sources work great in galleries and product video tabs. For the clickable shopping overlay specifically, you’ll need to use self-hosted, HLS, or Bunny Stream video, since embedded platforms control their own player.
5. Will this slow down my WooCommerce store? It shouldn’t, if set up correctly. Bunny Stream CDN delivery (free) takes video playback off your own server entirely, and the plugin includes lazy loading and smart per-shortcode asset loading so scripts only load where a gallery actually exists.
6. Is this compatible with my theme and page builder? MediaHaven works with Elementor, WPBakery, Divi, Beaver Builder, Gutenberg, and Bricks Builder. You build the gallery or product video with MediaHaven’s tools, then place the shortcode anywhere your builder supports shortcodes.
7. Can I assign shoppable video to an entire category instead of one product at a time? Yes — MediaHaven Pro supports automatic assignment by product category, tag, or storewide, which is the practical approach once you’re past a handful of SKUs.
8. What if my videos are long — will viewers actually watch through to the shoppable moment? Use Interactive Video Chapters (Pro) so viewers can jump straight to the relevant section, and keep the key shoppable moments (pricing, Add to Cart) within the first 30–45 seconds where attention is highest.
9. Does this work outside WooCommerce, like with FluentCart or SureCart? Yes — MediaHaven’s shoppable video and product video features are also compatible with FluentCart and SureCart in addition to WooCommerce.
10. How do I know if my setup is actually working the way it should? Use the verification checklist in Part 8 above — test playback across devices, confirm Bunny Stream sync, click through the shoppable overlay end-to-end, and check that Add to Cart correctly reflects the product and variation shown in the video.
Final Checklist Before You Launch
- MediaHaven Lite (or Pro) installed and Setup Wizard completed
- Product video attached and placed (tab / before / after summary)
- Bunny Stream connected and video synced
- Shoppable overlay configured and timed (Pro)
- Chapters and subtitles added to longer videos (Pro)
- Ajax Live Filter enabled if you have more than a few videos (Pro)
- Player styled to match your brand (Pro)
- Full end-to-end test completed on desktop and mobile
Once every box is checked, you’ve moved from a static product page to a fully interactive, video-driven WooCommerce experience — built entirely inside WordPress, on your own store, with no dependence on a third-party shopping platform.
- Install free: wordpress.org/plugins/mediahaven-lite
- See the live: demo.mediahaven.io
- Official documentation: mediahaven.io/docs/
- Upgrade to Pro: mediahaven.io/pricing — from $79/year · 14-day money-back guarantee
- Support
Leave a Reply