
Video monetization on WordPress has a reputation for being technical and inaccessible to anyone without an ad-ops background. The acronyms pile up fast — VAST, VPAID, VMAP, pre-roll, mid-roll, SIMID — and most documentation assumes you already know what half of them mean.
This guide breaks the topic down from first principles. By the end you will understand exactly how VAST ad delivery works, which ad formats generate the most revenue, where to get a VAST tag, and how to configure video monetization in MediaHaven Pro step by step.
What Is VAST?
VAST stands for Video Ad Serving Template. It is an open XML-based standard developed and maintained by the IAB Tech Lab (the technical division of the Interactive Advertising Bureau). The IAB created VAST to solve a foundational problem in video advertising: every ad server and video player used to have its own proprietary format, so an ad from one network could not play in a player from another vendor without custom engineering on both sides.
VAST is the universal handshake between an ad server and a video player.
Here is what happens at a technical level when a visitor loads a page with a monetized video on your WordPress site:
- The video player sends a request to your ad network using your VAST tag URL — a URL your ad network provided when you created a video ad unit
- The ad network responds with an XML file (the VAST response) containing instructions: which video ad file to load, how long it plays, whether it is skippable, where to send tracking pings at each milestone (impression, 25% watched, 50%, 75%, 100% completion, click)
- The player reads the XML, fetches the ad file, plays it at the configured position (before, during, or after your main video), and fires the tracking URLs back to the ad server at each milestone
- Your main video content plays
Because VAST is an open standard, a VAST tag from Google Ad Manager works in MediaHaven’s player exactly as it works in FV Player, JW Player, or any other VAST-compliant player. The ad delivery layer is decoupled from the player layer — this portability is what made VAST the industry default.
Key distinction: VAST is not the same as Google AdSense display advertising. Standard AdSense serves banner and display ads via a JavaScript snippet injected into a page. Google AdSense for Video (AFV) serves video ads via a VAST URL. They are entirely separate products with separate approval processes, separate dashboards, and separate revenue streams. Running both simultaneously on the same site is normal and there is no conflict between them.
Here is the VAST ad beginner guid you might check!
VAST, VPAID, and VMAP: What You Actually Need to Know
These three standards come up repeatedly in video ad documentation. Here is what each one actually is:
VAST
The core standard for video ad delivery. Defines how a video player communicates with an ad server and handles ad playback, tracking, and basic ad controls. This is what you want to use. VAST 2.0 and VAST 3.0 are the most widely supported versions across ad networks. VAST 4.0 introduced enhanced viewability reporting. VAST 5.0 is in development as of 2026 but not yet in commercial use.
VPAID (Video Player Ad-Serving Interface Definition)
An older extension to VAST that enabled interactive, JavaScript-driven ads. VPAID is largely deprecated as of 2026 due to security vulnerabilities, poor CTV compatibility, and performance issues. Most major ad networks have moved away from VPAID. The IAB’s replacement for VPAID’s interactive use cases is SIMID (Secure Interactive Media Interface Definition), which is implemented by ad networks on their side — you do not need to configure SIMID yourself as a WordPress publisher.
VMAP (Video Multiple Ad Playlist)
A separate standard that defines an ad schedule — when and how many ads appear across a longer video. VMAP works alongside VAST and is useful for complex multi-ad timeline setups. For most WordPress publishers, a simple VAST tag per placement is sufficient without needing VMAP.
Bottom line for WordPress publishers: Request a VAST tag from your ad network, paste it into your player plugin’s settings, and the standard does the rest. You do not need to understand VPAID or VMAP to get started.
The Four VAST Ad Formats
Pre-Roll Ads
Pre-roll ads play before the main video content starts. The visitor has clicked play and is actively waiting for the content to begin — which means viewability is effectively guaranteed. Pre-roll consistently earns the highest CPM (cost per thousand impressions) of all video ad formats.
Skippable pre-roll: Viewer can skip the ad after a defined number of seconds (typically 5). Lower CPM than non-skippable but causes less viewer friction.
Non-skippable pre-roll: Runs for the full duration — typically 15 to 30 seconds. Higher CPM, but can increase viewer drop-off if overused.
Best for: tutorials, product demo videos, news content, any video with high viewer intent.
Mid-Roll Ads
Mid-roll ads interrupt playback at a defined timestamp, similar to a traditional television commercial break. They work best in long-form content (10 minutes or more) where viewers are sufficiently invested in the content to tolerate an interruption.
For short videos under 5 minutes, mid-roll ads tend to hurt user experience without generating meaningful revenue benefit.
In MediaHaven Pro: You can specify the exact timestamp in seconds where the mid-roll ad fires, and you can set multiple mid-roll positions for longer content. (This matches how FV Player VAST also handles mid-rolls — by specifying the time in seconds.)
Best for: webinars, educational content, long-form reviews, documentary-style videos.
Post-Roll Ads
Post-roll ads play after the main video content ends. Viewership is lowest at this point because many users navigate away once content finishes. CPMs are the lowest of the three instream positions, but post-roll adds incremental revenue with zero disruption to the viewing experience.
Best for: branding campaigns, low-friction monetization as a secondary placement alongside pre-roll.
Overlay and Banner Ads (Non-Linear)
Overlay ads appear as banners across a portion of the video frame while the main content continues playing — similar to the clickable ad cards that appear on YouTube. They are non-intrusive in the sense that playback does not stop.
MediaHaven Pro’s overlay system supports three types of overlay ads: video ads, banner image ads, and clickable link ads. Ad position is fully configurable with nine placement zones across the video frame:
- Top left, top center, top right
- Middle left, middle center, middle right
- Bottom left, bottom center, bottom right
MediaHaven also supports an ad title and ad button label for each overlay ad (added in version 1.6.2), so the ad unit itself can include a custom headline and call-to-action button text.
Where to Get a VAST Tag
A VAST tag is a URL that your ad network or ad server provides when you create a video ad unit. Here are the most practical sources for WordPress publishers:
Google AdSense for Video (AFV)
Apply at ads.google.com — this is a separate application from standard AdSense. Google reviews your video content for eligibility before approving. Once approved, create a video ad unit in your AdSense dashboard. Google provides a VAST URL that you paste into your player.
Best for: publishers already approved for AdSense who want the simplest path to video monetization.
Google Ad Manager (GAM)
A more advanced option that functions as a full ad server. GAM is free for publishers below certain impression thresholds. Create a video ad unit under Inventory → Ad units → Video and generate a VAST tag. GAM lets you combine programmatic fill from Google’s demand with direct-sold video campaigns at specific CPMs.
Best for: publishers who want full control over ad serving, rate cards, and direct advertiser relationships.
Programmatic SSPs
Supply-side platforms like SpotX, Tremor Video, Magnite, and similar networks connect your video inventory to multiple programmatic demand sources simultaneously. Most require a minimum traffic threshold before approval — typically 100,000 or more monthly page views.
Best for: established publishers looking to maximize programmatic CPMs across multiple demand sources.
Direct Advertisers
If you have a specific niche audience, some advertisers will negotiate a direct CPM for video placements. They supply the video creative; you generate a VAST tag through your ad server (Google Ad Manager works for this) and point it at their video file URL.
Best for: niche publishers where the audience specificity justifies premium direct rates.
Recommendation for new publishers: Start with Google Ad Manager. It is free, supports both programmatic demand and direct deals, generates correctly formatted VAST tags, and provides reporting infrastructure you can build on as traffic grows. Moving to premium SSPs later is straightforward once you have an established track record.
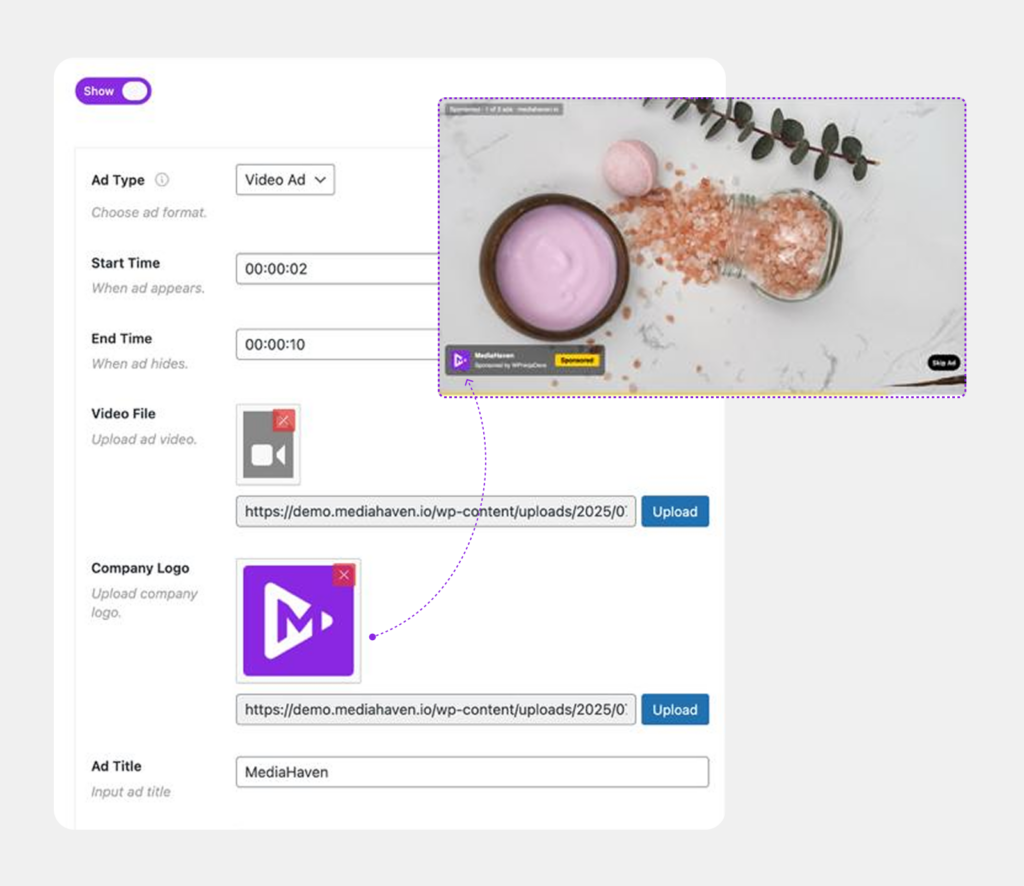
Configuring VAST Ads in MediaHaven Pro
VAST monetization is a Pro-only feature in MediaHaven. Once you have upgraded and activated the Pro version, the monetization settings appear in the WordPress admin.
Setting a per-video VAST URL
If you want to run different ad campaigns on specific videos — for example, a direct-sold campaign on a specific product review video — use the Override VAST URL field in each individual video’s edit screen.
Configuring overlay ad positions
Navigate to the ad position settings within the monetization panel. Select from the nine available overlay positions (top/middle/bottom × left/center/right). Set the ad type (video, banner, or link), configure the ad title and button label, and set the audio behavior — MediaHaven Pro supports a mute option for ads to comply with browser autoplay restrictions.
Ad conflict handling
Version 1.6.5 fixed a known issue with ad position conflicts between the main player and related videos on single video pages — a real-world bug that would cause ads to fire incorrectly when a single video page includes a related videos section. This is resolved in the current version.
Why WordPress-Native VAST Is Better Than Relying on YouTube
Many site owners simply upload videos to YouTube and embed them, letting YouTube handle monetization through the YouTube Partner Program. It feels simpler — but the trade-offs are significant.
YouTube controls which ads appear on your content. You cannot prevent a direct competitor’s ad from running as a pre-roll on your tutorial video.
YouTube’s revenue split is roughly 55% to creators. With your own VAST setup and an ad network that pays you directly, you retain close to 100% of the ad revenue after the ad network takes its cut (which is separate from the publisher payout rate).
YouTube owns the audience relationship. Subscribers exist on YouTube’s platform. Algorithm changes or policy updates can reduce your reach with no recourse. Your WordPress gallery keeps visitors on your domain.
YouTube embeds load third-party scripts. Each embedded YouTube player loads Google’s iframe player scripts, which count against your Core Web Vitals, add third-party request overhead, and raise GDPR/privacy compliance concerns. MediaHaven’s own player with self-hosted or HLS content avoids all of this.
A WordPress-native VAST setup — your gallery, your VAST tag, your ad network — gives you full ownership of traffic data, audience data, and revenue flow. MediaHaven Pro’s lazy loading, schema.org output, and per-shortcode asset loading also make the native setup faster and more SEO-friendly than most YouTube embed approaches.
Ad Best Practices
Start with one placement per video. Running pre-roll + two mid-rolls + overlay + post-roll simultaneously on every video depresses programmatic CPMs (buyers bid less on cluttered inventory) and increases viewer drop-off. Start with a single pre-roll, measure completion rates, then add placements incrementally based on data.
Comply with browser autoplay rules. Modern browsers block autoplaying video with audio. VAST pre-roll ads should start muted when triggered by autoplay. MediaHaven Pro includes an ad audio mute option (added in version 1.6.2) specifically for this compliance requirement.
Monitor ad impression and click data. MediaHaven Pro stores ad performance data (clicks and impressions) directly in the WordPress database, accessible through the plugin’s reporting. Use this alongside your ad network’s own reporting dashboard to identify your best-performing video content.
Use multiple YouTube API keys. If you are running large YouTube channel feeds, the plugin supports adding multiple API keys that rotate automatically to prevent hitting daily quota limits — a practical feature for high-volume publishers.
VAST and display ads are additive, not competing. Running Google AdSense display banners on the page alongside VAST video ads in your player is standard practice. They operate on separate ad units and separate revenue streams.
Technical Reference: How VAST Tags Work
A VAST tag is a URL pointing to an XML file. When the player requests the tag, the XML response contains:
- The video ad file URL (MP4 or WebM)
- Duration and skip offset
- Tracking URLs for each viewing milestone: impression, quartile completion (25%, 50%, 75%, 100%), click-through
- Companion ad definitions if applicable
- Fallback or error handling instructions if the ad fails to load
You do not need to read or write VAST XML yourself — your ad network generates the tag URL and you paste it into the plugin. The player interprets the XML response and handles all milestone tracking automatically.
Getting Started
If you already have MediaHaven installed, upgrading to Pro unlocks the VAST monetization panel immediately.
- Install the free plugin: MediaHaven Lite
- Upgrade MediaHaven to Pro: MediaHaven Pricing
- Setup MediaHaven VAST ad from Single Video “Ad Controls” and boost revenue 10x fast.
- VAST ad live demo
From Google ad manager you can also create VAST tag URL.
- Apply for Google Ad Manager at admanager.google.com (free for small publishers)
- Create a video ad unit in GAM and copy the VAST tag URL
- Paste the VAST URL into MediaHaven’s monetization settings
- Select your ad position and save
From first install to live video ads is under one hour, including the time to generate a VAST tag from Google Ad Manager.
Leave a Reply